Azure AI Security Hardening
Everything You Built Is Exposed
Volume 1 gave you a fully working Azure AI stack. This volume hardens it. Every service you deployed is insecure by default — public endpoints, API keys, no audit trail, Microsoft-managed encryption. Volume 2 fixes all of it, chapter by chapter, command by command.
What This Volume Fixes
Every chapter targets a specific attack surface. By Chapter 10 you will run a red team suite against your own deployment and verify every control holds.
This guide hardens the exact infrastructure built in Volume 1 - Azure AI Implementation Guide. If you haven't completed Volume 1 yet, start there. Every command in this guide references the same resource names, same resource group, and same Azure subscription set up in Volume 1. The set-env.ps1 file from Volume 1 is your starting point.
Set Environment Variables
Before running any commands, set these variables in your terminal session. This avoids typos and makes the rest of the commands copy-paste safe.
Step 1 - Log In to Azure
This opens a browser window for interactive login. After authenticating, the CLI stores a token locally. All subsequent commands use this token automatically - you stay logged in for ~8 hours before needing to re-authenticate.
Get you tenant id from Azure portal
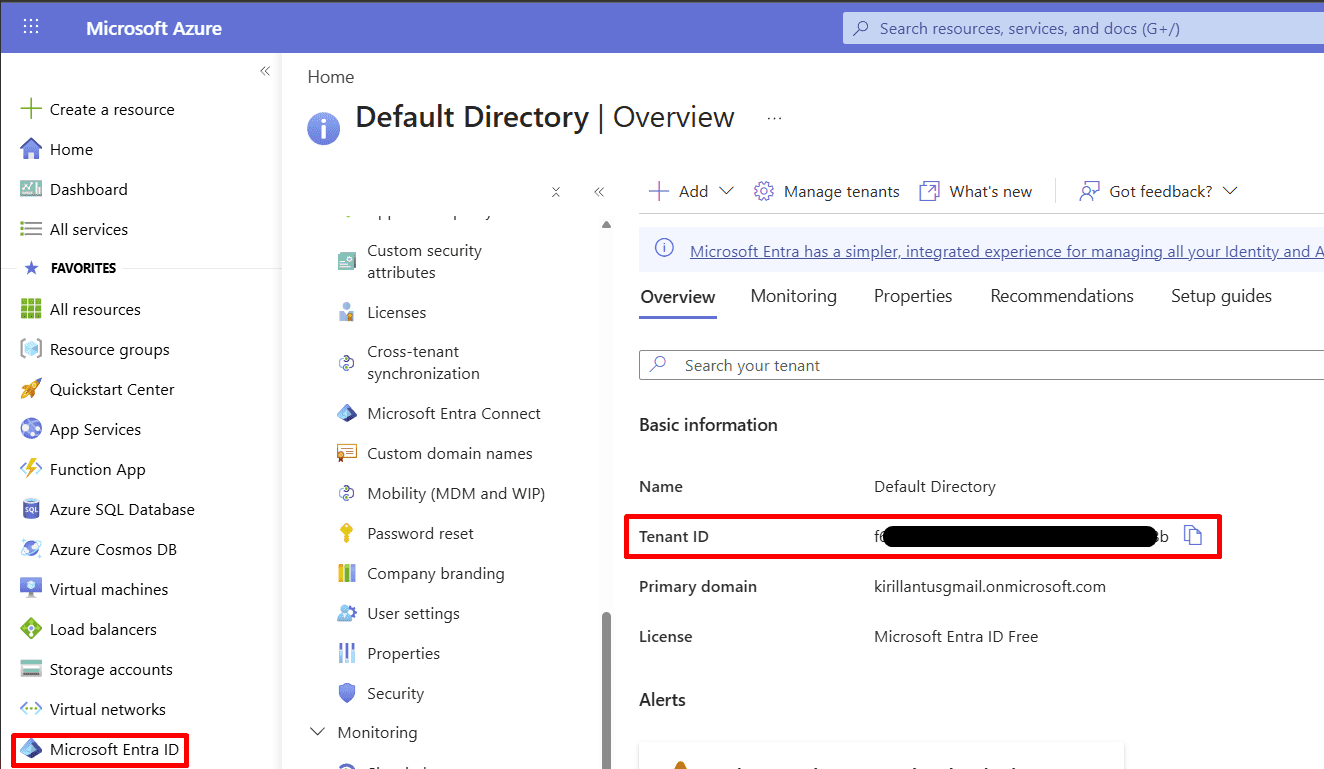
log in directly to your personal tenant and set your subscription then verify
az login --tenant f6426121-f99c-444f-871b-66060a13948b
az account show --query "{Name:name, User:user.name, State:state}" -o table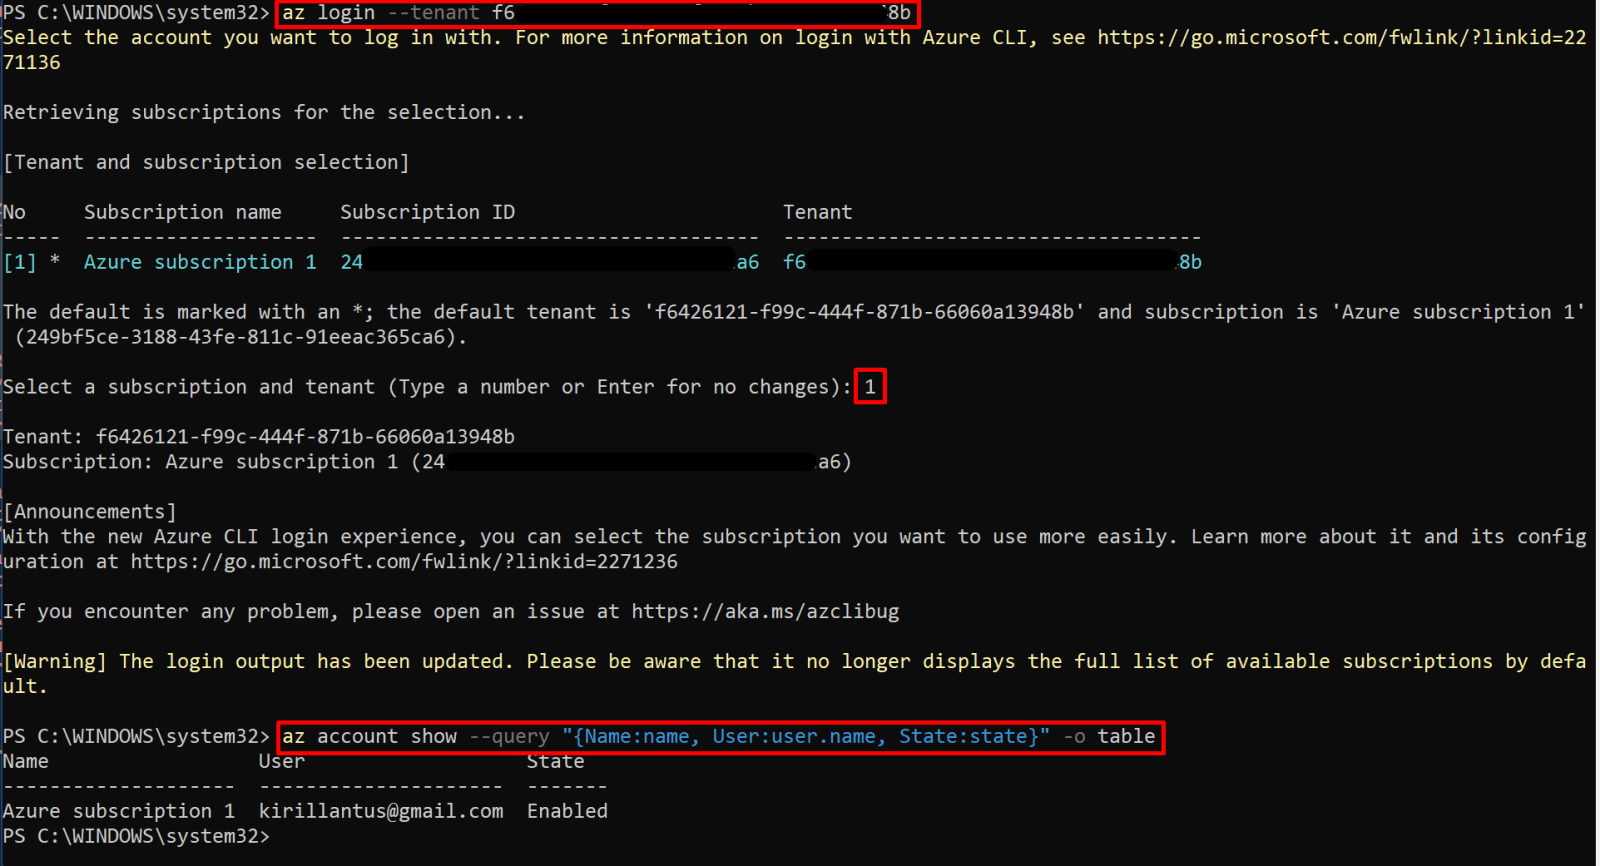
Step 2 - Recover and hardcode your resources names.
Recover your actual resources names:
az resource list --resource-group rg-ai-lab --query "[].name" -o tsv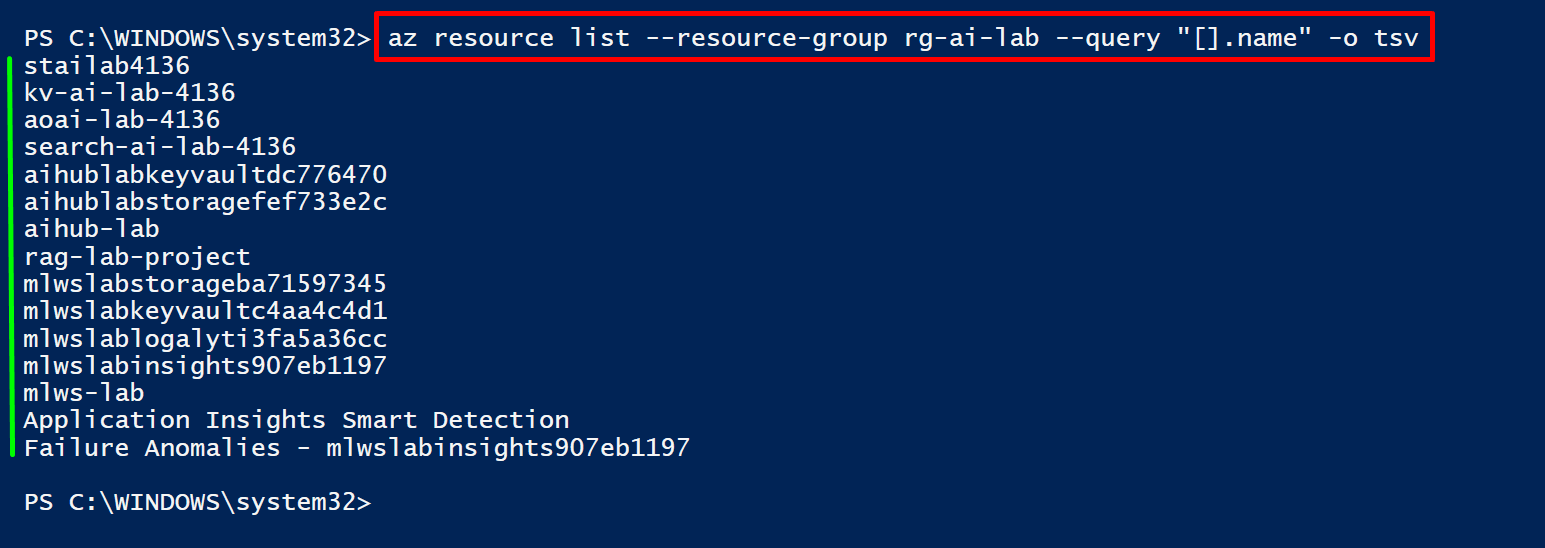
Then hardcode them:
Note: Save the hardcoded block to a script file once you have the real names in C:\azure-rag\Security\set-env.ps1
$env:SUBSCRIPTION_ID = "your-actual-sub-id"
$env:LOCATION        = "canadacentral"
$env:RG              = "rg-ai-lab"
# ── Hardcode the ACTUAL deployed names from Volume 1 ──
$env:STORAGE_NAME    = "stailab####"   # replace #### with real suffix
$env:KV_NAME         = "kv-ai-lab-####"
$env:AOAI_NAME       = "aoai-lab-####"
$env:SEARCH_NAME     = "search-ai-lab-####"
$env:HUB_NAME        = "aihub-lab"
$env:ML_WORKSPACE    = "mlws-lab"
$env:APP_IDENTITY = "id-ai-lab"
az account set --subscription $env:SUBSCRIPTION_ID
Write-Host "Active: $(az account show --query name -o tsv)" -ForegroundColor Green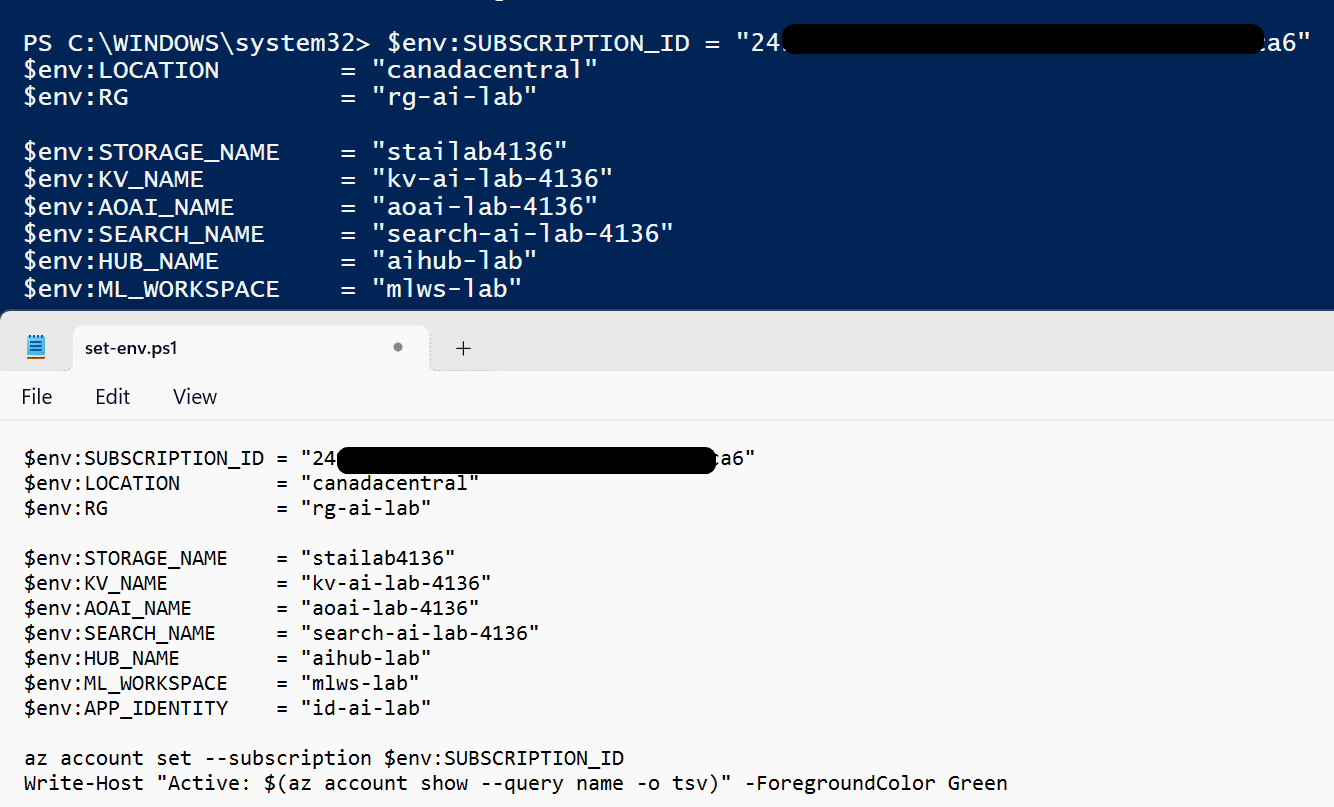
Then at the start of every session just run:
C:\azure-rag\Security\set-env.ps1
Managed Identity & RBAC
Step 1 - Create a User-Assigned Managed Identity
A managed identity is an Azure AD principal that Azure manages for you - it has no password, no certificate, and no secret. You assign it to your application (App Service, AKS, VM, etc.) and then grant that identity specific roles on your AI resources. The identity gets automatically rotated tokens from Azure AD.
Create the managed identity
az identity create `
--name $env:APP_IDENTITY `
--resource-group $env:RG `
--location $env:LOCATION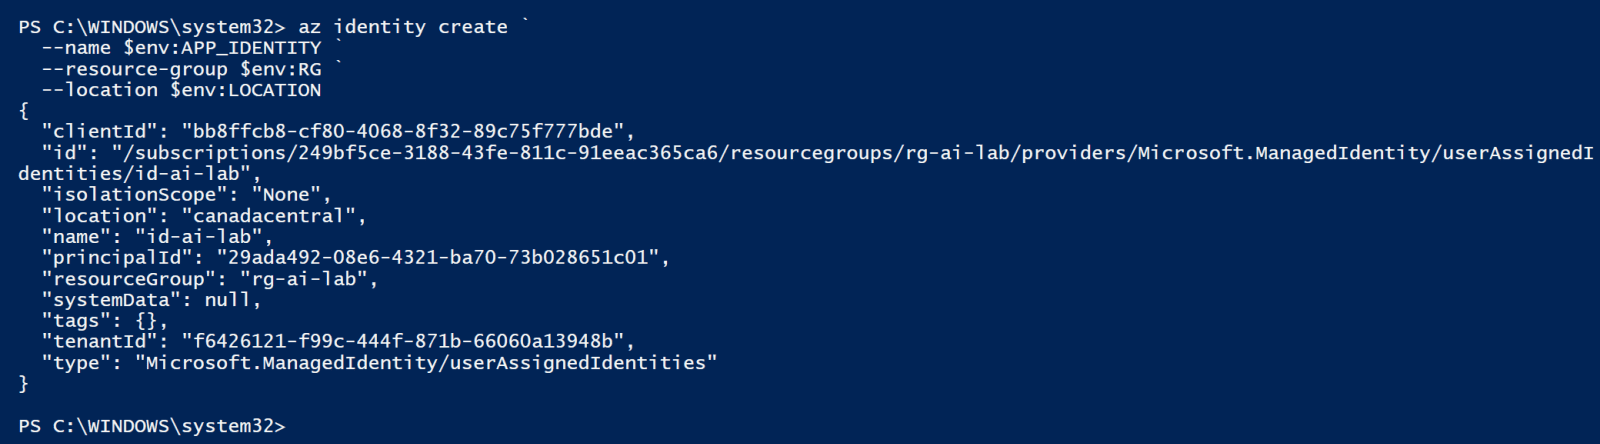
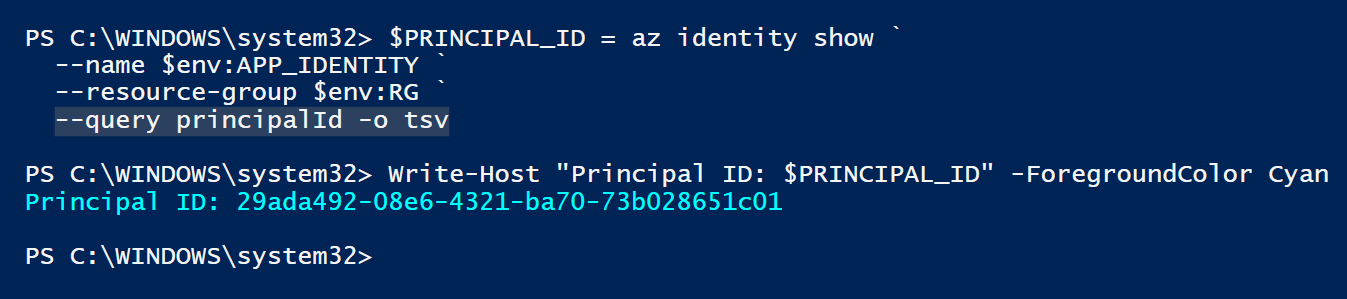
Get the principal ID
$PRINCIPAL_ID = az identity show `
--name $env:APP_IDENTITY `
--resource-group $env:RG `
--query principalId -o tsv
Write-Host "Principal ID: $PRINCIPAL_ID" -ForegroundColor CyanNote: --query principalId -o tsv is commonly used with the Azure CLI to extract a specific value from command output.
Step 2 - Disable API Key Authentication
This is the single most impactful security change you can make. Once disabled, API keys stop working entirely — the only way to call the API is with a valid Azure AD token. Do this after you have confirmed your application can authenticate via Managed Identity, otherwise you'll lock yourself out.
Get the resource ID of the OpenAI resource
$AOAI_ID = az cognitiveservices account show `
--name $env:AOAI_NAME `
--resource-group $env:RG `
--query id -o tsvWrite-Host "AOAI Resource ID: $AOAI_ID" -ForegroundColor Cyan
AOAI Resource ID: /subscriptions/249bf5ce-3188-43fe-811c-91eeac365ca6/resourceGroups/rg-ai-lab/providers/Microsoft.CognitiveServices/accounts/aoai-lab-4136
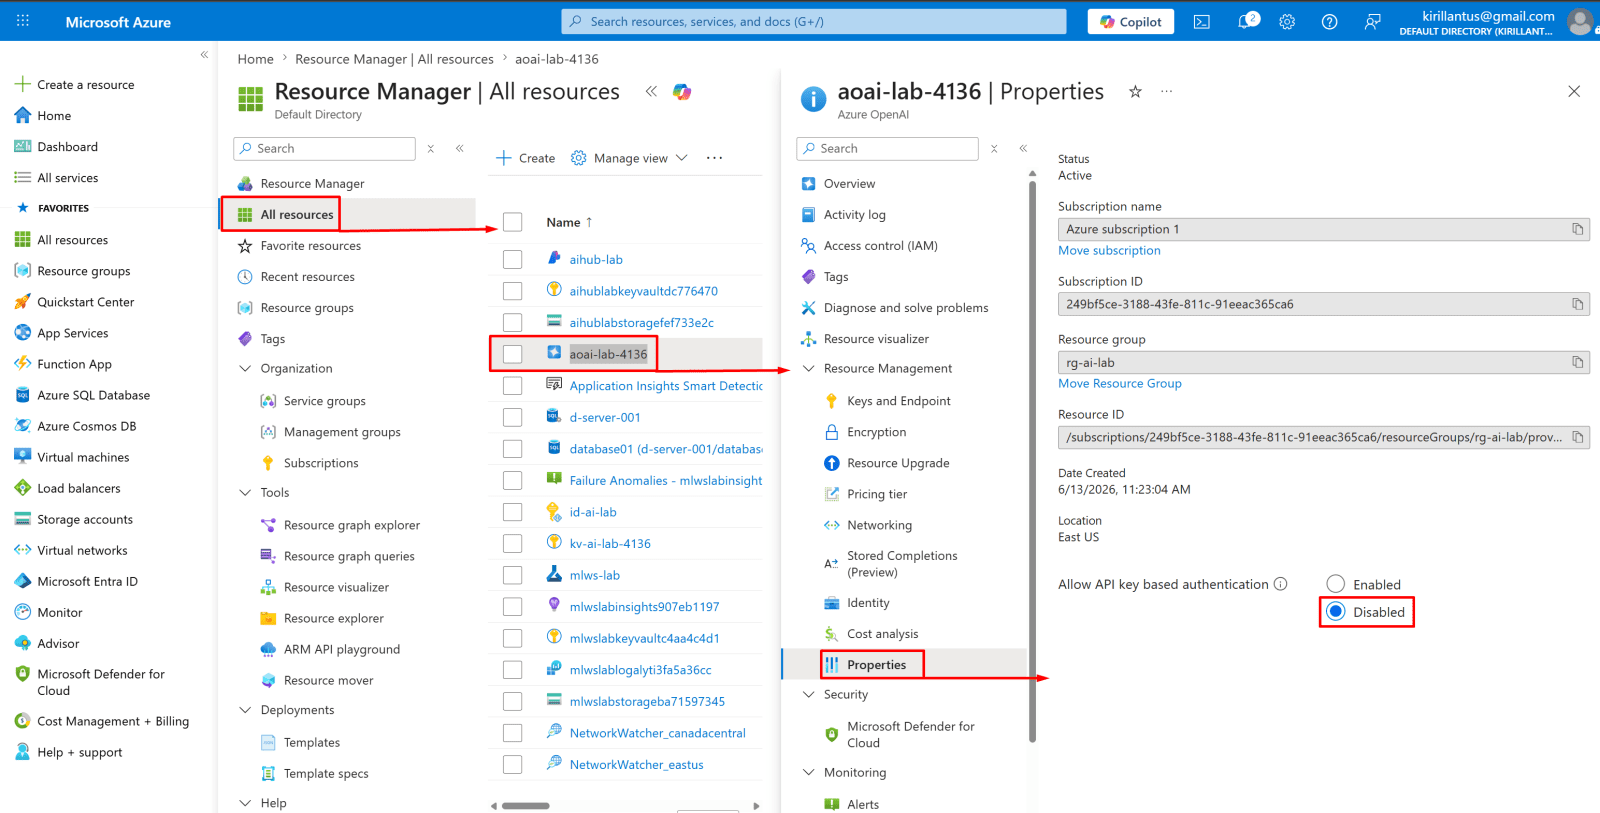
Disable key auth on Azure OpenAI
Go to portal.azure.com
Search for your OpenAI resource - aoai-lab-4136
Left menu → Resource Management → Properties
Toggle "Allow API key based authentication" → Disabled
Save
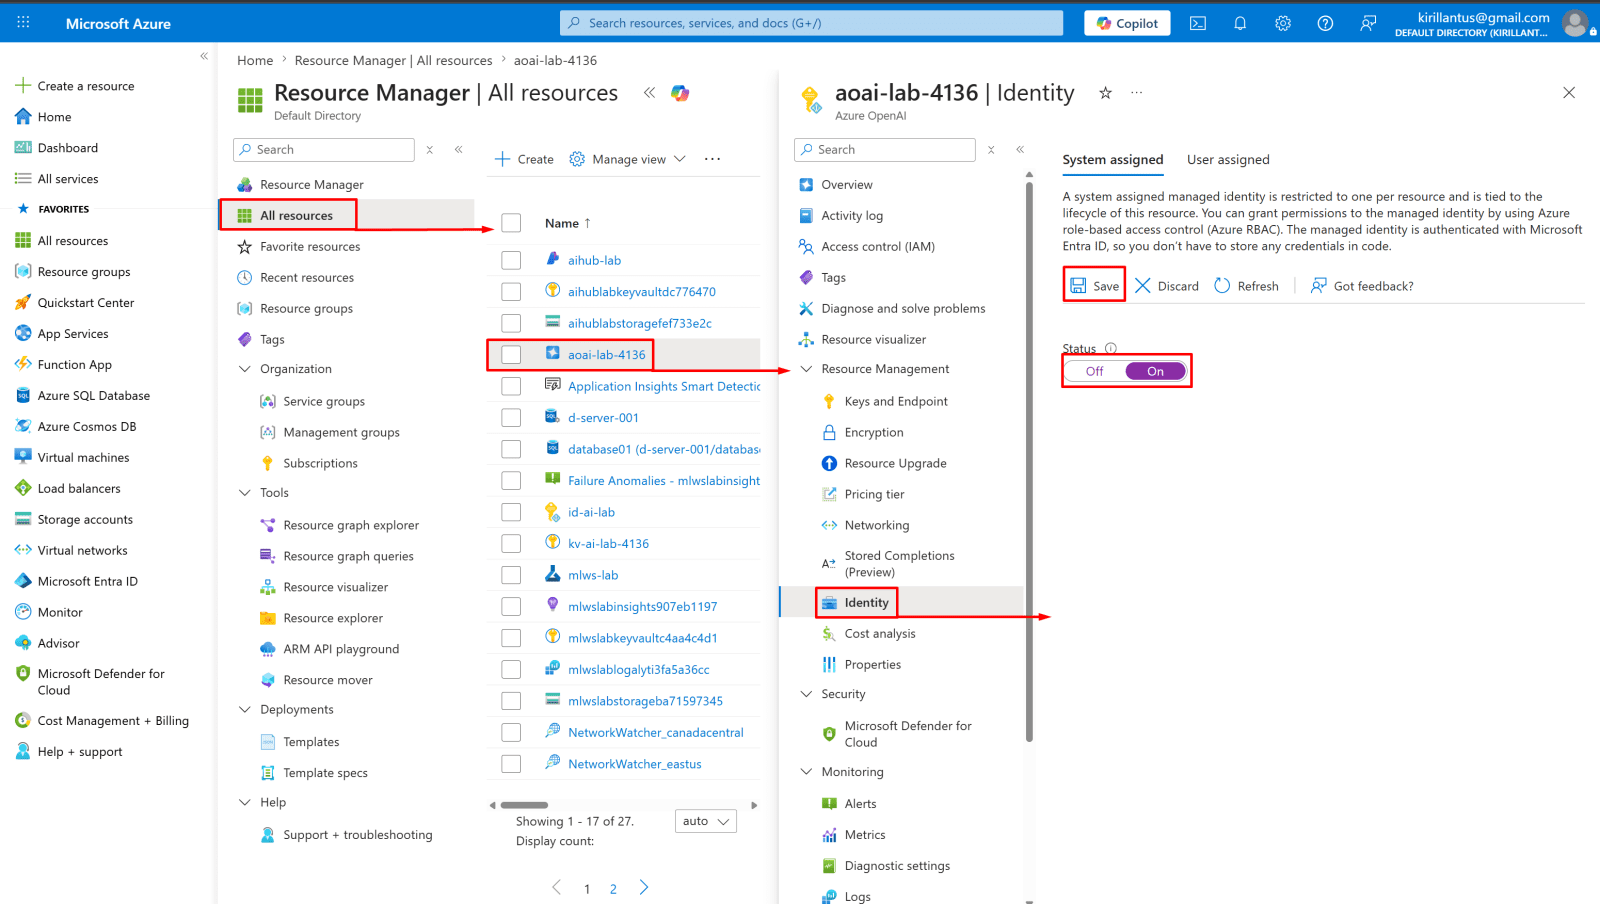
Enable system assigned managed identity
Go to → Azure OpenAI → Identity
Toggle Status from Off → On
Click Save
Note: It may take few minutes
Object (principal) ID: 52dada0b-0014-4a9b-98c7-ca9c4fe80e86
Verify - should return "True" (disableLocalAuth = True)
az cognitiveservices account show `
--name $env:AOAI_NAME `
--resource-group $env:RG `
--query properties.disableLocalAuth -o tsv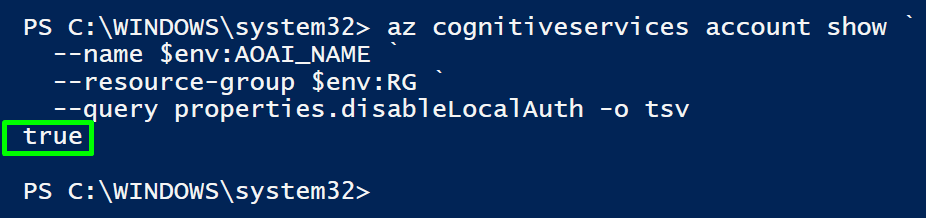
Make sure both $PRINCIPAL_ID and $AOAI_ID are set in your session - these were captured earlier but aren't in set-env.ps1. Add the new lines after the Write-Host line at the bottom:
AOAI_ID = az cognitiveservices account show `
--name $env:AOAI_NAME `
--resource-group $env:RG `
--query id -o tsv
$PRINCIPAL_ID = az identity show `
--name $env:APP_IDENTITY `
--resource-group $env:RG `
--query principalId -o tsv
Write-Host "AOAI_ID: $AOAI_ID" -ForegroundColor Cyan
Write-Host "Principal ID: $PRINCIPAL_ID" -ForegroundColor Cyan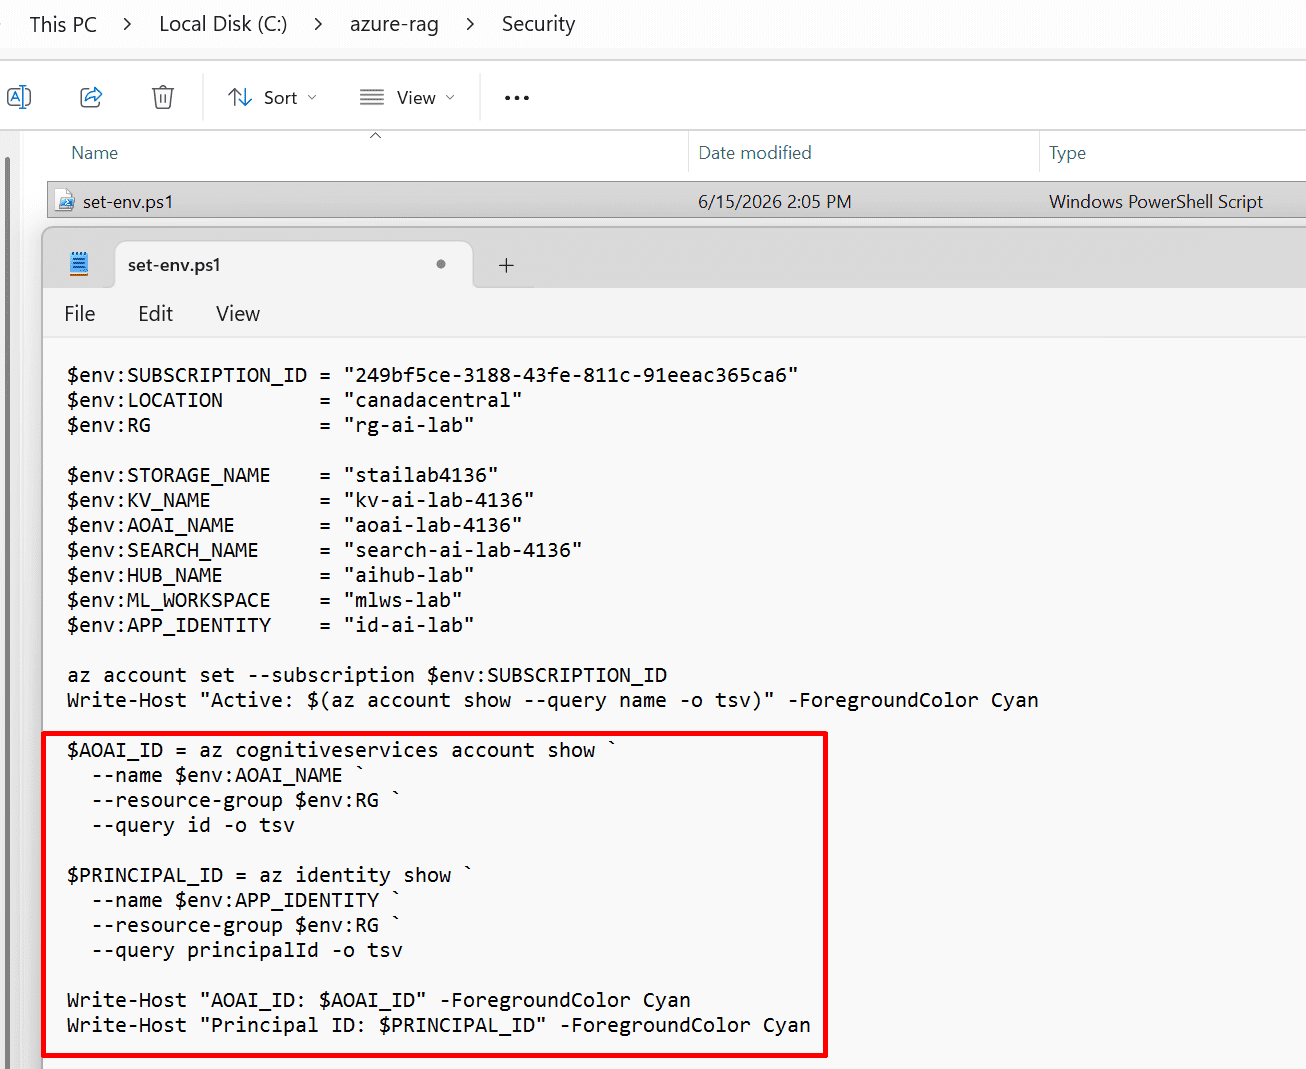
Then at the start of every session just run:
C:\azure-rag\Security\set-env.ps1
Step 4 - Assign Least-Privilege Roles
Azure provides purpose-built roles for AI services. You should never assign Cognitive Services Contributor or Owner to an application identity - use the narrowest role that lets the app do its job.
Here are the three roles you'll actually need:
| Cognitive Services OpenAI User | Call inference endpoints only | Application identities |
|---|---|---|
| Cognitive Services OpenAI Contributor | Call inference + fine-tune, deploy models | ML pipeline identities |
| Cognitive Services Reader | Read metadata, no data plane access | Monitoring identities |
Assign "Cognitive Services OpenAI User" to the managed identity
az role assignment create `
--assignee-object-id $PRINCIPAL_ID `
--assignee-principal-type ServicePrincipal `
--role "Cognitive Services OpenAI User" `
--scope $AOAI_ID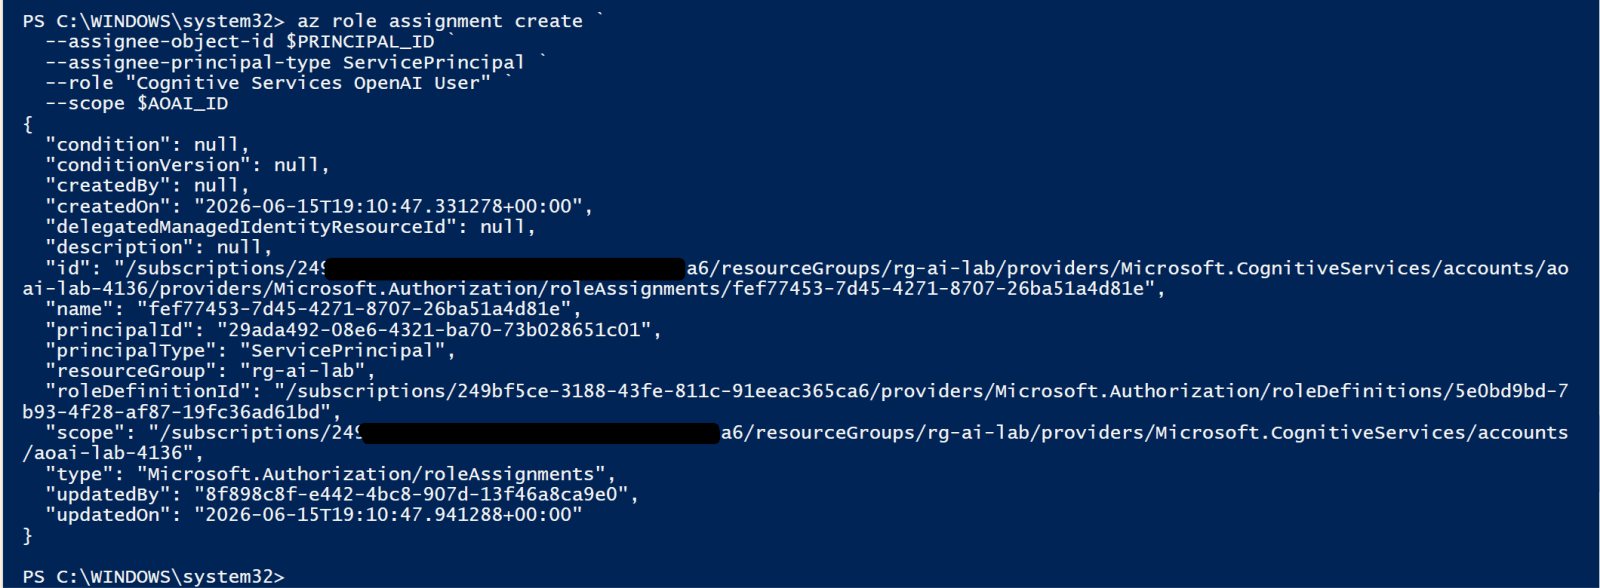
Verify the assignment
az role assignment list `
--scope $AOAI_ID `
--query "[].{Role:roleDefinitionName, Principal:principalName}" `
-o table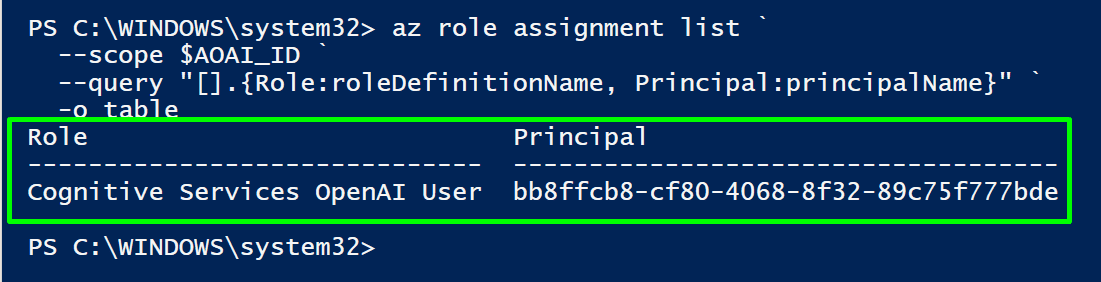
Step 5 - Audit All Role Assignments
Before locking anything down, get a full picture of who currently has access. This command lists every role assignment on the resource group, including human users and service principals that shouldn't have access.
List all role assignments on the resource group
az role assignment list `
--resource-group $env:RG `
--include-inherited `
--query "[].{Principal:principalName,Role:roleDefinitionName,Scope:scope}" `
-o table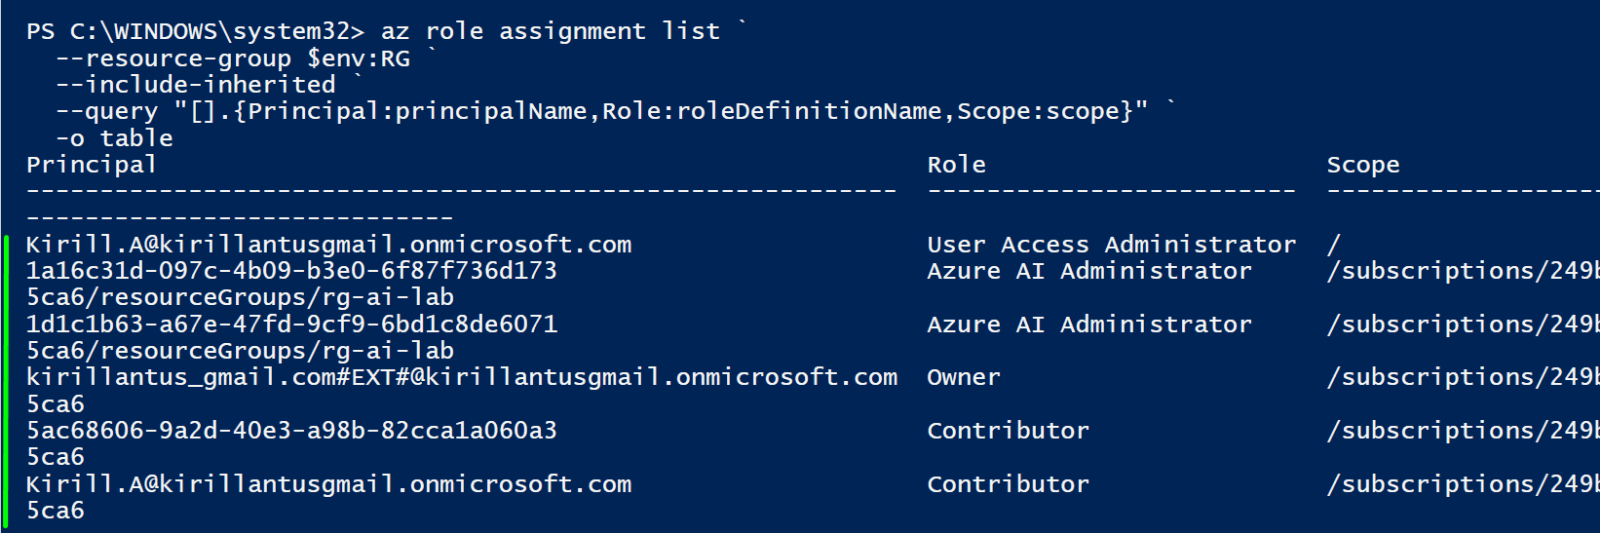
Find any Owners or Contributors - these are high-risk
az role assignment list `
--resource-group $env:RG `
--include-inherited `
--query "[?roleDefinitionName=='Owner' || roleDefinitionName=='Contributor'].principalName" `
-o tsv
Private Endpoints & Networking
By default every Azure AI resource is accessible from anywhere on the internet. This chapter creates a private endpoint that brings the service into your VNet, then disables all public access. After this, your AI services are invisible from the internet.
Why Public Endpoints Are a Problem
When Azure creates an OpenAI or AI Search resource, it gets a public FQDN like mycompany-openai.openai.azure.com that resolves to a public IP. Any attacker on the internet can attempt to reach it. With RBAC-only auth it's harder to exploit, but it still exposes your endpoint to brute force, credential stuffing, and any future vulnerability in the service. Private endpoints remove the resource from the internet entirely.
Step 1 - Create a VNet and Subnet
If you already have a VNet, skip this and use your existing subnet. The subnet for private endpoints needs to have privateEndpointNetworkPolicies disabled - Azure requires this for private endpoint subnet delegation.
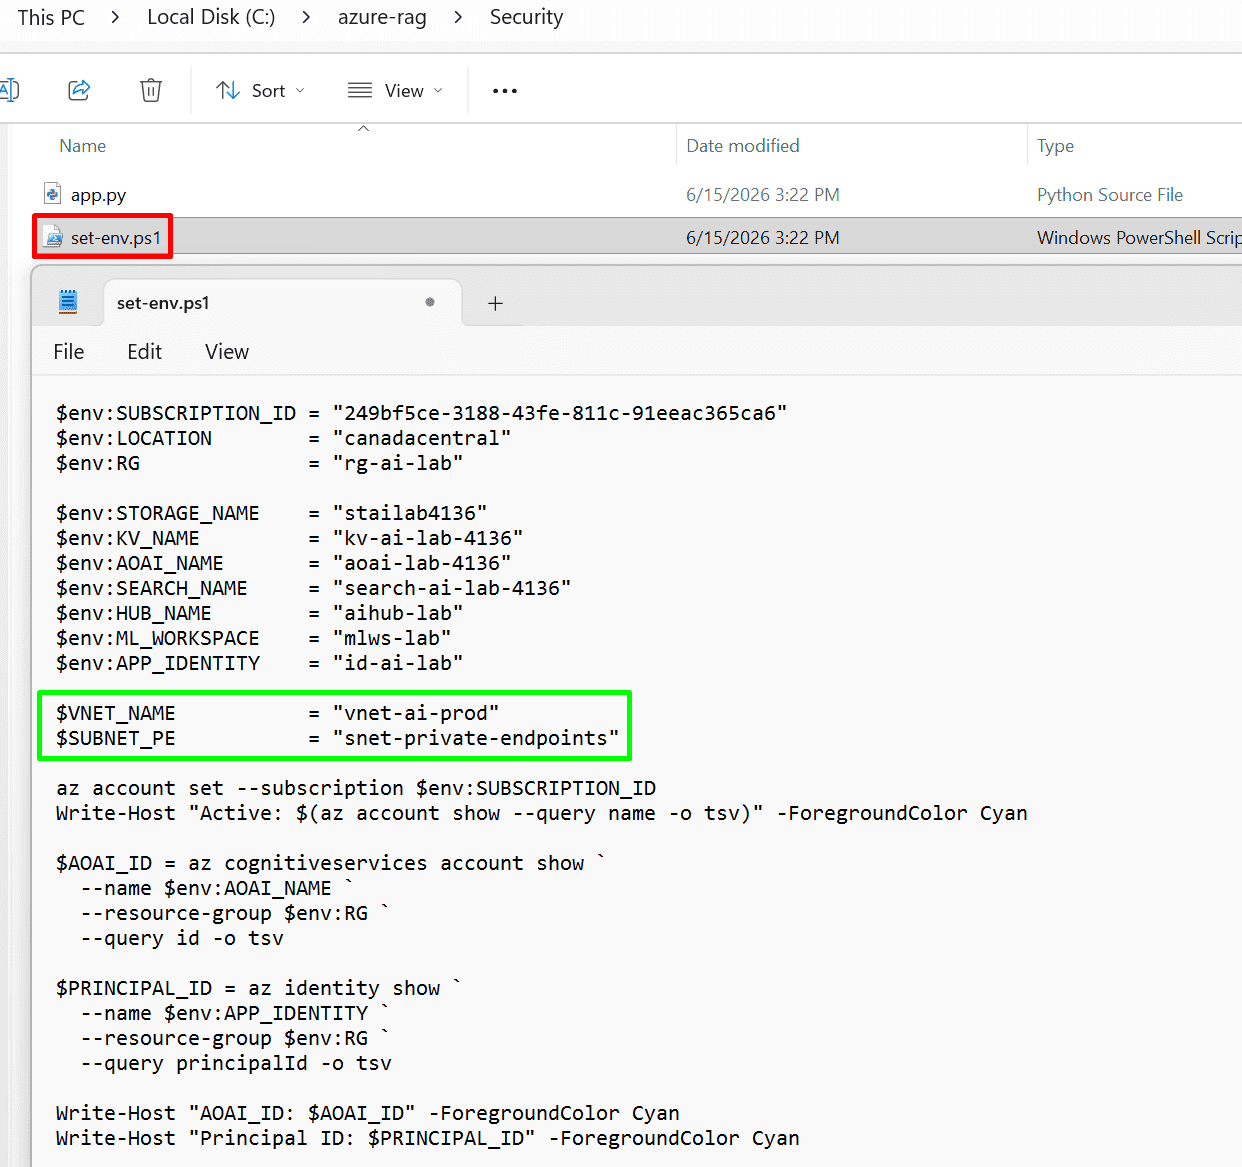
Add these two to set-env.ps1 since they'll be referenced in subsequent steps:
$VNET_NAME = "vnet-ai-prod"
$SUBNET_PE = "snet-private-endpoints"Note: Run this 2 lines in powershell or ruthe entire . C:\azure-rag\Security\set-env.ps1
Create VNet
az network vnet create `
--name $VNET_NAME `
--resource-group $env:RG `
--location $env:LOCATION `
--address-prefix "10.0.0.0/16"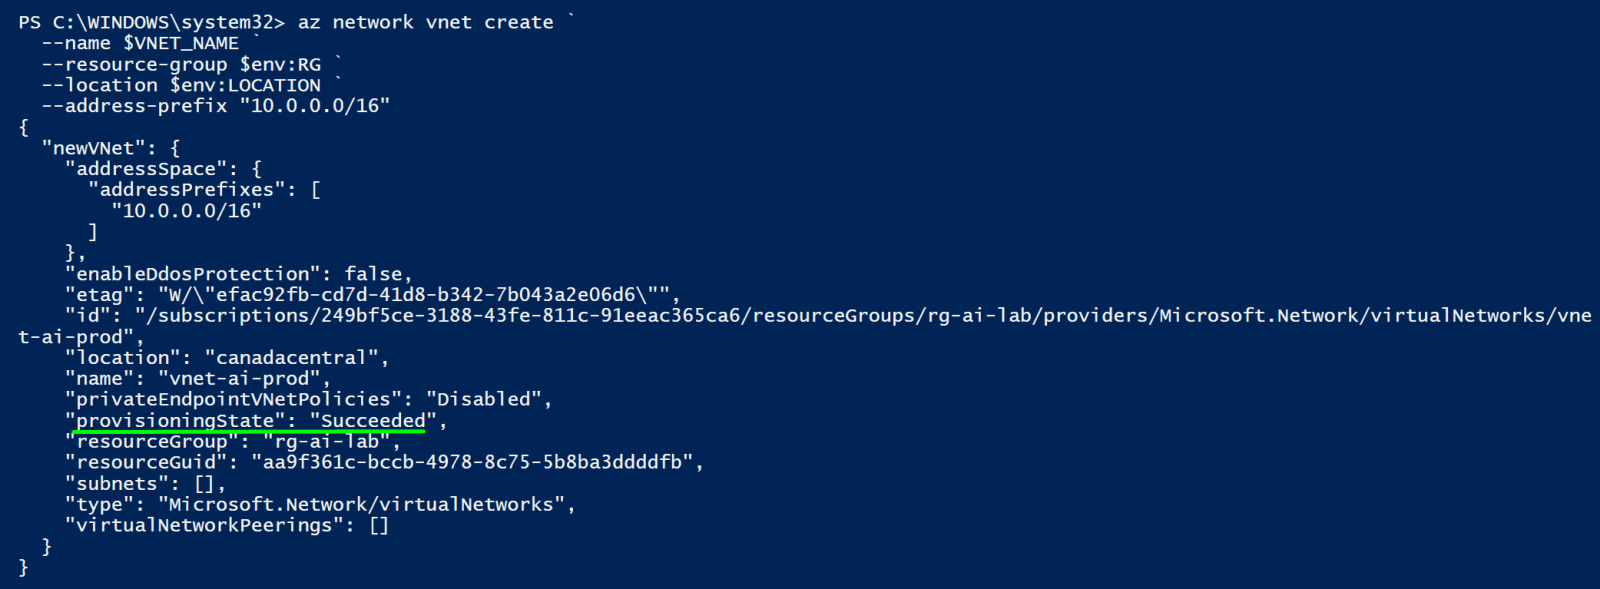
Create subnet for private endpoints
az network vnet subnet create `
--name $SUBNET_PE `
--resource-group $env:RG `
--vnet-name $VNET_NAME `
--address-prefix "10.0.1.0/24"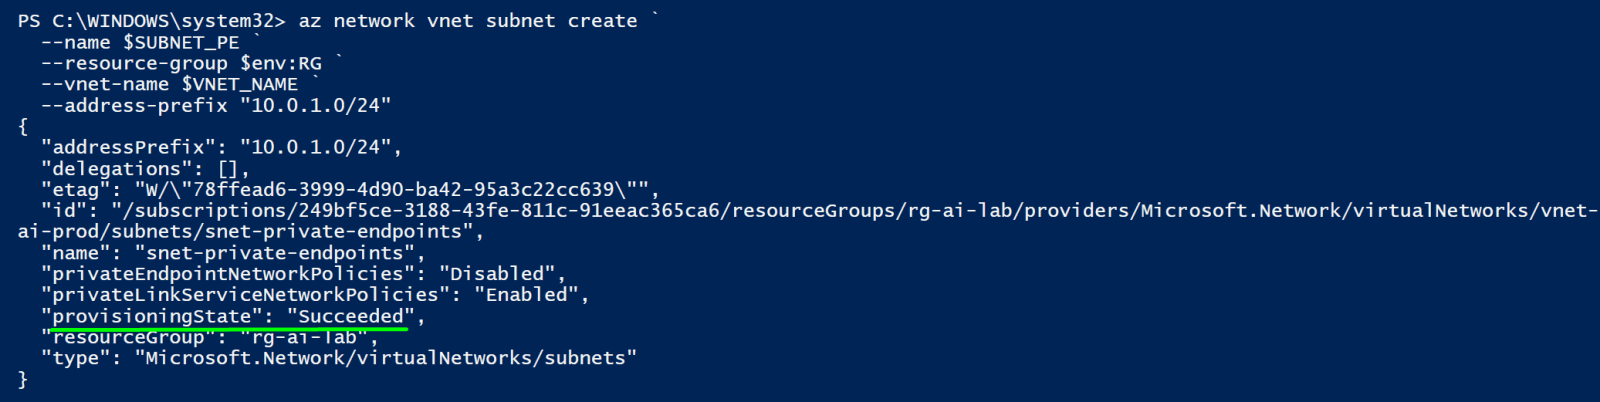
Disable private-endpoint-network-policies (required for private endpoints)
az network vnet subnet update `
--name $SUBNET_PE `
--resource-group $env:RG `
--vnet-name $VNET_NAME `
--private-endpoint-network-policies Disabled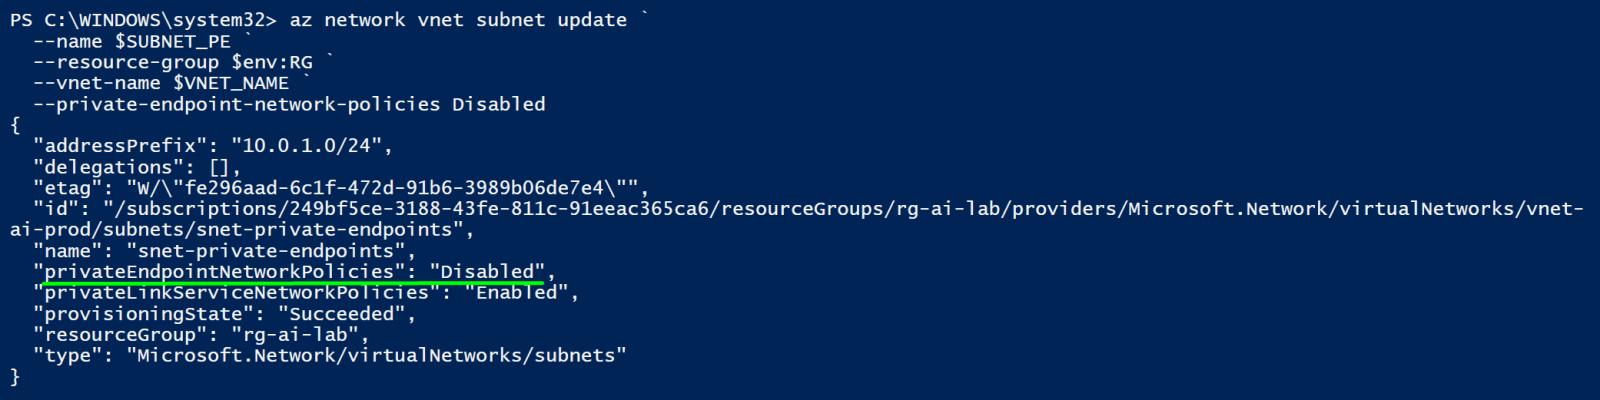
Confirm Vnet and subnet
Confirm VNet
az network vnet show `
--name $VNET_NAME `
--resource-group $env:RG `
--query "{Name:name, Location:location, AddressSpace:addressSpace.addressPrefixes}" `
-o table
Confirm subnet
az network vnet subnet show `
--name $SUBNET_PE `
--resource-group $env:RG `
--vnet-name $VNET_NAME `
--query "{Name:name, Prefix:addressPrefix, PrivateEndpointNetworkPolicies:privateEndpointNetworkPolicies}" `
-o table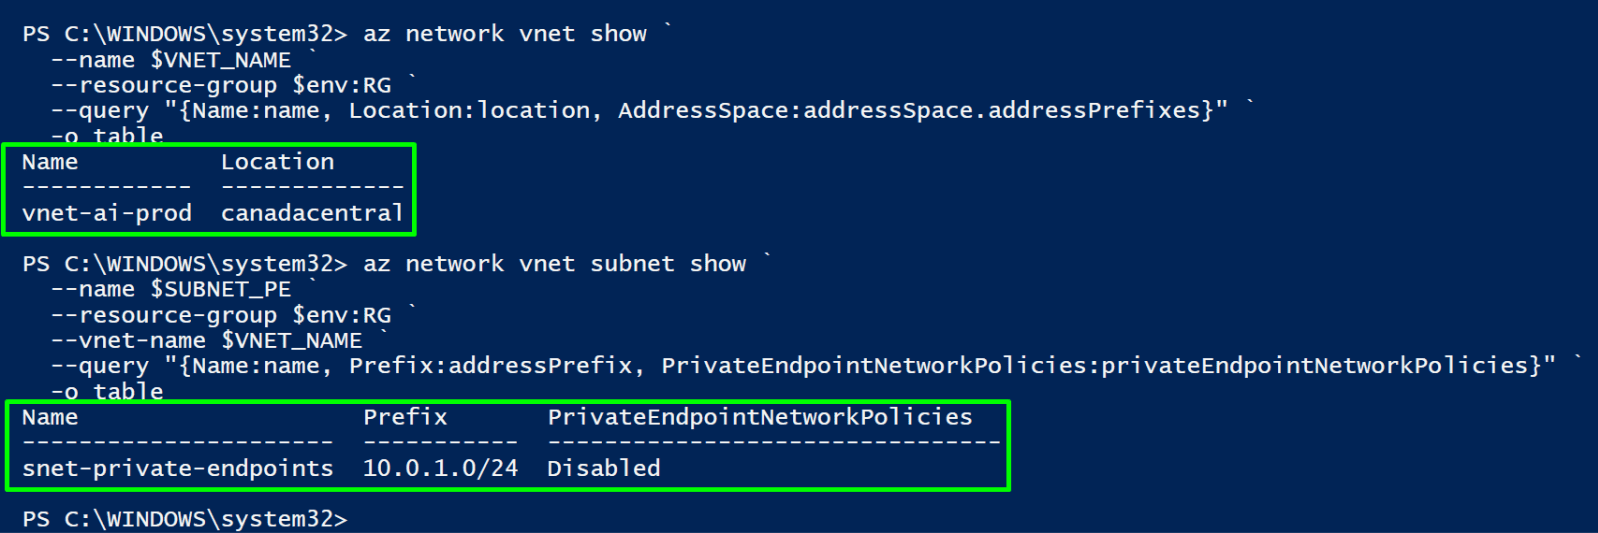
Step 2 - Create Private Endpoint for Azure OpenAI
A private endpoint creates a network interface in your subnet with a private IP address. Traffic to your OpenAI resource flows through this private IP inside your VNet instead of going to the public internet. The --group-id specifies which sub-resource to target - for Cognitive Services and OpenAI it's always account.
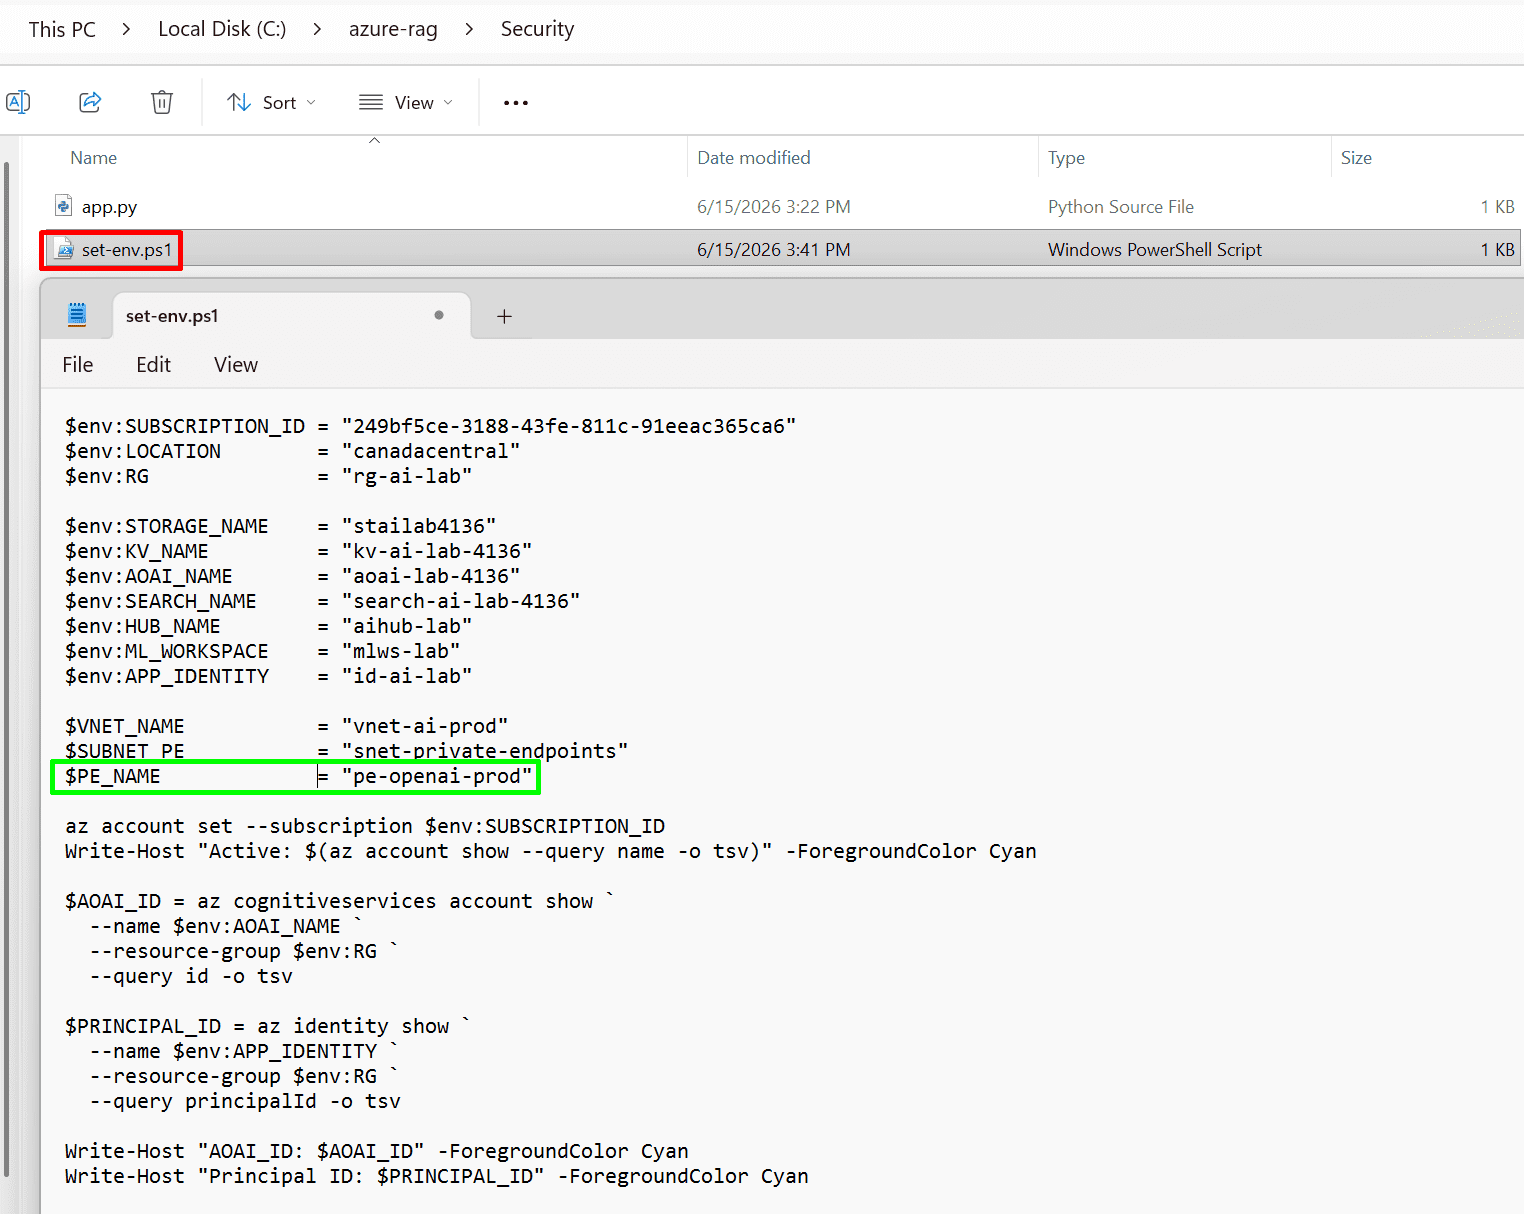
Add these two to set-env.ps1 since they'll be referenced in subsequent steps:
$PE_NAME = "pe-openai-prod"
Note: Run this 2 lines in powershell or run the entire . C:\azure-rag\Security\set-env.ps1
Create the private endpoint
az network private-endpoint create `
--name $PE_NAME `
--resource-group $env:RG `
--location $env:LOCATION `
--vnet-name $VNET_NAME `
--subnet $SUBNET_PE `
--private-connection-resource-id $AOAI_ID `
--group-id "account" `
--connection-name "openai-pe-connection"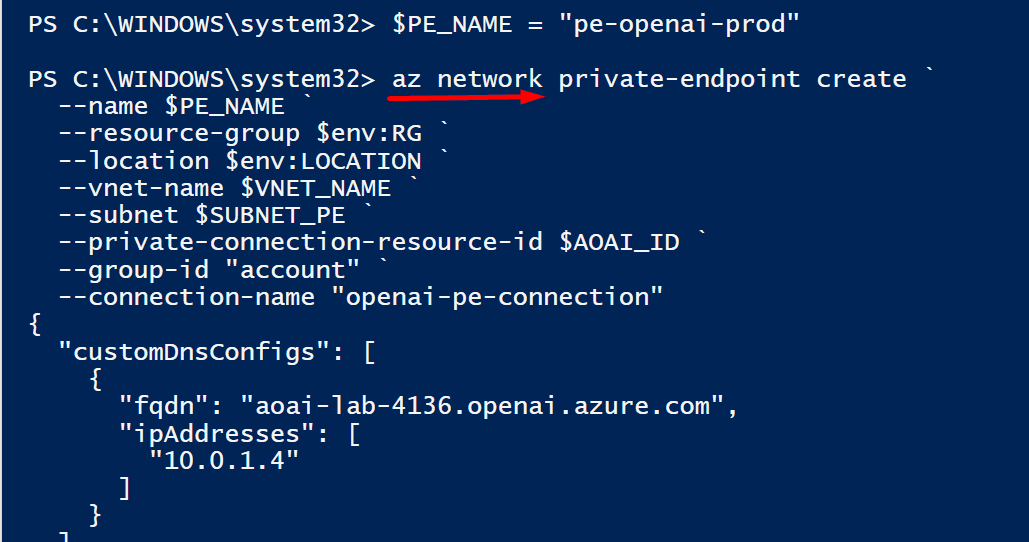
--SNIP--
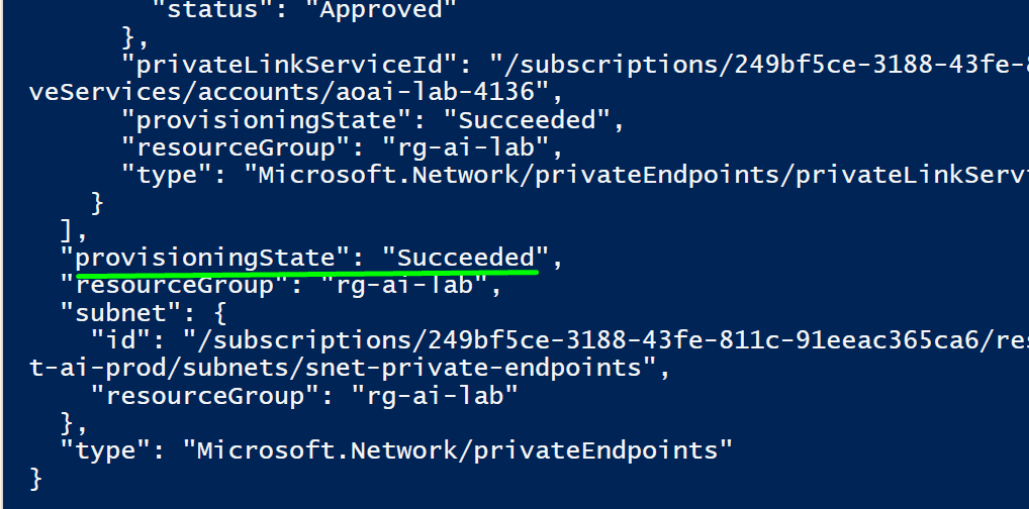
Verify the endpoint was created and is approved
az network private-endpoint show `
--name $PE_NAME `
--resource-group $env:RG `
--query "privateLinkServiceConnections[].privateLinkServiceConnectionState.status" `
-o tsv
Step 3 - Configure Private DNS
DNS is the part people forget. Without a private DNS zone, your VMs resolve the OpenAI FQDN to its public IP even though you have a private endpoint. You need to create a private DNS zone for openai.azure.com, link it to your VNet, and add an A record pointing to the private IP of the endpoint NIC.
Create private DNS zone for OpenAI
az network private-dns zone create `
--name "privatelink.openai.azure.com" `
--resource-group $env:RG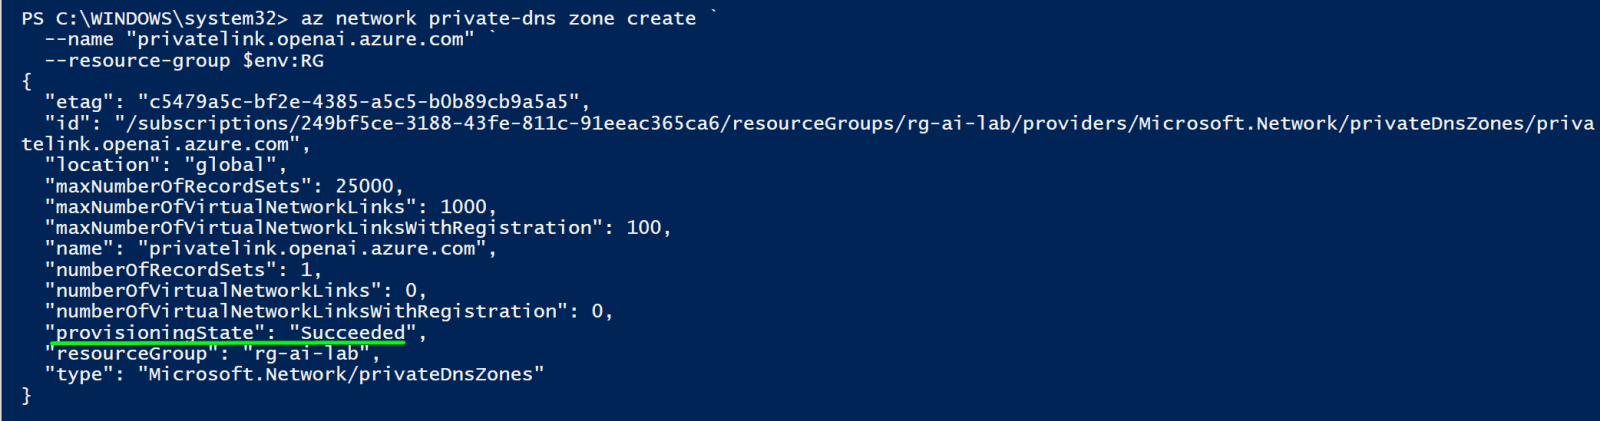
Link DNS zone to your VNet
az network private-dns link vnet create `
--name "dns-link-openai" `
--resource-group $env:RG `
--virtual-network $VNET_NAME `
--zone-name "privatelink.openai.azure.com" `
--registration-enabled false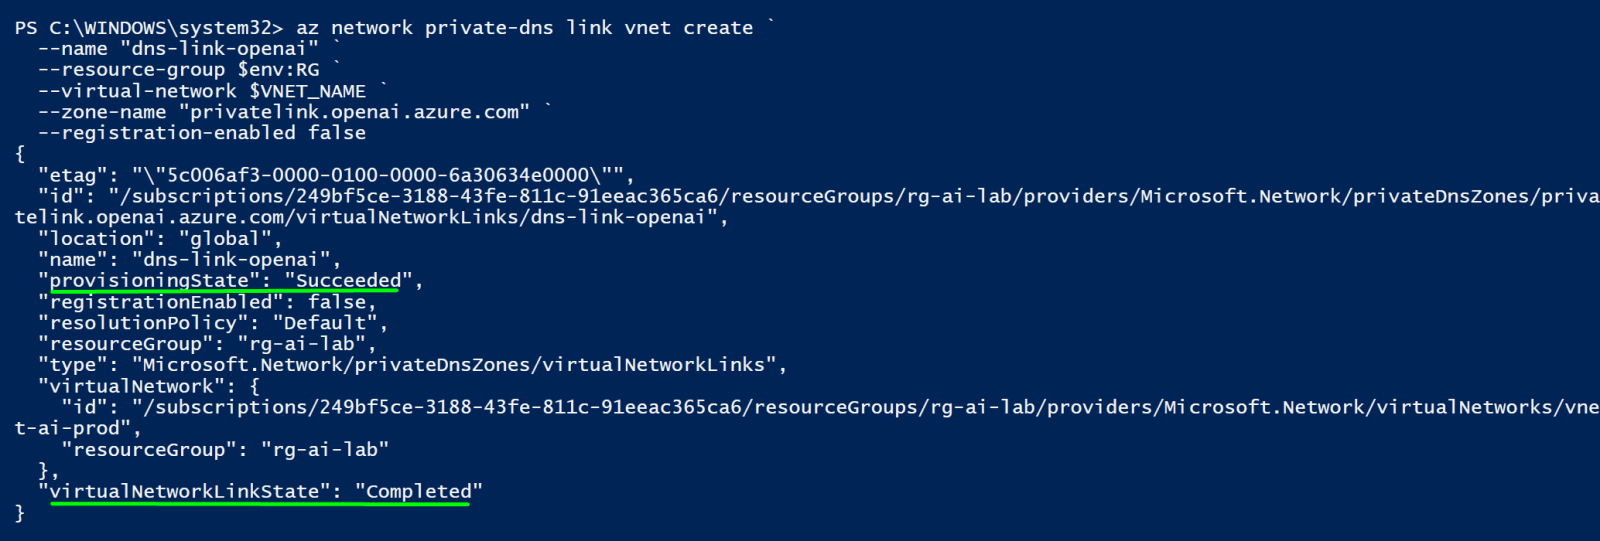
Create DNS zone group - auto-populates A records from the PE NIC
az network private-endpoint dns-zone-group create `
--name "openai-dns-group" `
--resource-group $env:RG `
--endpoint-name $PE_NAME `
--private-dns-zone "privatelink.openai.azure.com" `
--zone-name "openai"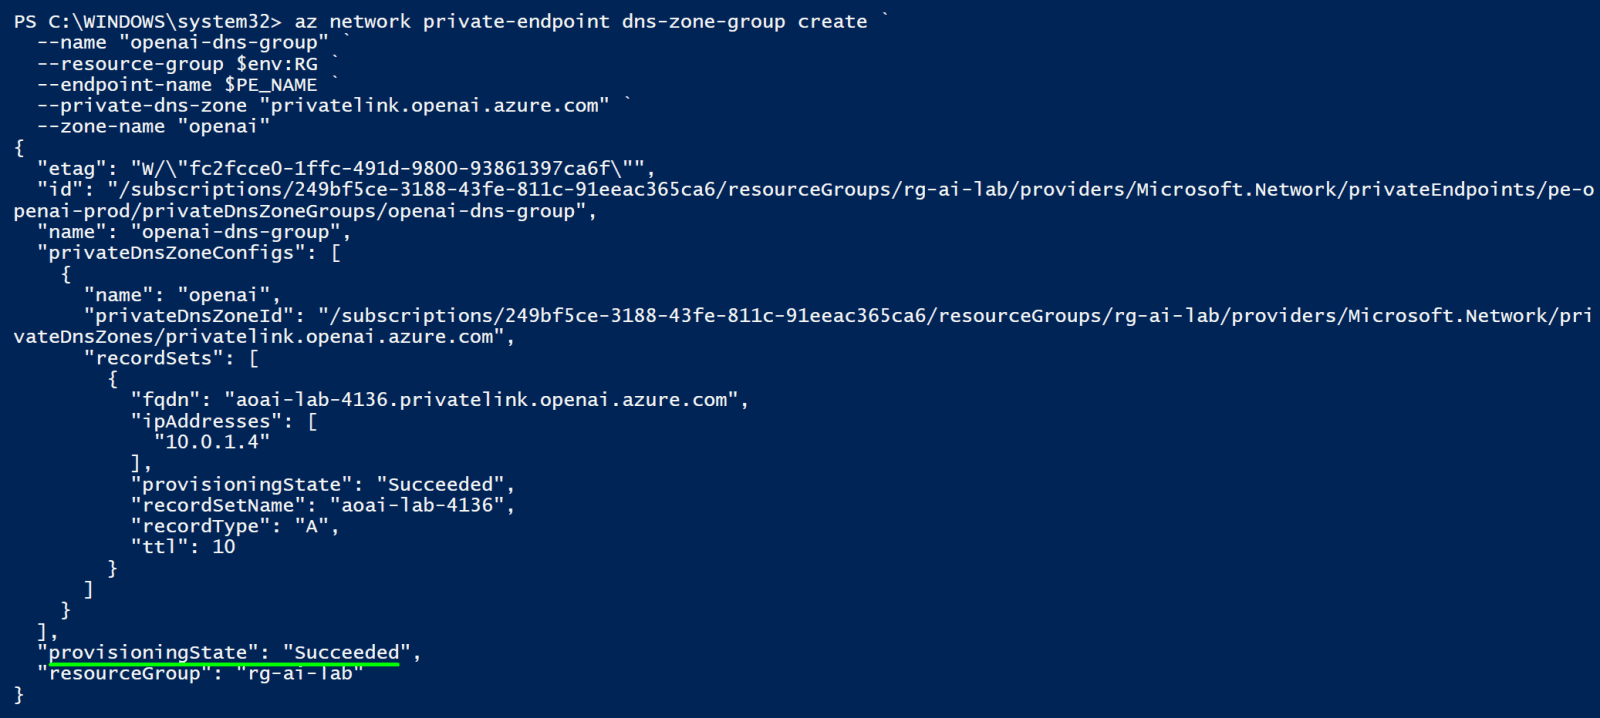
Verify the A record was created
az network private-dns record-set a list `
--resource-group $env:RG `
--zone-name "privatelink.openai.azure.com" `
-o table
Step 4 - Disable Public Network Access
Creating a private endpoint doesn't automatically block public access - you have to do that explicitly. Until you run this command, the public endpoint is still alive alongside the private one. This is the command that actually takes your OpenAI resource off the internet.
Disable public network access on Azure OpenAI
Go to Azure OpenAI (aoai-lab-4136) → Networking
Select Disabled radio button (third option)
Click Save
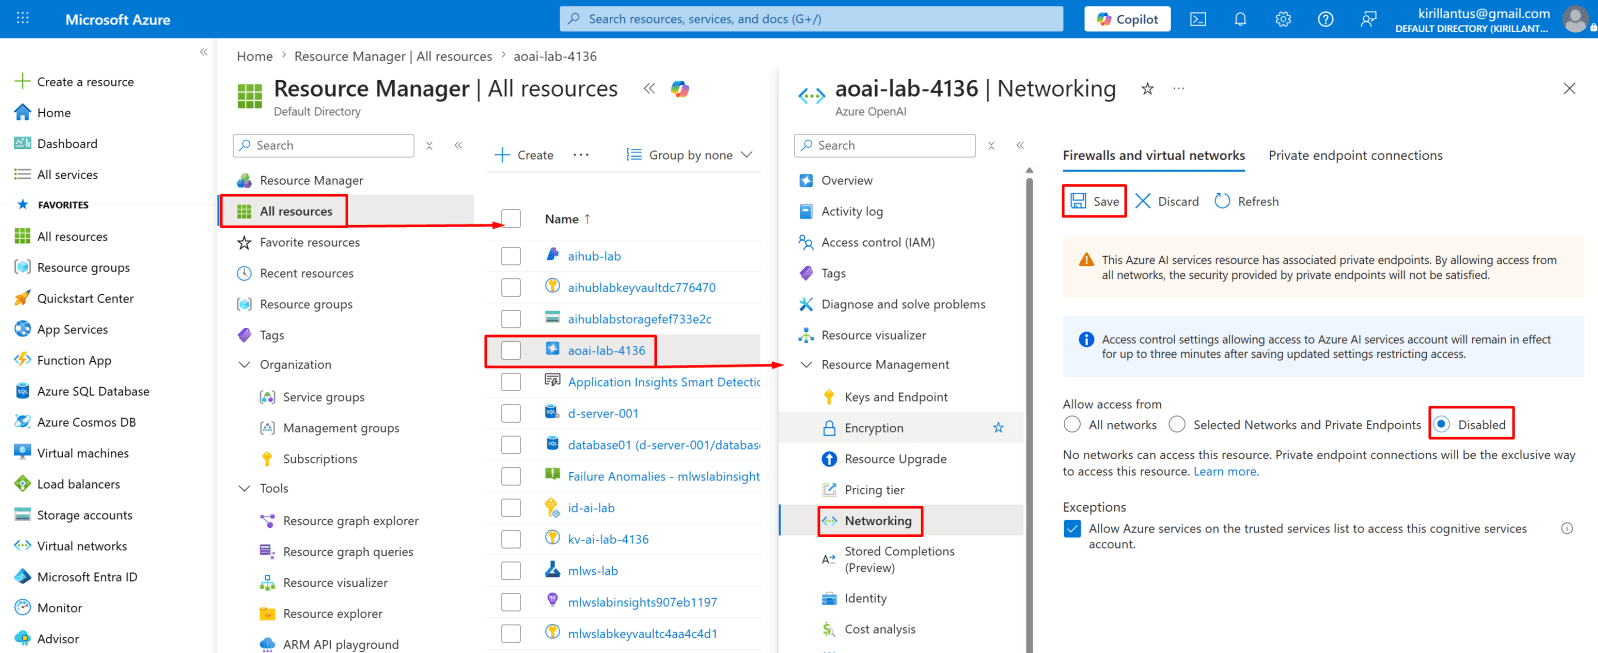
Verify - should return "Disabled"
az cognitiveservices account show `
--name $env:AOAI_NAME `
--resource-group $env:RG `
--query properties.publicNetworkAccess -o tsv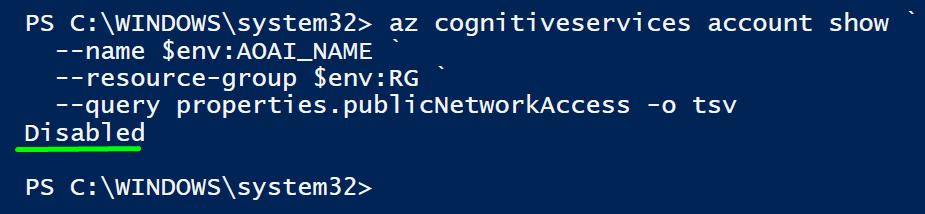
Step 5 - Repeat for AI Search
AI Search needs the same treatment. The group-id is different — use searchService and the DNS zone is privatelink.search.windows.net.
add $SEARCH_ID to set-env.ps1 the same way you did $AOAI_ID:
$SEARCH_ID = az search service show `
--name $env:SEARCH_NAME `
--resource-group $env:RG `
--query id -o tsv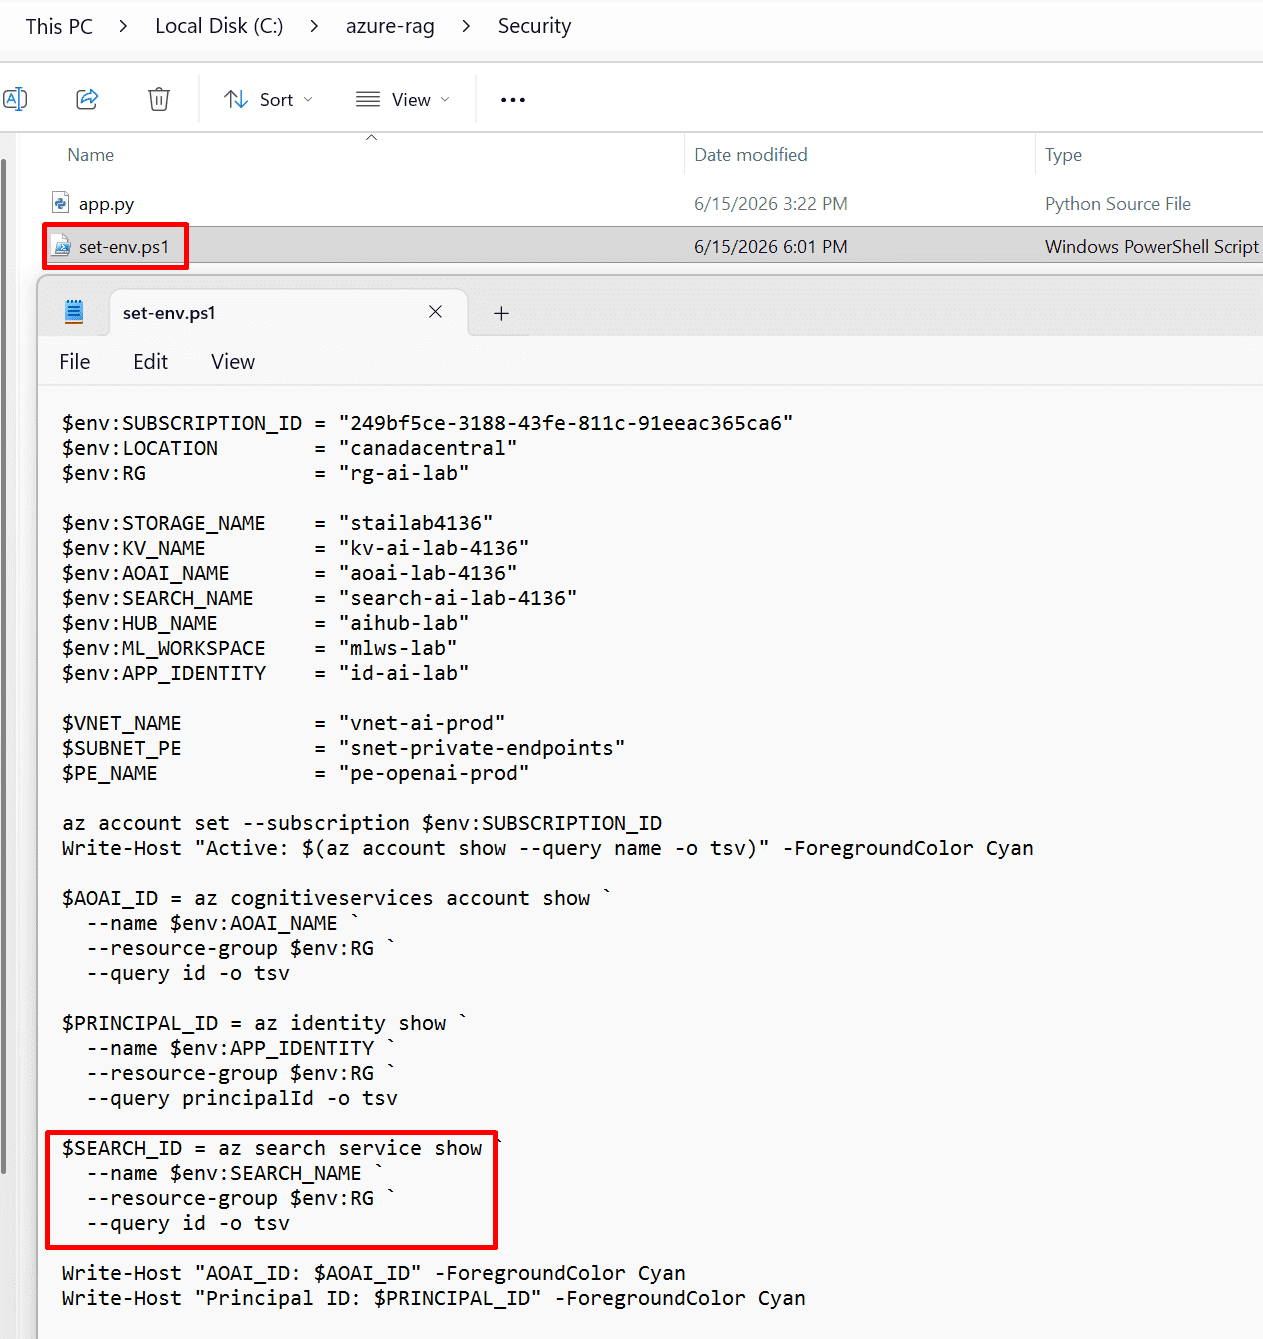
Create private endpoint for AI Search
az network private-endpoint create `
--name "pe-search-prod" `
--resource-group $env:RG `
--location $env:LOCATION `
--vnet-name $VNET_NAME `
--subnet $SUBNET_PE `
--private-connection-resource-id $SEARCH_ID `
--group-id "searchService" `
--connection-name "search-pe-connection"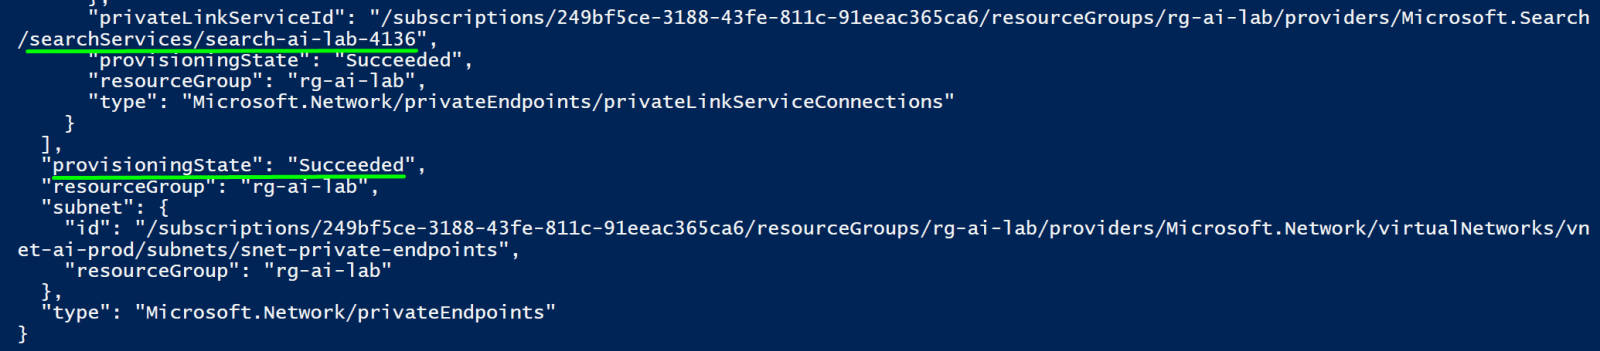
Create private DNS for Search
az network private-dns zone create `
--name "privatelink.search.windows.net" `
--resource-group $env:RGaz network private-dns link vnet create `
--name "dns-link-search" `
--resource-group $env:RG `
--virtual-network $VNET_NAME `
--zone-name "privatelink.search.windows.net" `
--registration-enabled false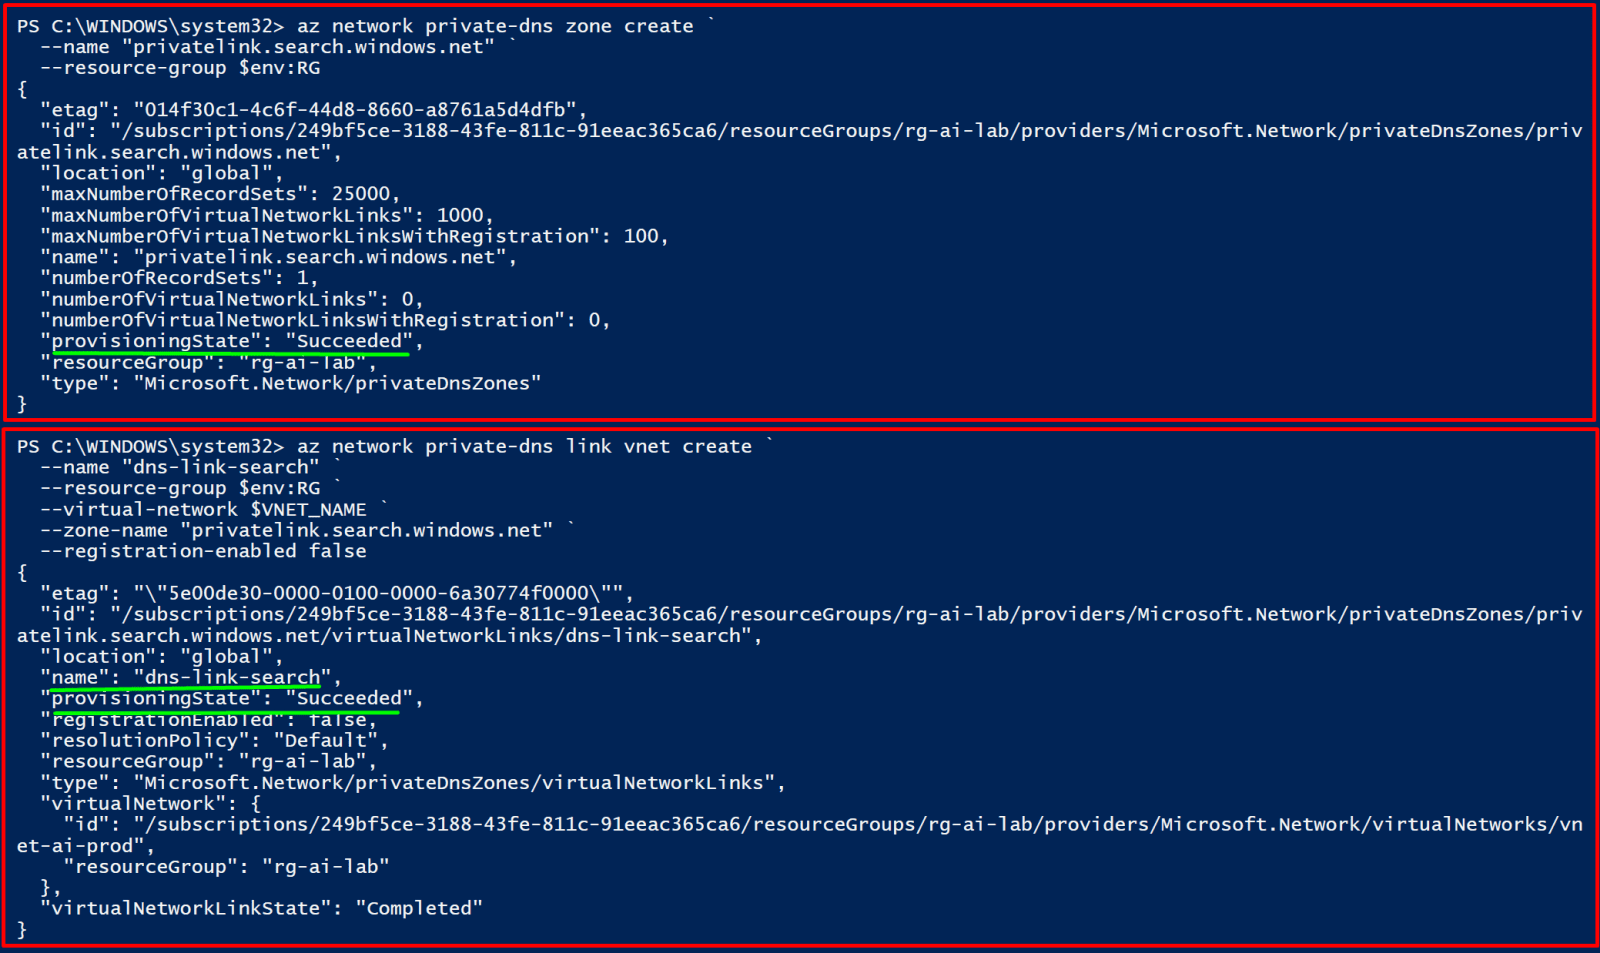
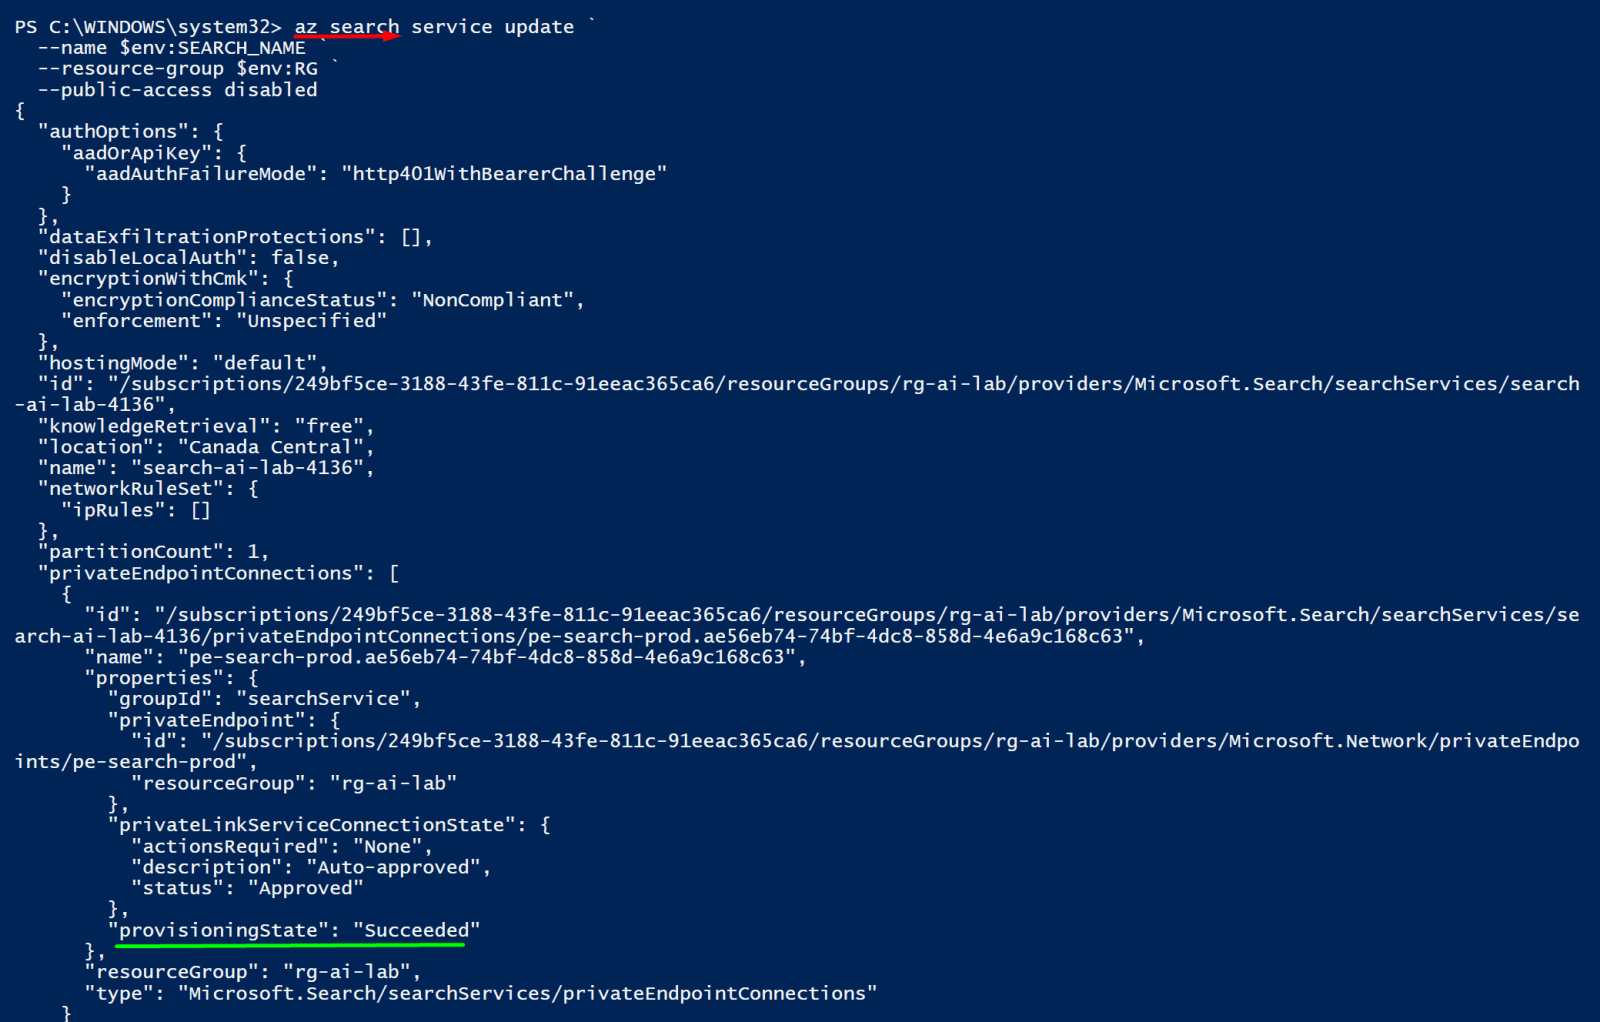
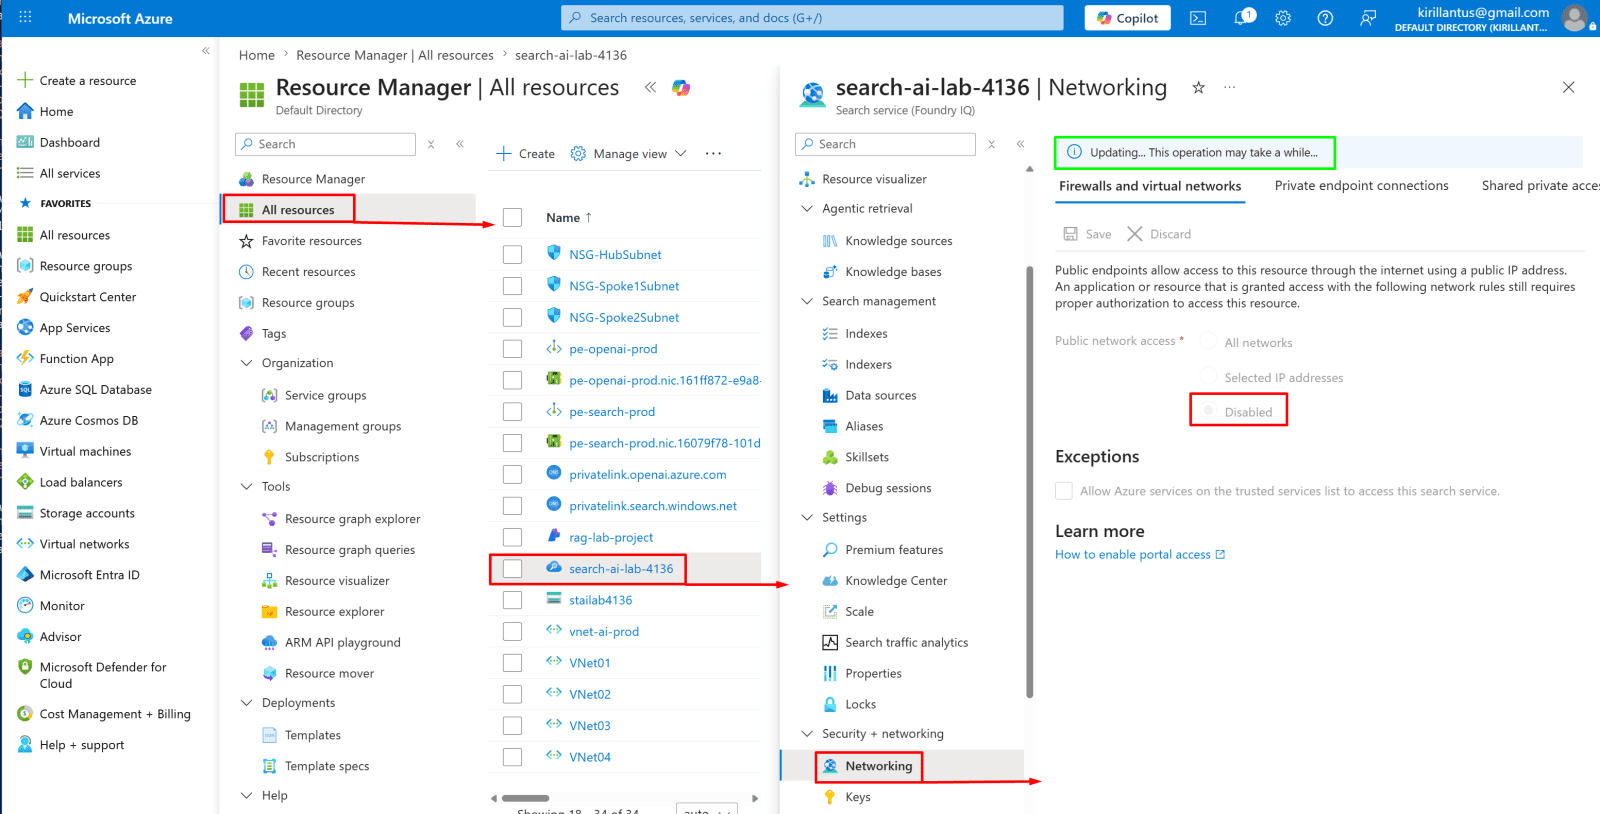
Disable public access on Search
az search service update `
--name $env:SEARCH_NAME `
--resource-group $env:RG `
--public-access disabledNote: This may take few minutes
Azure OpenAI Security
After locking down identity and networking, harden the OpenAI resource itself: enable diagnostic logging, apply customer-managed keys, restrict model deployments, and monitor token usage.
Step 1 - Enable Diagnostic Logging
By default, Azure OpenAI logs nothing. No record of which prompts were sent, which model was called, or how many tokens were consumed. Diagnostic logs send this data to a Log Analytics workspace where you can query it, alert on it, and audit it. This is required for any compliance framework.
Add these to set-env.ps1 then run it:
$LAW_NAME = "law-ai-security"
$LAW_ID = az monitor log-analytics workspace show `
--workspace-name $LAW_NAME `
--resource-group $env:RG `
--query id -o tsv
Create Log Analytics workspace and enable diagnostics
az monitor log-analytics workspace create `
--workspace-name $LAW_NAME `
--resource-group $env:RG `
--location $env:LOCATION `
--sku PerGB2018 `
--retention-time 90Note: logs take 5-15 minutes to start flowing after diagnostics is enabled, and you need actual API calls to generate RequestResponse entries.

Get workspace ID
$LAW_ID = az monitor log-analytics workspace show `
--workspace-name $LAW_NAME `
--resource-group $env:RG `
--query id -o tsv
Write-Host "LAW ID: $LAW_ID"

Step 2 - Customer-Managed Keys (CMK)
By default Azure encrypts your data at rest with Microsoft-managed keys. With CMK, you provide the key from your own Azure Key Vault. This means Microsoft cannot decrypt your data, only your key vault can. If you revoke the key, the data becomes inaccessible immediately. This is required for many regulatory frameworks.
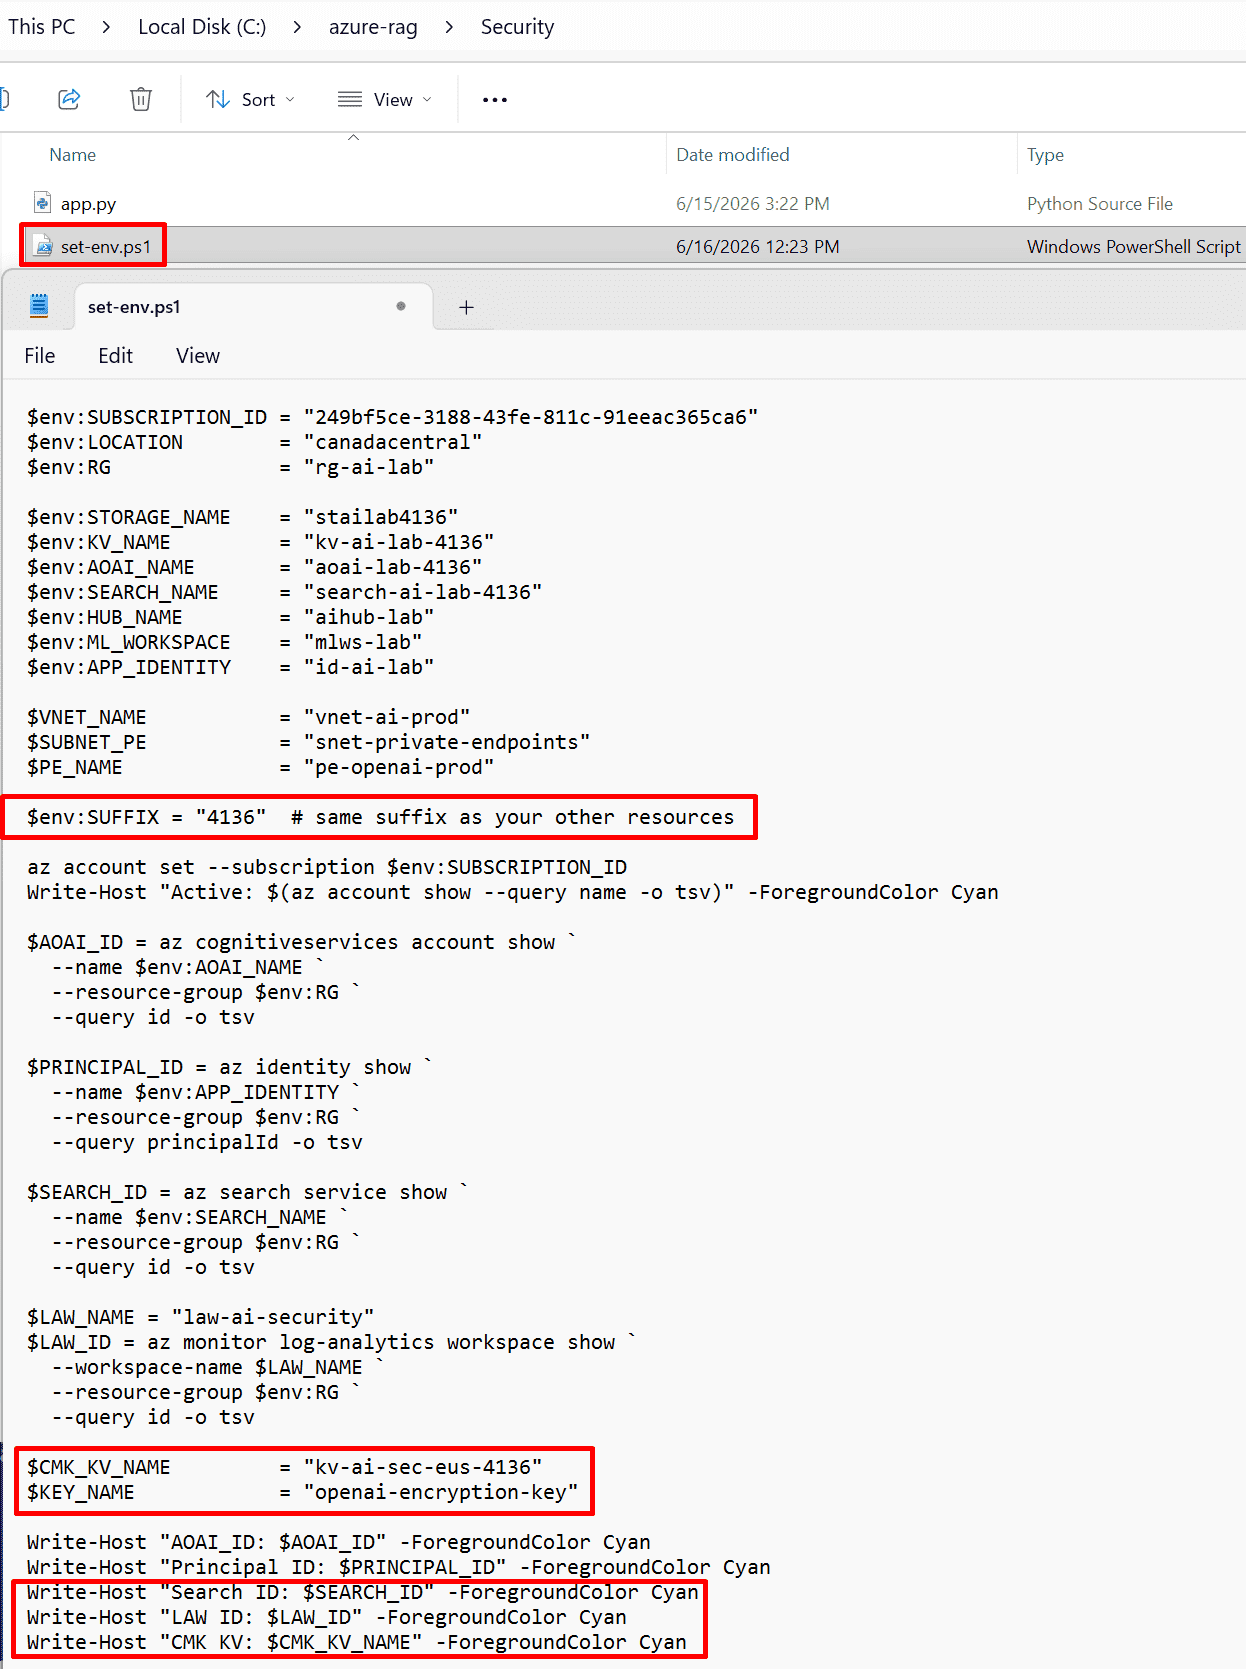
Add the suffix to set-env.ps1 to make it unique:
$env:SUFFIX = "4136"  # same suffix as your other resources
$CMK_KV_NAME         = "kv-ai-sec-eus-4136"
$KEY_NAME = "openai-encryption-key"Note: Note I used $CMK_KV_NAME instead of $KV_NAME to avoid collision with your existing $env:KV_NAME (which is kv-ai-lab-4136 from Volume 1).
Add the missing Write-Host lines so you can confirm everything on load
Write-Host "Search ID: $SEARCH_ID" -ForegroundColor Cyan
Write-Host "LAW ID: $LAW_ID" -ForegroundColor Cyan
Write-Host "CMK KV: $CMK_KV_NAME" -ForegroundColor CyanNote: rerun the . C:\azure-rag\Security\set-env.ps1
Create a new Key Vault with purge protection (required for CMK) in eastus because the OpenAI resource is in eastus.
az keyvault create `
--name $CMK_KV_NAME `
--resource-group $env:RG `
--location "eastus" `
--sku premium `
--enable-purge-protection true `
--retention-days 90
Assign Key Vault Crypto Officer role to yourself
Get your current user object ID
$MY_OID = az ad signed-in-user show --query id -o tsvAssign Key Vault Crypto Officer role to yourself
az role assignment create `
--role "Key Vault Crypto Officer" `
--assignee $MY_OID `
--scope "/subscriptions/$env:SUBSCRIPTION_ID/resourceGroups/$env:RG/providers/Microsoft.KeyVault/vaults/$CMK_KV_NAME"Note: Wait 30-60 seconds for propagation
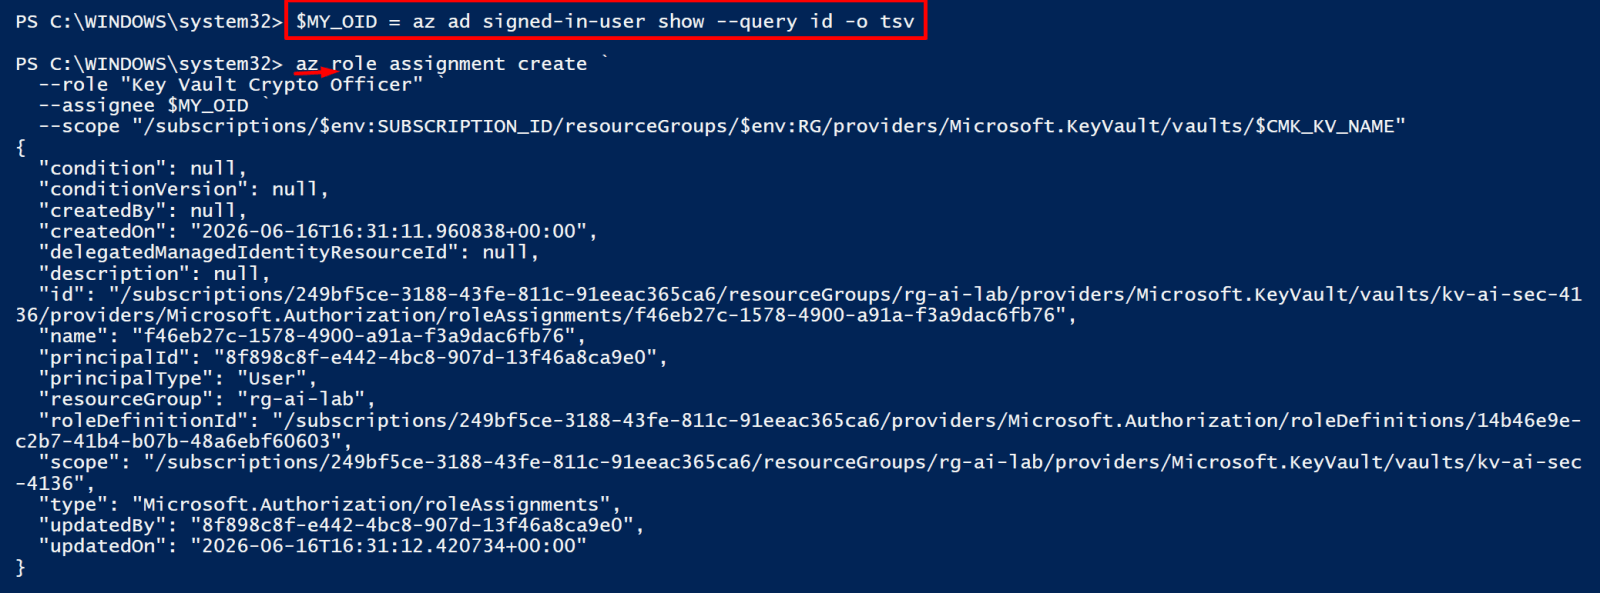
Create the encryption key (RSA-4096)
az keyvault key create `
--vault-name $CMK_KV_NAME `
--name $KEY_NAME `
--kty RSA `
--size 4096
Get key version
$KEY_VERSION = az keyvault key show `
--vault-name $CMK_KV_NAME `
--name $KEY_NAME `
--query key.kid -o tsv
Write-Host "Key Version: $KEY_VERSION"
Get OpenAI system-assigned identity
$AOAI_IDENTITY = az cognitiveservices account show `
--name $env:AOAI_NAME `
--resource-group $env:RG `
--query identity.principalId -o tsvWrite-Host "AOAI Identity: $AOAI_IDENTITY"
Grant OpenAI identity the Crypto Service Encryption User role on the CMK vault
az role assignment create `
--role "Key Vault Crypto Service Encryption User" `
--assignee $AOAI_IDENTITY `
--scope "/subscriptions/$env:SUBSCRIPTION_ID/resourceGroups/$env:RG/providers/Microsoft.KeyVault/vaults/$CMK_KV_NAME"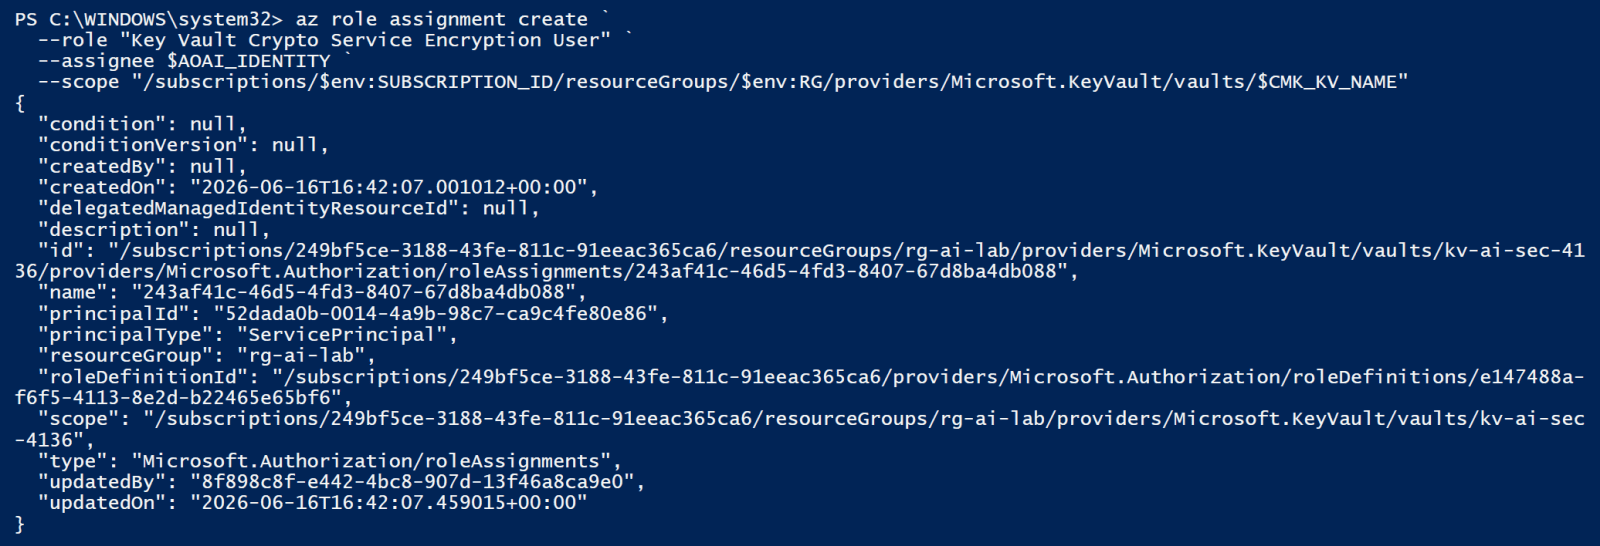
Apply CMK to the OpenAI resource
Write body to a temp file
$KEY_VERSION = ($KEY_VERSION -split '/')[-1]
Write-Host "Key Version GUID: $KEY_VERSION"@"
{
"properties": {
"encryption": {
"keySource": "Microsoft.KeyVault",
"keyVaultProperties": {
"keyName": "$KEY_NAME",
"keyVaultUri": "https://$CMK_KV_NAME.vault.azure.net/",
"keyVersion": "$KEY_VERSION"
}
}
}
}
"@ | Out-File -FilePath $bodyFile -Encoding utf8Writing to a file sidesteps that entirely - the JSON stays clean on disk, and @$bodyFile tells az rest to read the body from the file instead of a string. No quote escaping issues.
The file saved in your TEMP folder : C:\Users\
9. 9. Confirm keyVersion shows just the GUID before running az rest
Get-Content $bodyFile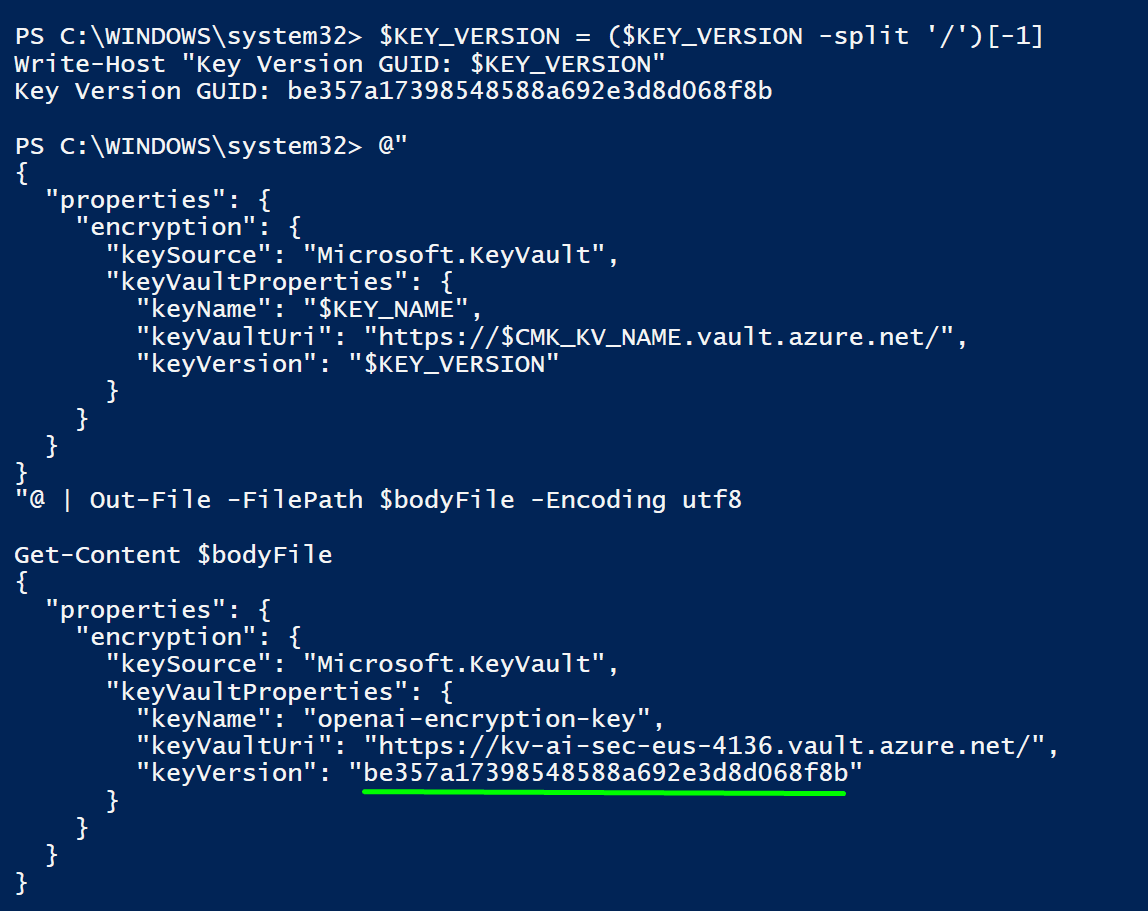
10.--method PATCH `
--url "https://management.azure.com${AOAI_ID}?api-version=2023-05-01" `
--headers "Content-Type=application/json" `
--body "@$bodyFile"
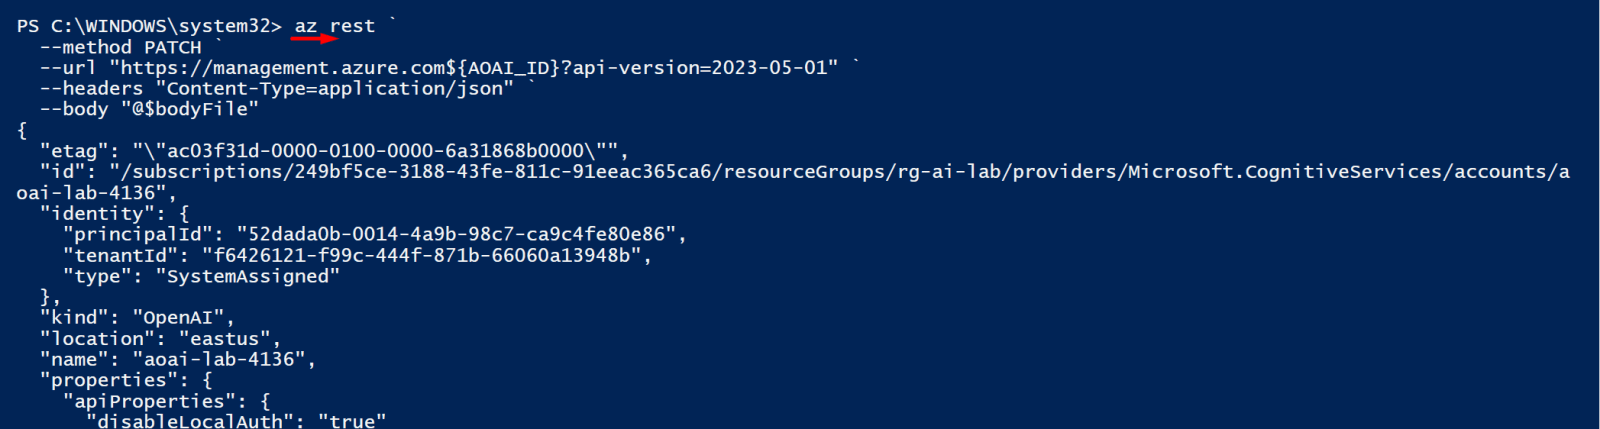
--SNIP--
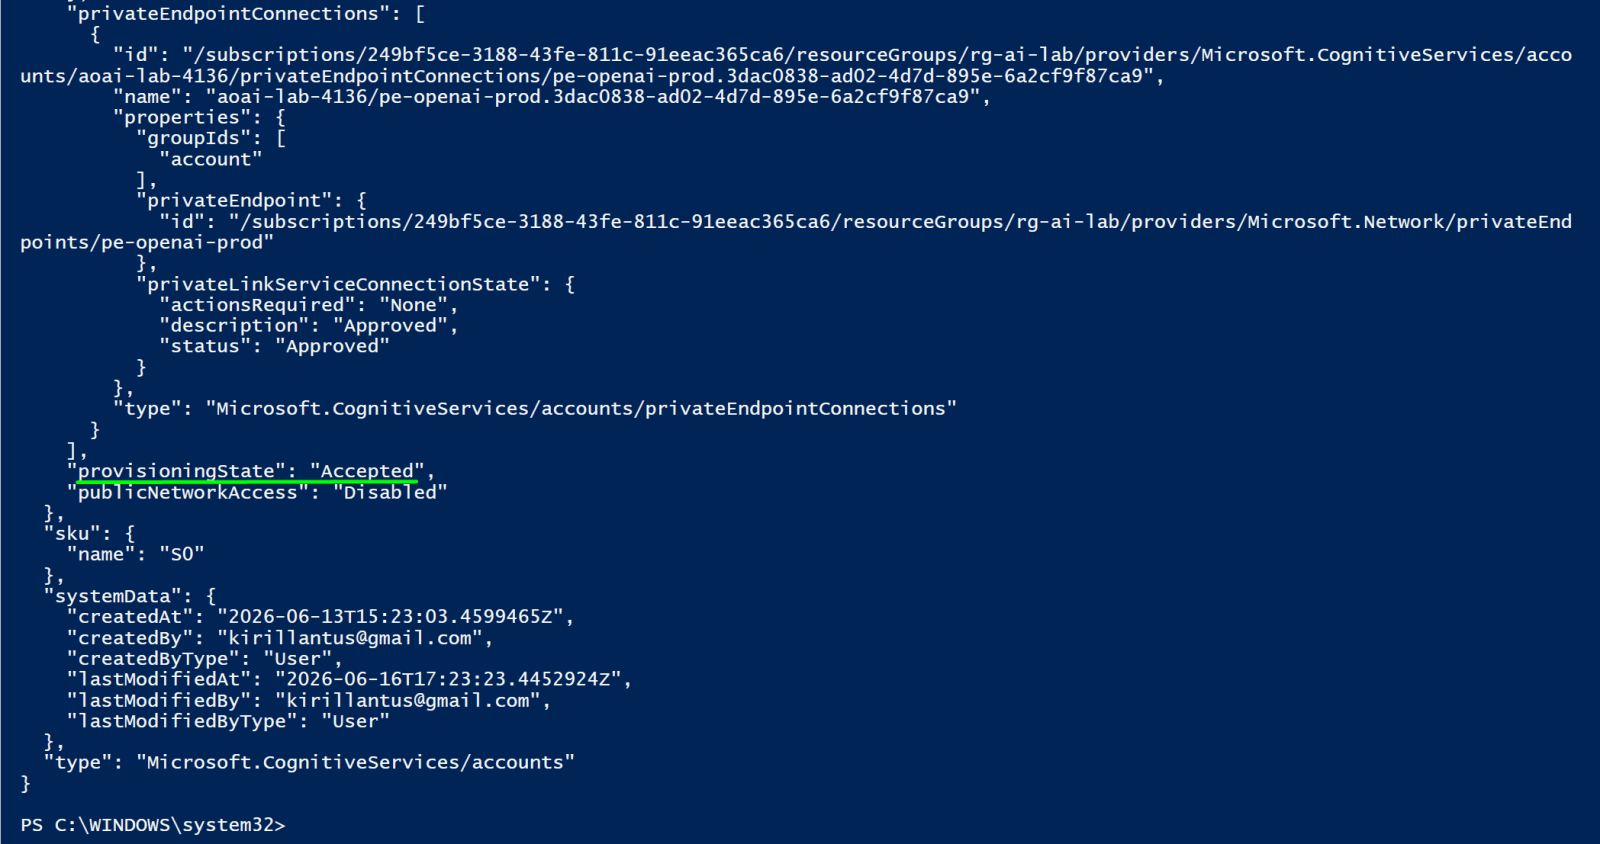
CMK applied successfully. Key confirms:
provisioningState: Accepted - CMK being applied
publicNetworkAccess: Disabled - still locked down
privateLinkServiceConnectionState: Approved - private endpoint active
Step 4 - Restrict Model Deployments with Azure Policy
Without policy controls, anyone with Contributor access can deploy any available model - including expensive GPT-4o or o1 models, or models with weaker safety filters. Use Azure Policy to create an allowlist of approved models. This policy denies deployments of any model not in your approved list.
Create and assign model restriction policy
Create policy definition
az policy definition create `
--name "allow-approved-openai-models" `
--display-name "Allow only approved Azure OpenAI models" `
--rules "{`"if`":{`"allOf`":[{`"field`":`"type`",`"equals`":`"Microsoft.CognitiveServices/accounts/deployments`"},{`"not`":{`"field`":`"Microsoft.CognitiveServices/accounts/deployments/model.name`",`"in`":[`"gpt-4o`",`"gpt-4o-mini`",`"text-embedding-ada-002`"]}}]},`"then`":{`"effect`":`"Deny`"}}" `
--mode All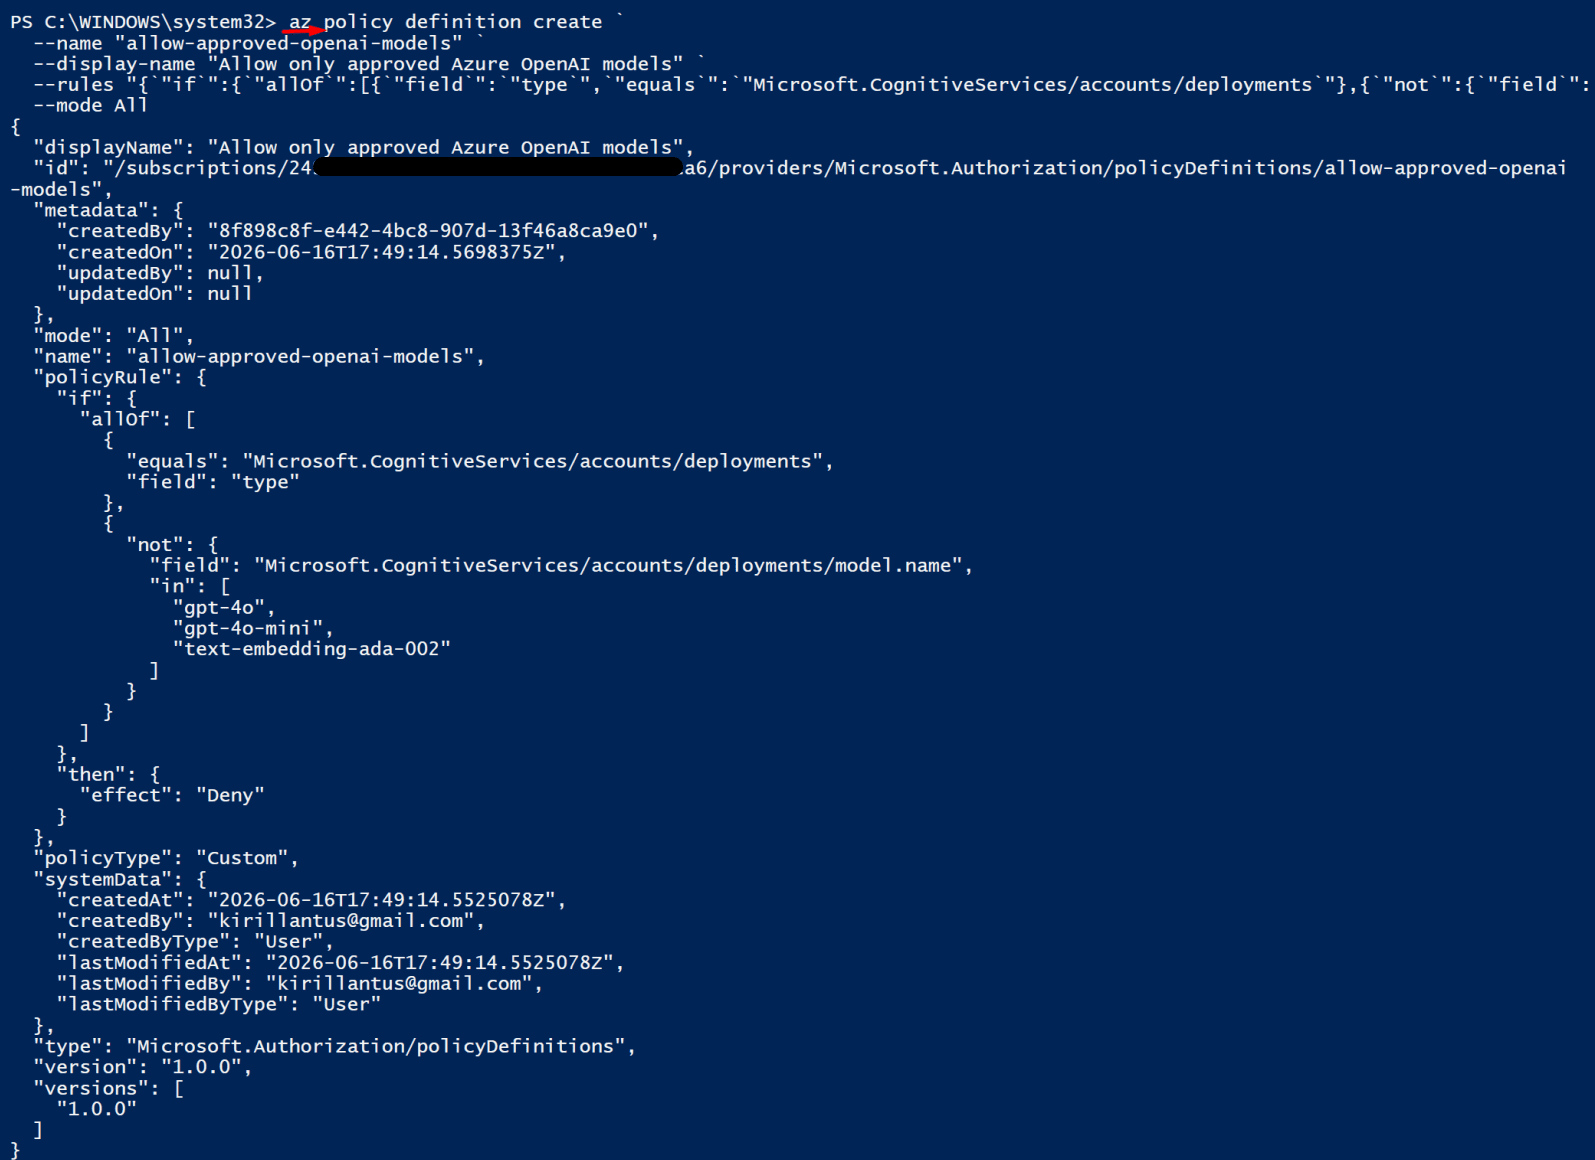
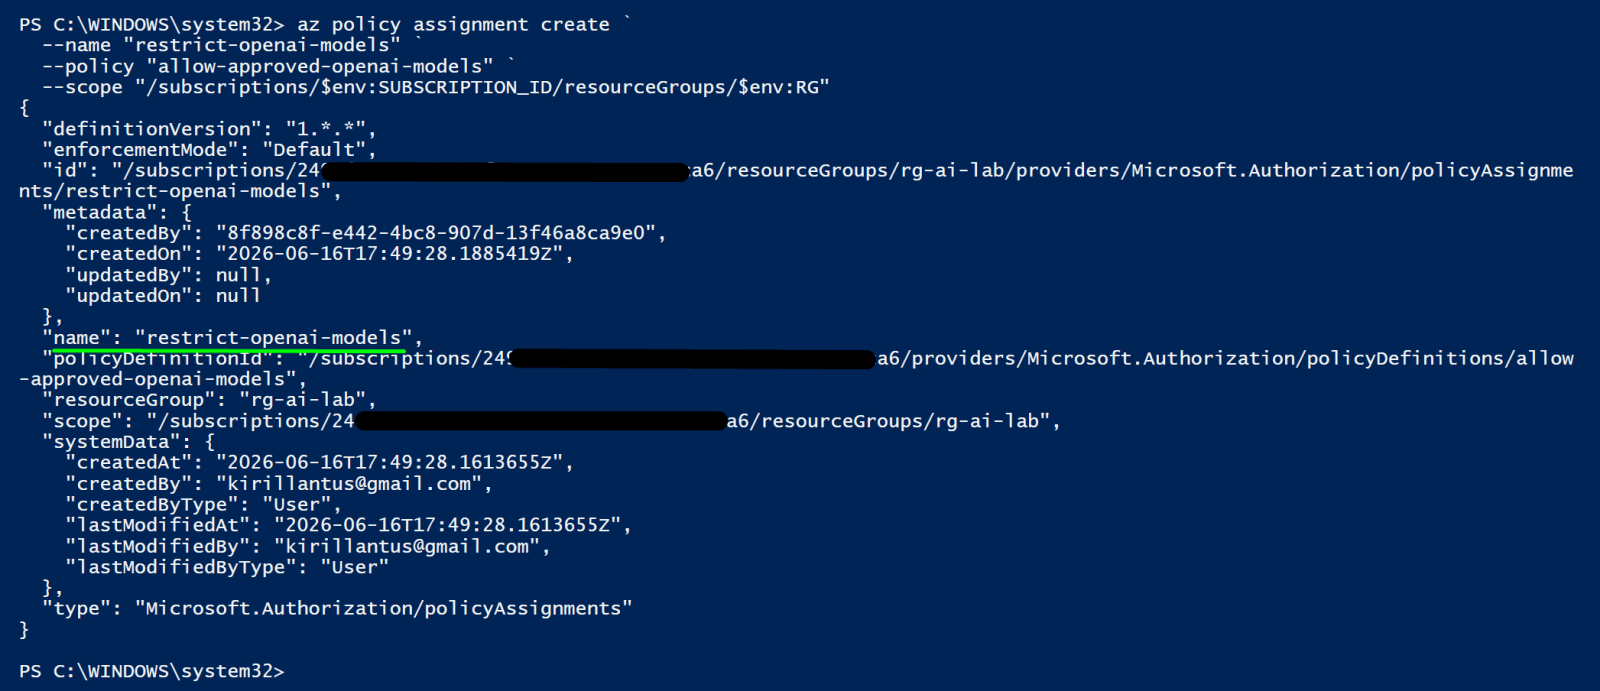
Assign the policy to your resource group
Note: Both succeeded - policy definition created and assigned to rg-ai-lab. Only gpt-4o, gpt-4o-mini, and text-embedding-ada-002 deployments are now allowed.
Step 5 - Query Logs with KQL
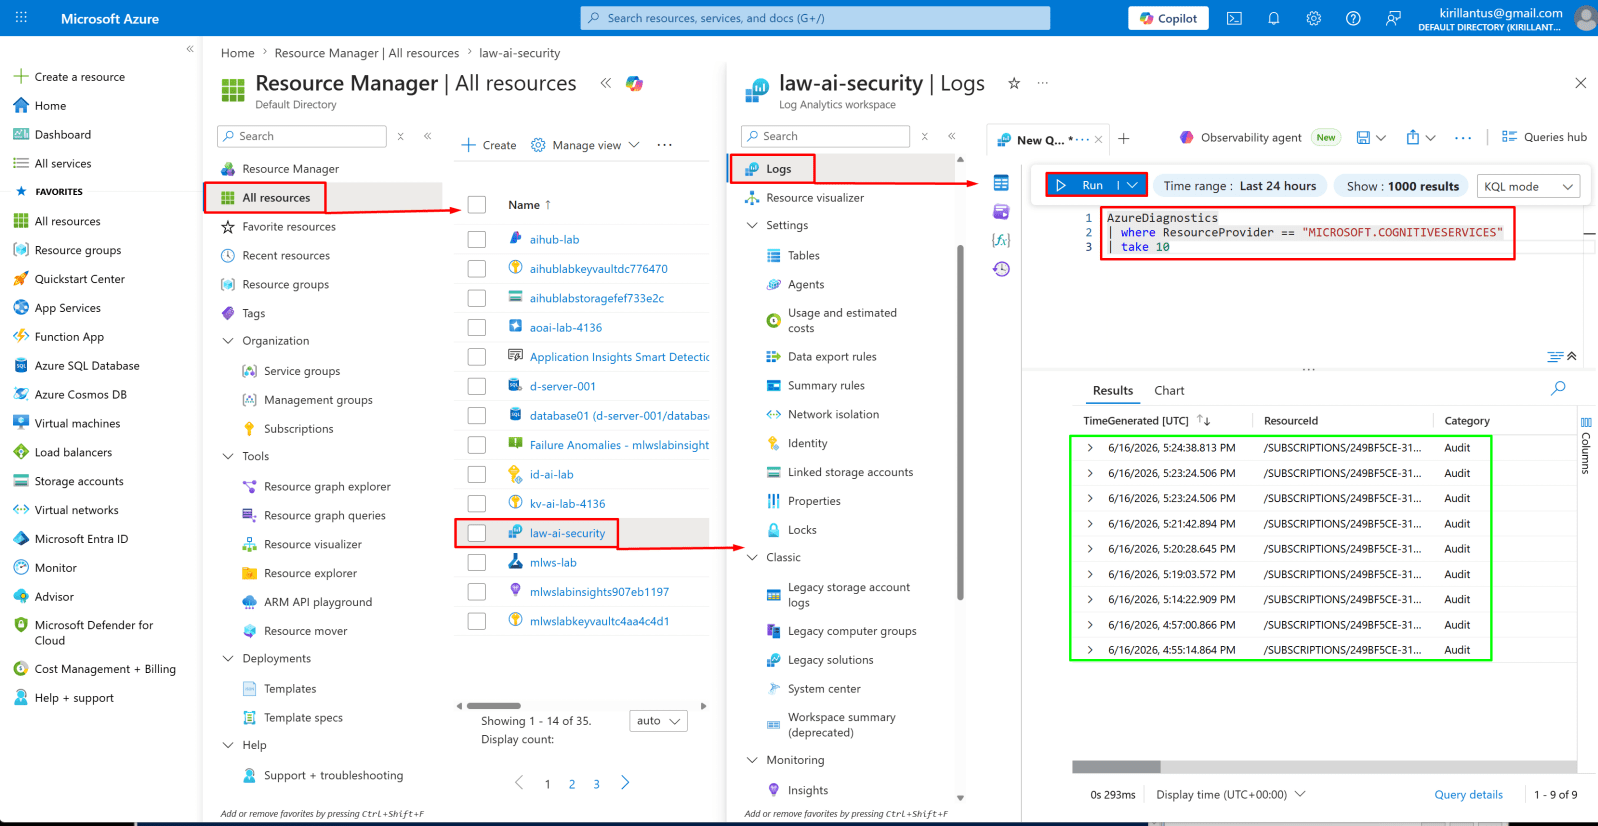
Once logs are flowing, you can query them in Log Analytics. Here are the three most useful queries for security monitoring.
KQL - detect high token usage (possible exfiltration) then run: . C:\azure-rag\Security\set-env.ps1
AzureDiagnostics
| where ResourceProvider == "MICROSOFT.COGNITIVESERVICES"
| take 10Note: Logs are flowing - AzureDiagnostics is receiving Audit category events from MICROSOFT.COGNITIVESERVICES. Diagnostics is confirmed working.
Azure AI Studio & Foundry
AI Studio (now Azure AI Foundry) is the workspace for building, testing, and deploying AI applications. By default workspaces use public endpoints and broad access. This chapter isolates the workspace, locks down compute, and controls the model catalog.
Step 1 - Update network isolation
When creating an AI Foundry workspace for production, always enable managed VNet isolation from day one. Setting it afterward is much more disruptive. The --managed-network allow_only_approved_outbound flag tells the workspace to only allow outbound traffic to explicitly approved destinations - no arbitrary internet egress from your compute.
Update network isolation
A few things to flag before running:
$HUB_NAME is already set in set-env.ps1 as aihub-lab
Storage already exists from Volume 1 (stailab4136)
The hub aihub-lab was already created in Volume 1
az ml workspace update `
--name $env:HUB_NAME `
--resource-group $env:RG `
--managed-network allow_only_approved_outbound `
--public-network-access disabledNote: We configure --managed-network allow_only_approved_outbound and --public-network-access disabled to ensure the Azure ML workspace can communicate only with approved services and cannot be accessed directly from the public internet.

Step 2 - Provision the managed network:
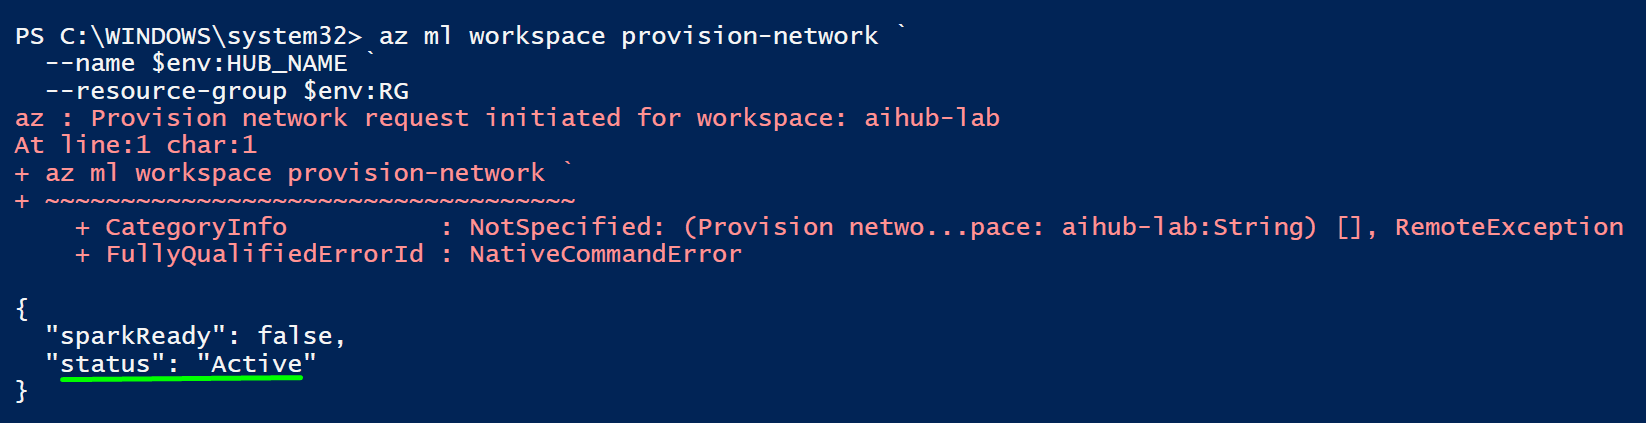
The managed network isn't created until you explicitly provision it. This creates the private endpoints between the workspace and its dependent services (storage, Key Vault, Container Registry). Run this once before creating compute resources.
Provision network request
az ml workspace provision-network `
--name $env:HUB_NAME `
--resource-group $env:RGNote: Wait 5-10 minutes then check status:
Note: We run az ml workspace provision-network to create and apply the private networking resources required by the workspace so that the managed network and network security settings become active.
Step 3 - Create hardened compute instance:
Compute instances are the VMs developers use for notebooks and experiments. By default they have a public IP, SSH is enabled, and the local admin account is active. Lock all of this down for production deployments.
Create hardened compute instance
$COMPUTE_NAME = "cidev01"
az ml compute create `
--name $COMPUTE_NAME `
--resource-group $env:RG `
--workspace-name $env:HUB_NAME `
--type ComputeInstance `
--size Standard_DS3_v2 `
--enable-node-public-ip falseNote: It will take few minutes
Important: Compute Instance runs 24/7 and costs money while active.
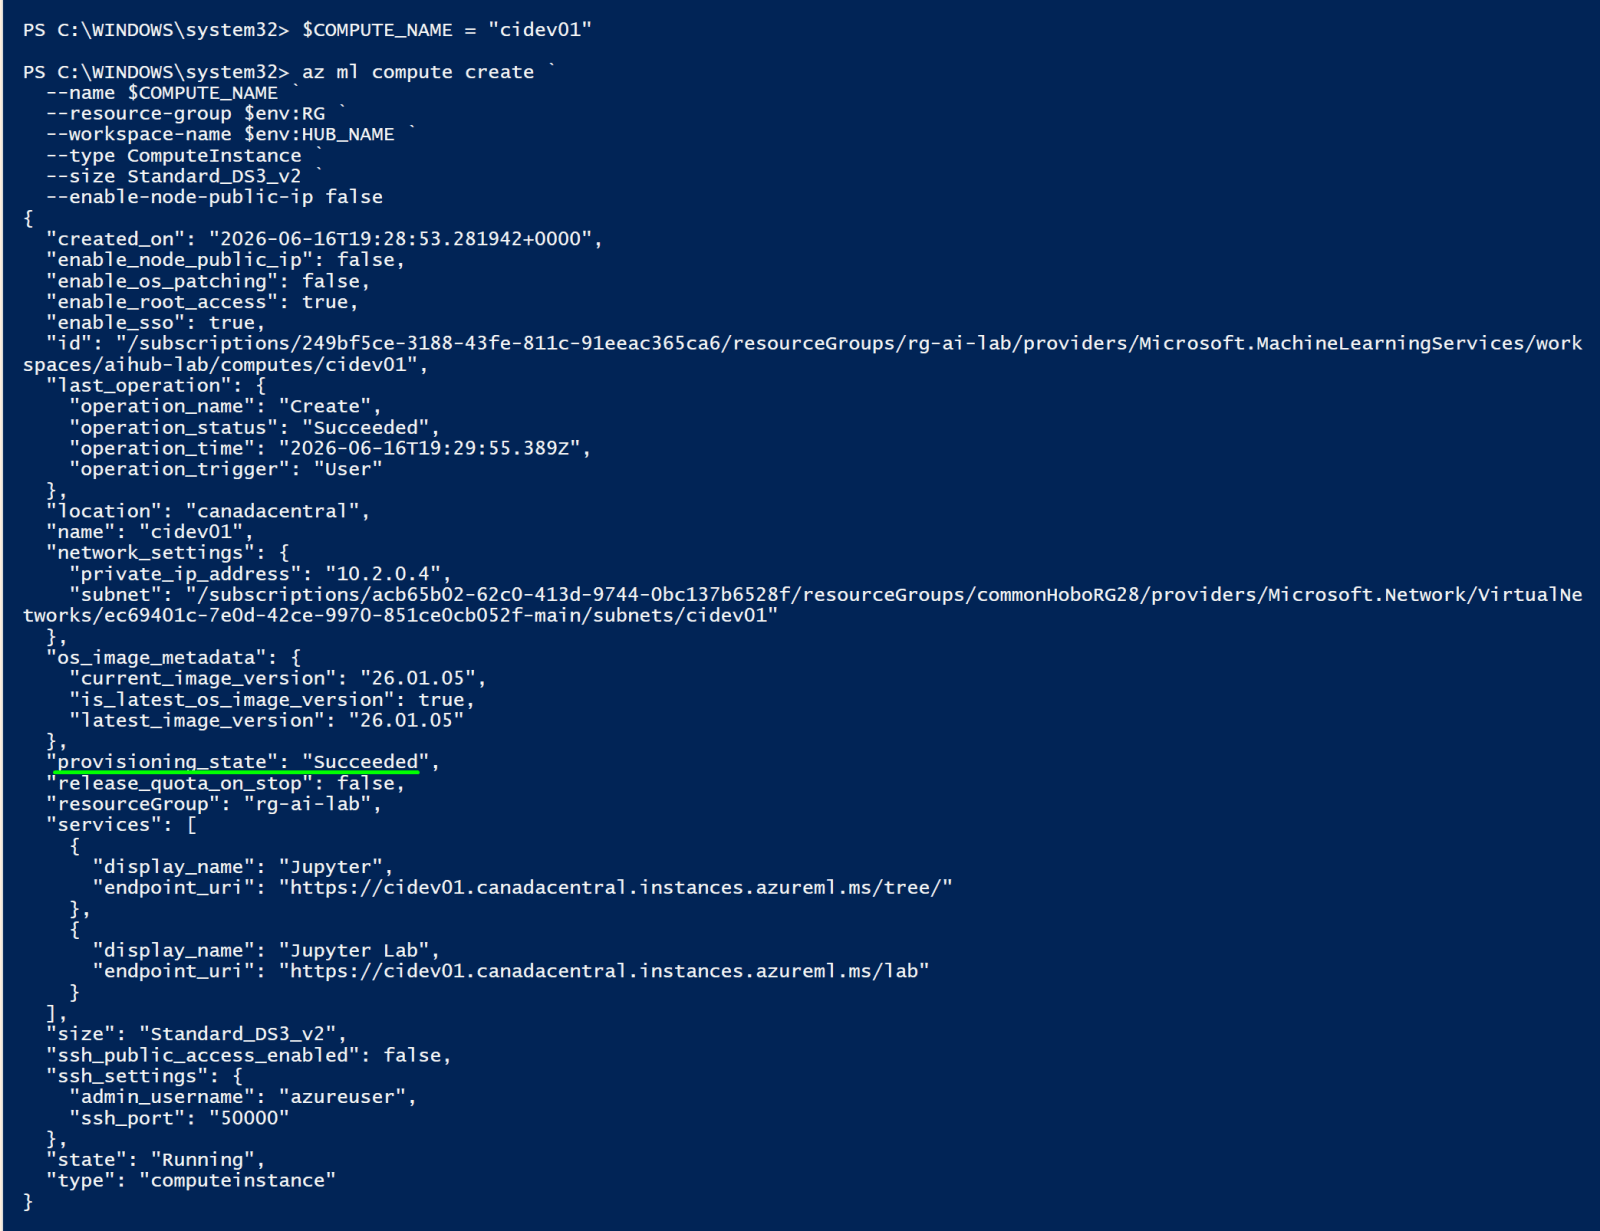
Created successfully. Key security settings confirmed:
✅enable_node_public_ip: false
✅ssh_public_access_enabled: false
✅provisioning_state: Succeeded
Stop it now to avoid charges:
az ml compute stop `
--name $COMPUTE_NAME `
--resource-group $env:RG `
--workspace-name $env:HUB_NAME
Confirmed its stopped
az ml compute show `
--name $COMPUTE_NAME `
--resource-group $env:RG `
--workspace-name $env:HUB_NAME `
--query "state" -o tsv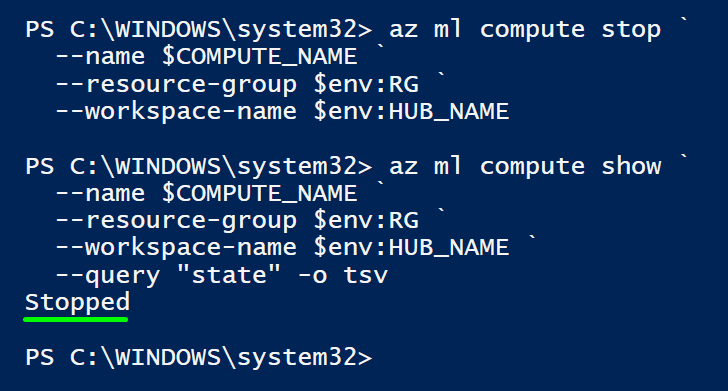
Step 4 - Workspace role assignment
AI Foundry has its own RBAC roles. Use the narrowest role for each persona. Data scientists don't need to create compute clusters or manage connections. Model deployers don't need to read training data.
Since this is a solo lab I use my own object ID
Identify yot object ID
$WORKSPACE_ID = az ml workspace show `
--name $env:HUB_NAME `
--resource-group $env:RG `
--query id -o tsv
Write-Host $WORKSPACE_ID
Assign AzureML Data Scientist role
Replace with actual user object ID
$USER_OBJECT_ID = "249bf5ce-3188-43fe-811c-91eeac365ca6"
$USER_OBJECT_ID = az ad signed-in-user show --query id -o tsv
az role assignment create `
--assignee-object-id $USER_OBJECT_ID `
--assignee-principal-type User `
--role "AzureML Data Scientist" `
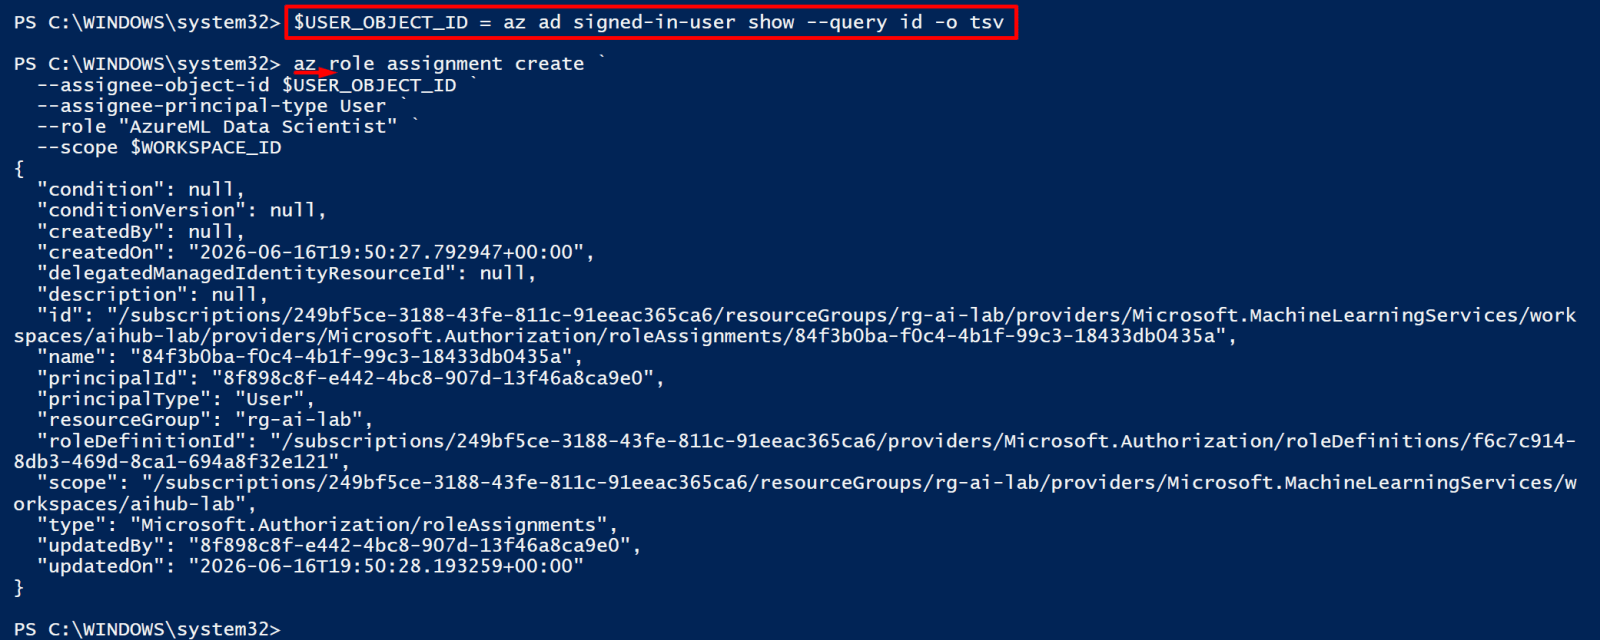
--scope $WORKSPACE_IDNote: This command assigns the AzureML Data Scientist role to your user account for that specific Azure ML workspace, giving you permission to create, manage, and use ML resources within the workspace.
✅Role assignment succeeded — "AzureML Data Scientist" granted, scoped to aihub-lab.

Azure AI Search - RAG Security
Azure AI Search is the retrieval layer in most Azure RAG architectures. An unsecured search index is a data leak waiting to happen - users can retrieve documents they shouldn't have access to. This chapter secures the full retrieval pipeline: RBAC on the index, document-level ACLs, and semantic filtering.
The Core RAG Security Problem
In a naive RAG implementation, all documents are in one index, and every user query retrieves from the full corpus. If HR documents and engineering specs live in the same index, a user asking about their salary might get back someone else's performance review as a retrieved chunk. The fix is a combination of index-level RBAC and document-level security trimming.
🚨Default Risk - No Per-Document Auth
Azure AI Search has no built-in per-document access control. If you don't implement security trimming, every user who can query your index can retrieve every document in it, regardless of the document's original access controls.
Step 1 - Enable RBAC-Only Authentication
Just like OpenAI, AI Search uses admin API keys by default. Disable them and switch to RBAC-only mode so every access requires a valid Azure AD token.
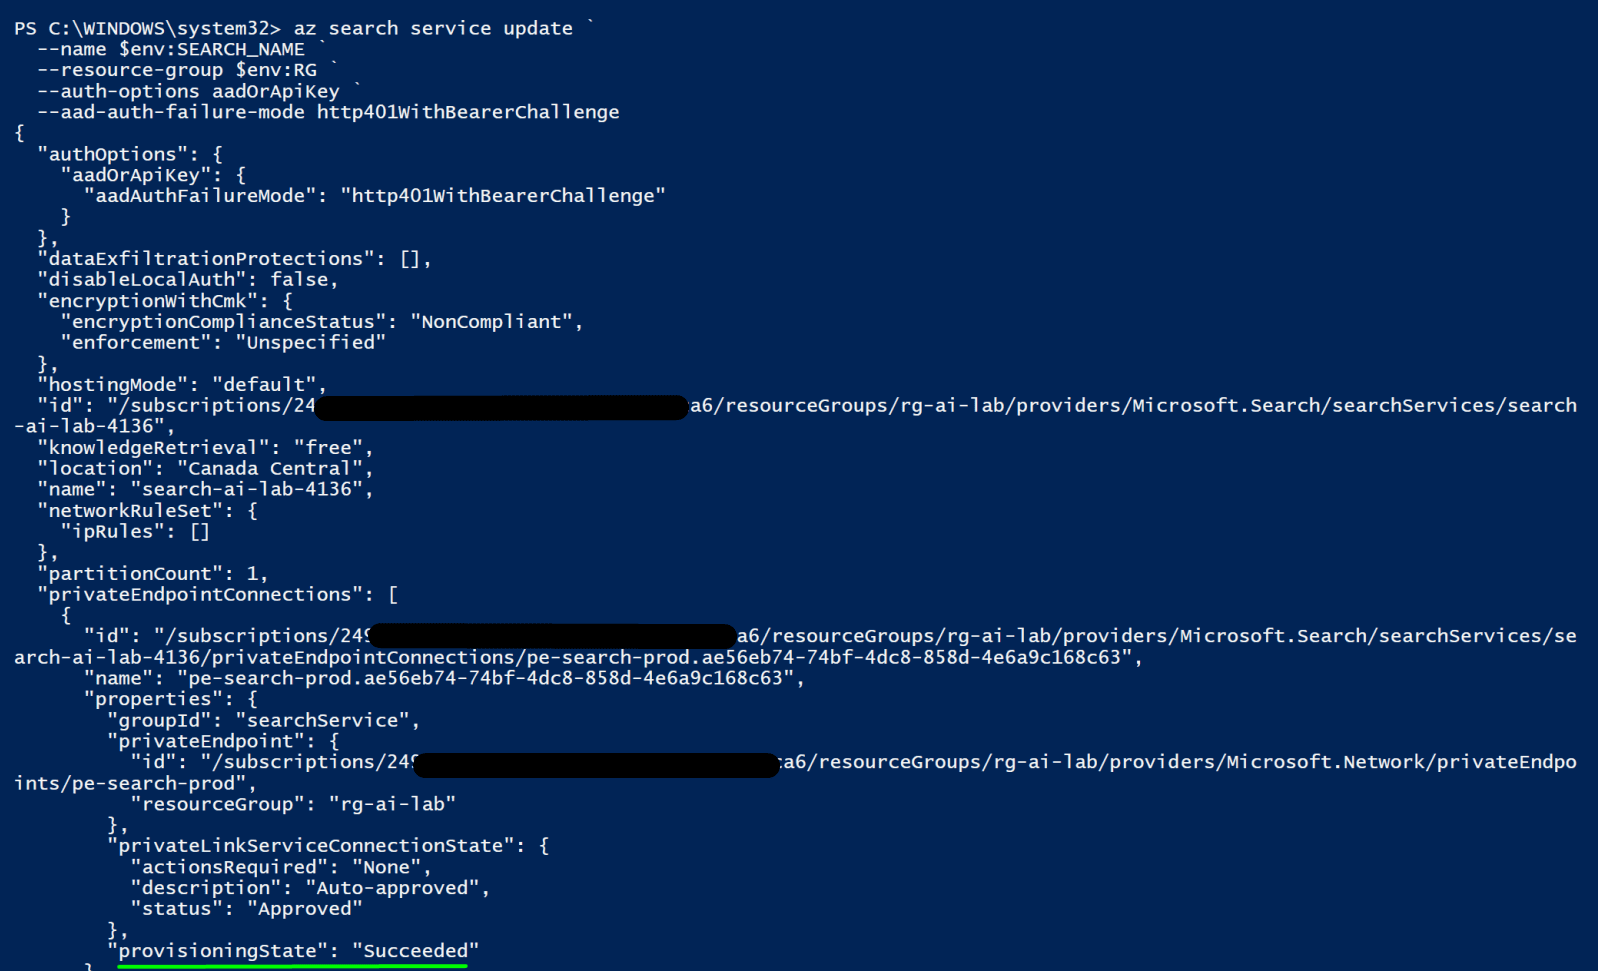
Enable Azure AD authentication for Azure AI Search
az search service update `
--name $env:SEARCH_NAME `
--resource-group $env:RG `
--auth-options aadOrApiKey `
--aad-auth-failure-mode http401WithBearerChallengeNote: We run this command before to enable Azure AD authentication for Azure AI Search and require users to authenticate securely before accessing the service.
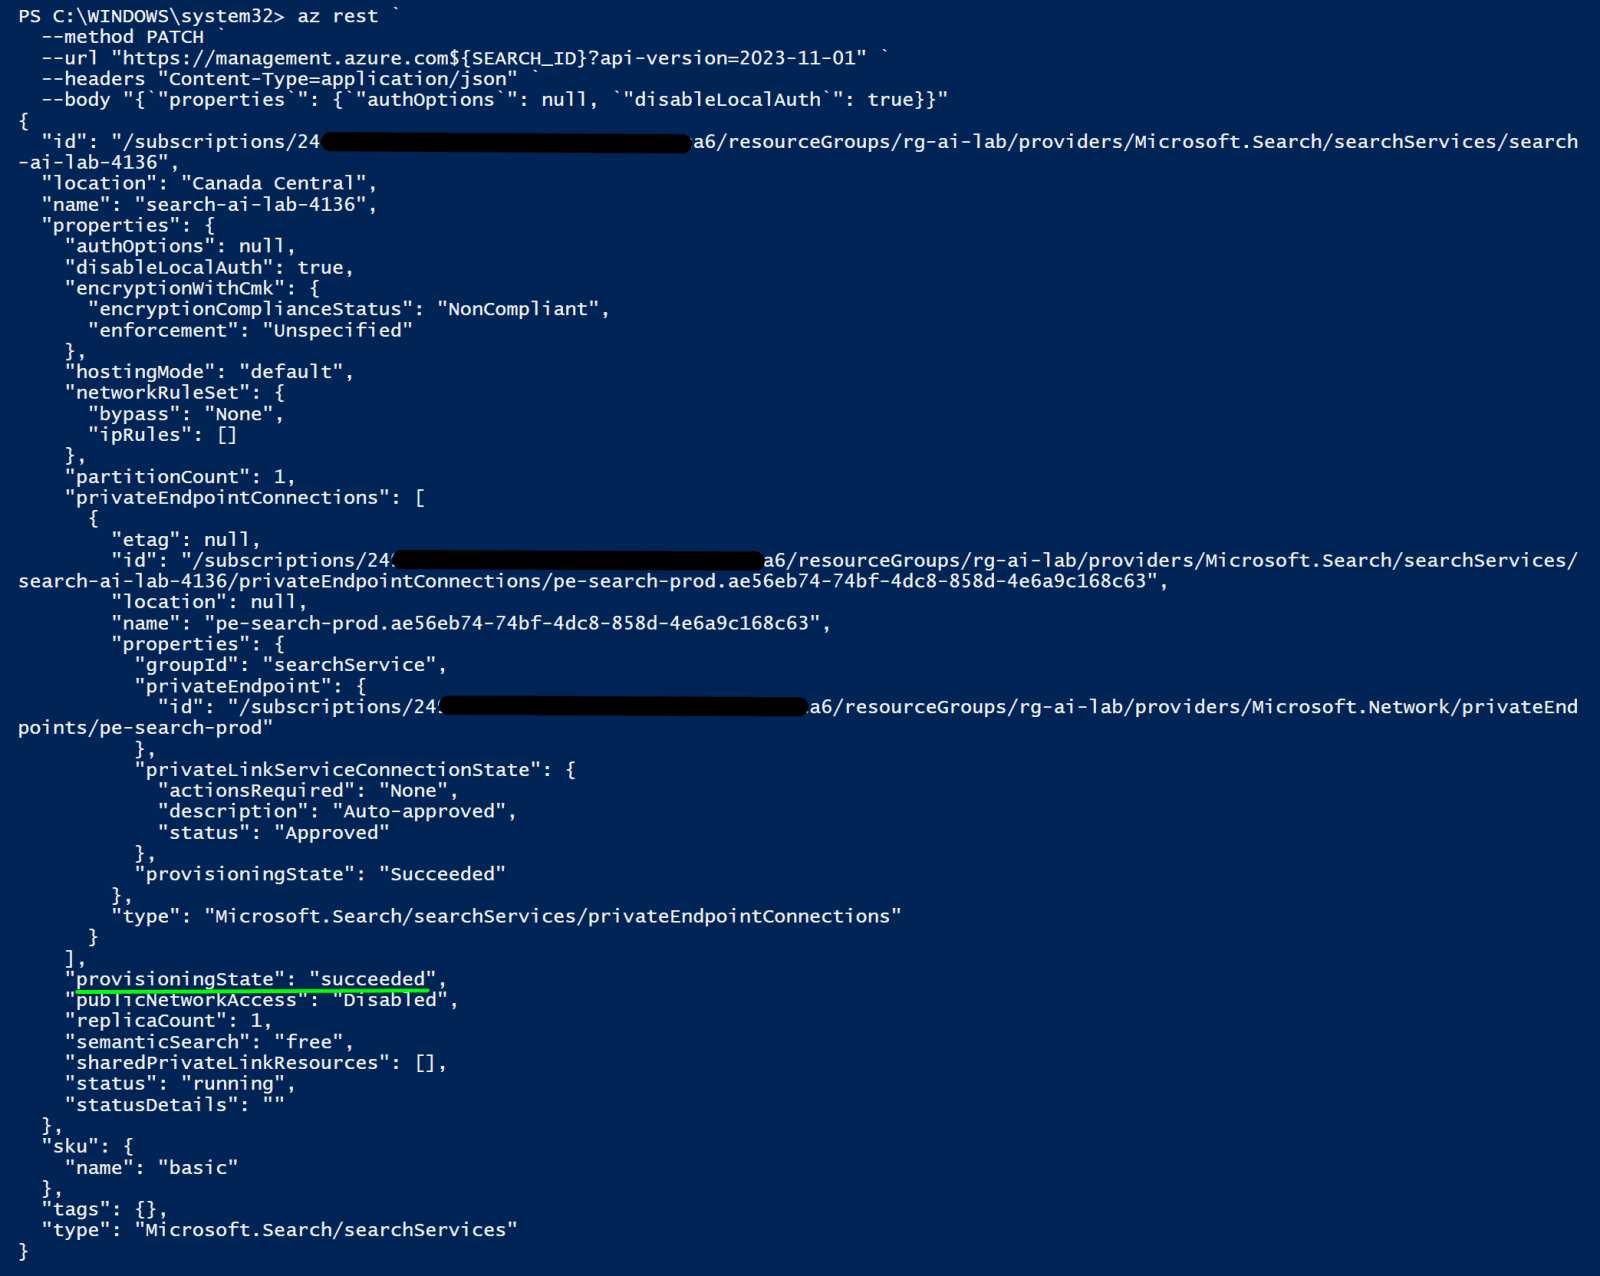
Disable API key authentication (LocalAuth), enforce RBAC
az rest `
--method PATCH `
--url "https://management.azure.com${SEARCH_ID}?api-version=2023-11-01" `
--headers "Content-Type=application/json" `
--body "{`"properties`": {`"authOptions`": null, `"disableLocalAuth`": true}}"Note: We execute this command to disable API key authentication on Azure AI Search and enforce Azure AD (Entra ID)–only access for stronger security.
Assign Search Index Data Reader to your app identity
az role assignment create `
--assignee-object-id $PRINCIPAL_ID `
--assignee-principal-type ServicePrincipal `
--role "Search Index Data Reader" `
--scope $SEARCH_ID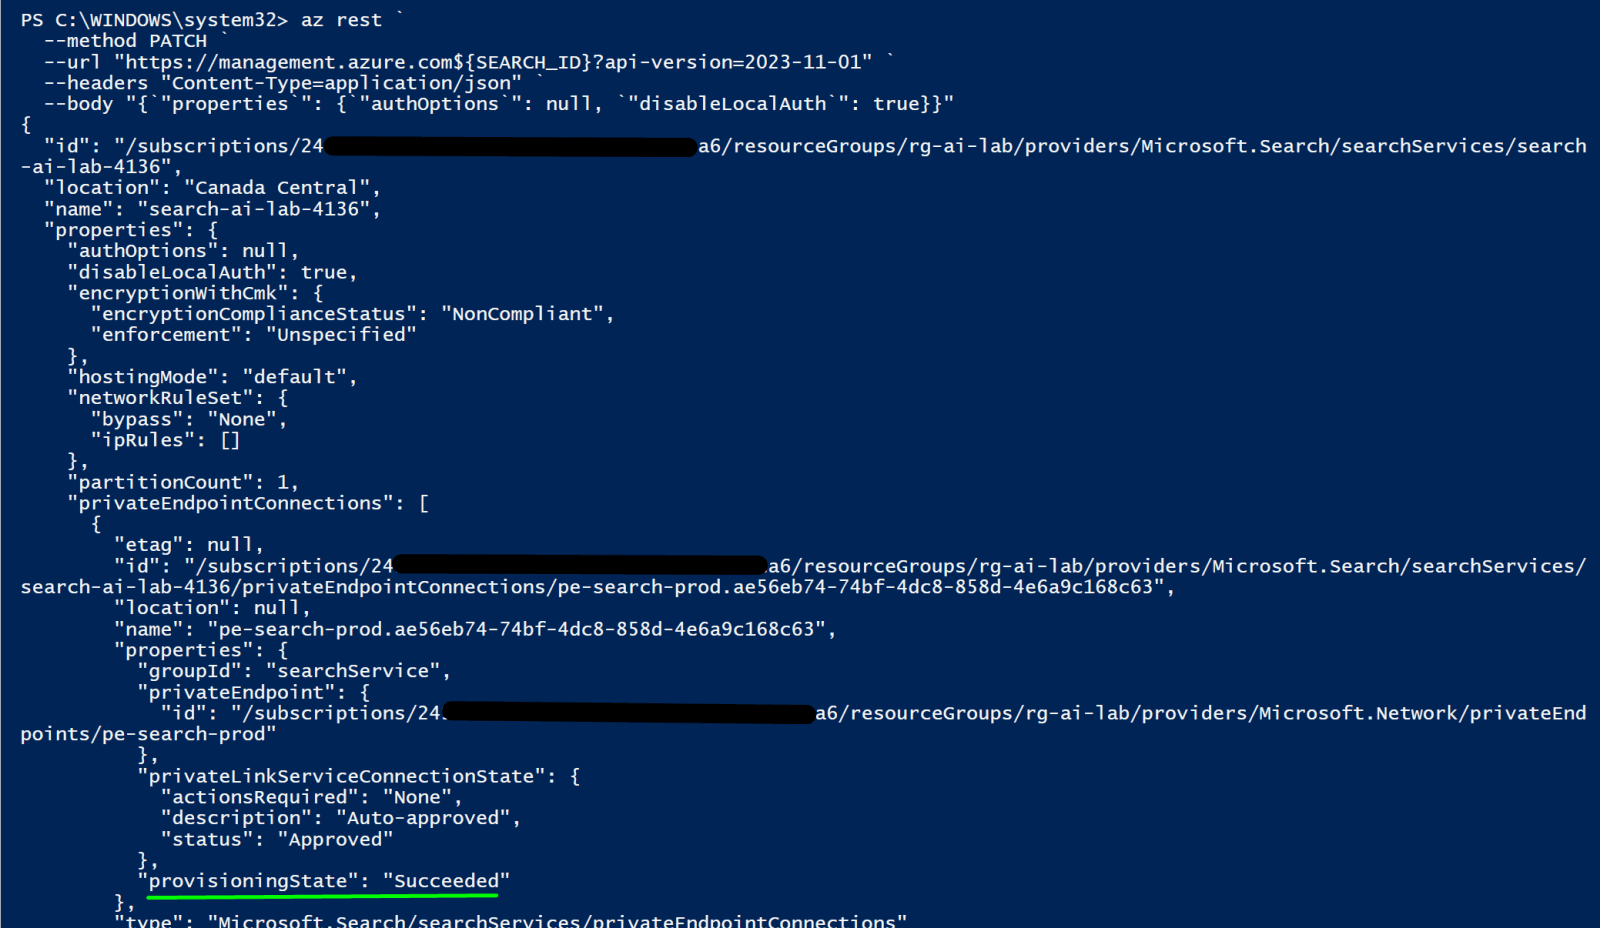
Azure ML & Prompt Flow
This lab uses a Hub workspace only - a dedicated Project was not provisioned, so endpoint deployment is skipped here but the commands apply directly when a Project exists.
Azure ML manages training compute and model lifecycle. Prompt Flow builds and deploys LLM pipelines. Both introduce new attack surfaces: training data poisoning, insecure inference endpoints, and pipeline injection. This chapter hardens both.
Step 1 - Harden Inference Endpoints
When you deploy a Prompt Flow as a managed online endpoint, Azure creates an HTTP endpoint. By default it uses key-based auth. Switch it to token-based auth, restrict the compute SKU, and enable traffic mirroring for audit.
NoteOnline endpoints must be created under an AI Foundry Project, not the Hub. Use --workspace-name
az ml online-endpoint create `
--name "pf-endpoint-prod" `
--resource-group $env:RG `
--workspace-name $env:HUB_NAME `
--auth-mode aad_token
Step 2 - Prompt Flow Input Validation
Prompt Flow lets you build LLM pipelines with Python nodes. Any Python node that accepts user input is a potential injection point. Add a validation node at the start of every flow that sanitizes inputs before they reach the LLM or any tool calls.
Note: Input validation should be implemented as the first node in every Prompt Flow pipeline. Validate length, normalize unicode, and scan for injection patterns before any input reaches the LLM or tool calls.
Note: This lab does not deploy a Prompt Flow pipeline - validation node implementation applies when building flows in AI Foundry Studio.
Azure AI Content Safety deployment
Content Safety is not a simple regex filter - it uses a fine-tuned classification model trained on adversarial examples. It provides four key capabilities you can't easily replicate yourself: prompt shield (injection detection), groundedness check (hallucination detection), harmful content filtering, and protected material detection.
Step 1 - Create Content Safety Resource
add $CS_NAME = "cs-ai-lab-4136" to set-env.ps1.
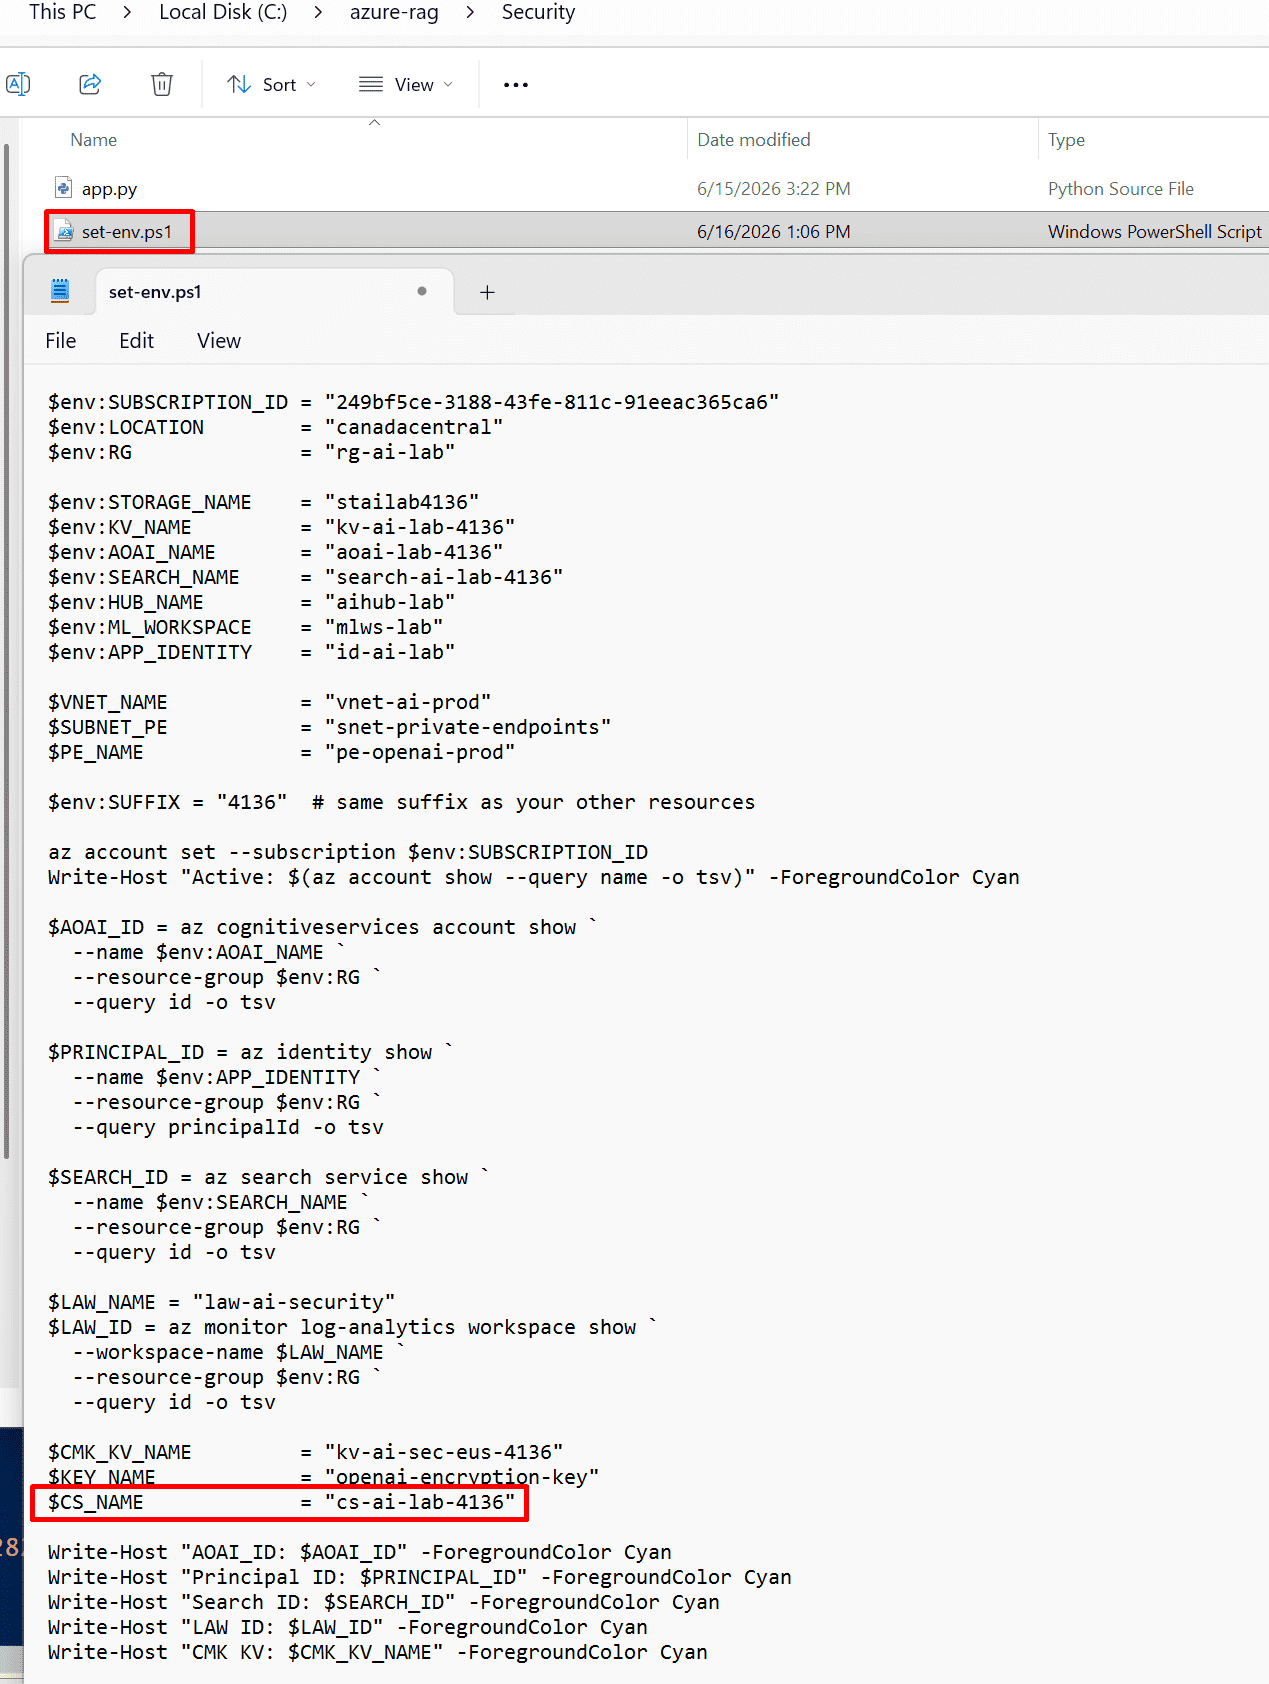
Create an Azure AI Content Safety service so our AI application can automatically moderate prompts and responses for harmful or unsafe content.
$CS_NAME = "cs-ai-lab-4136"
az cognitiveservices account create `
--name $CS_NAME `
--resource-group $env:RG `
--kind ContentSafety `
--sku S0 `
--location $env:LOCATION `
--yes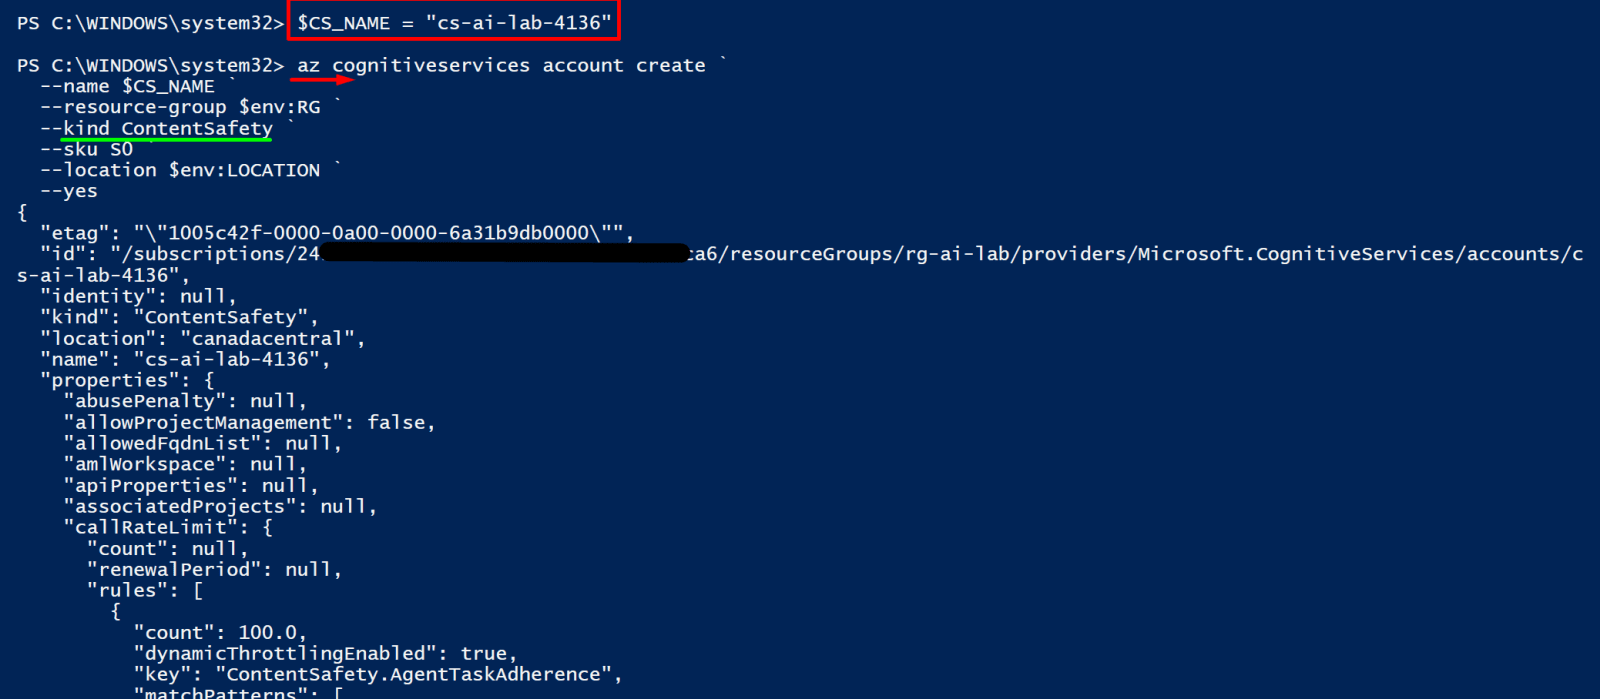
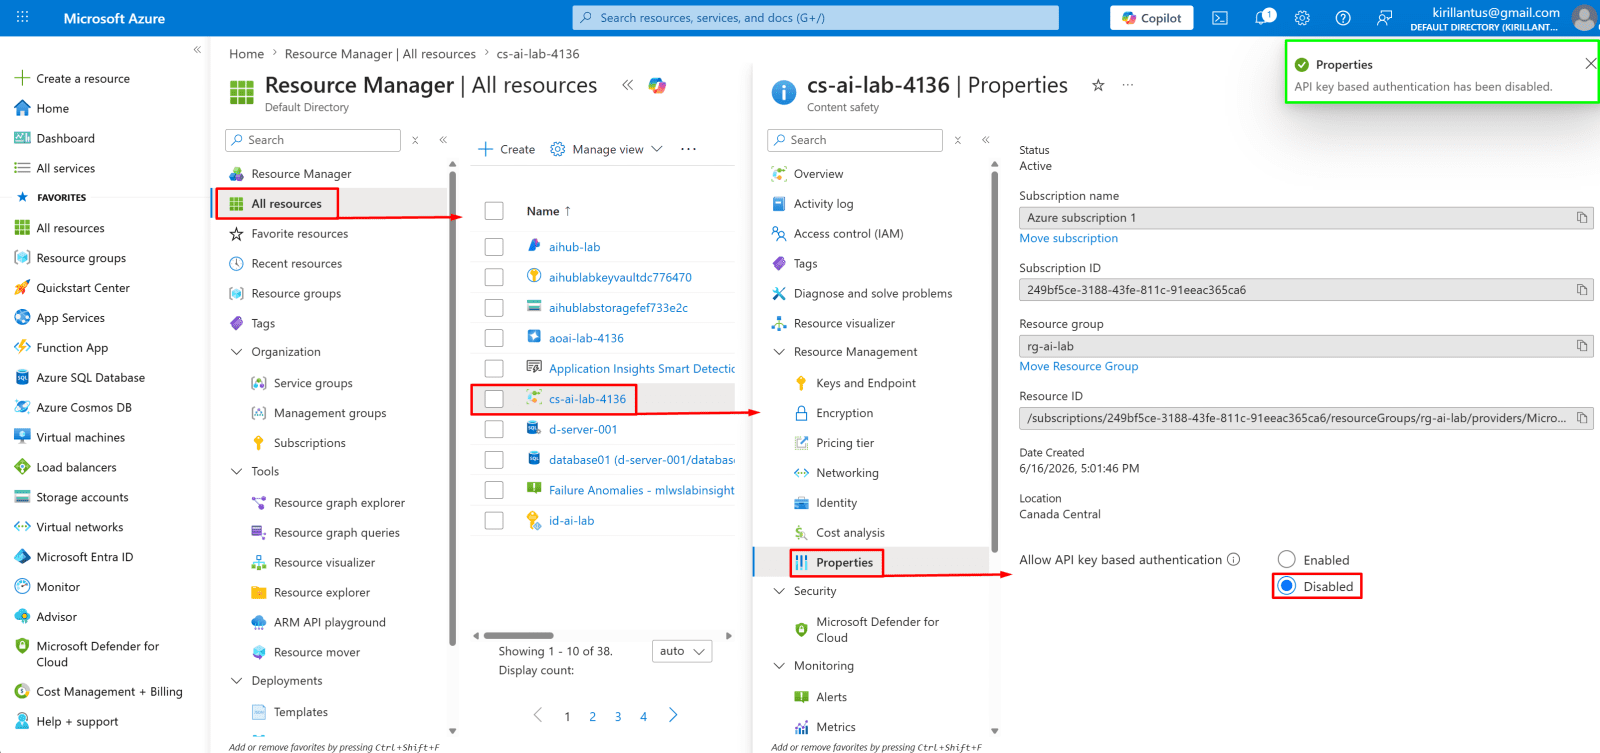
Disable LocalAuth, use the portal Properties blade like you did for OpenAI.
Microsoft Defender for AI
Microsoft Defender for AI (formerly Defender for Cloud AI workloads) provides runtime threat detection for Azure AI services. It watches your AI workloads and fires alerts for anomalous access patterns, credential abuse, and model extraction attempts.
Step 1 - Enable Defender for AI
Defender for AI is a plan on Defender for Cloud. Enabling it activates threat detection for all Azure OpenAI and Cognitive Services resources in the subscription. It monitors control-plane operations (who created resources, who changed configs) and data-plane signals (anomalous API usage patterns).
Make sure the Az.Security module is loaded - if not:
Install-Module -Name Az.Security -Force -AllowClobber
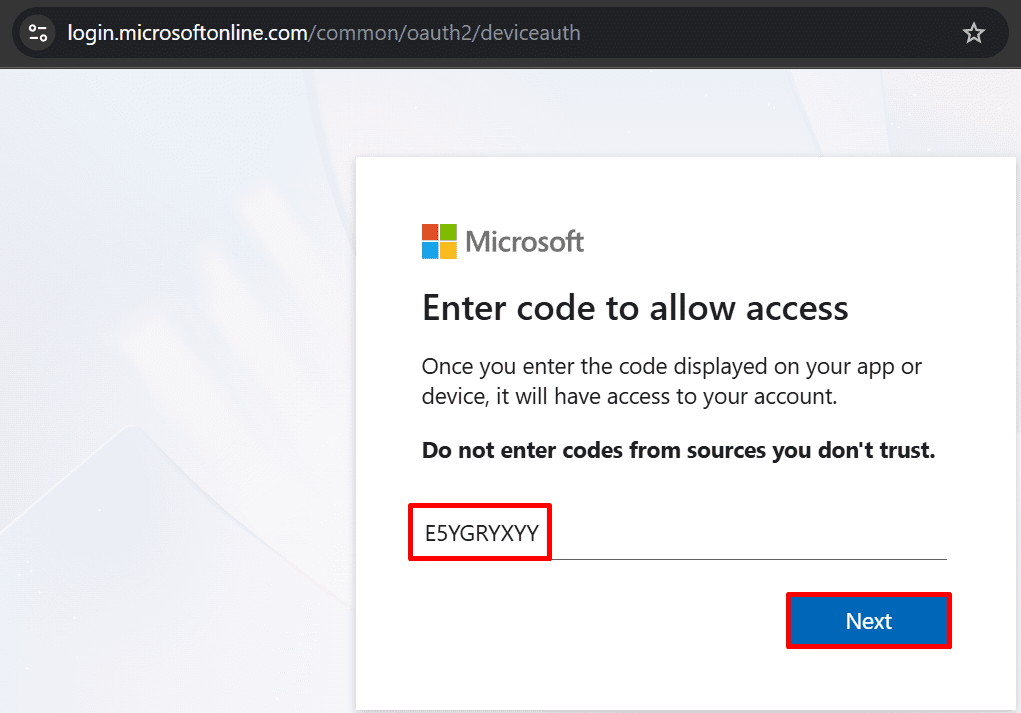
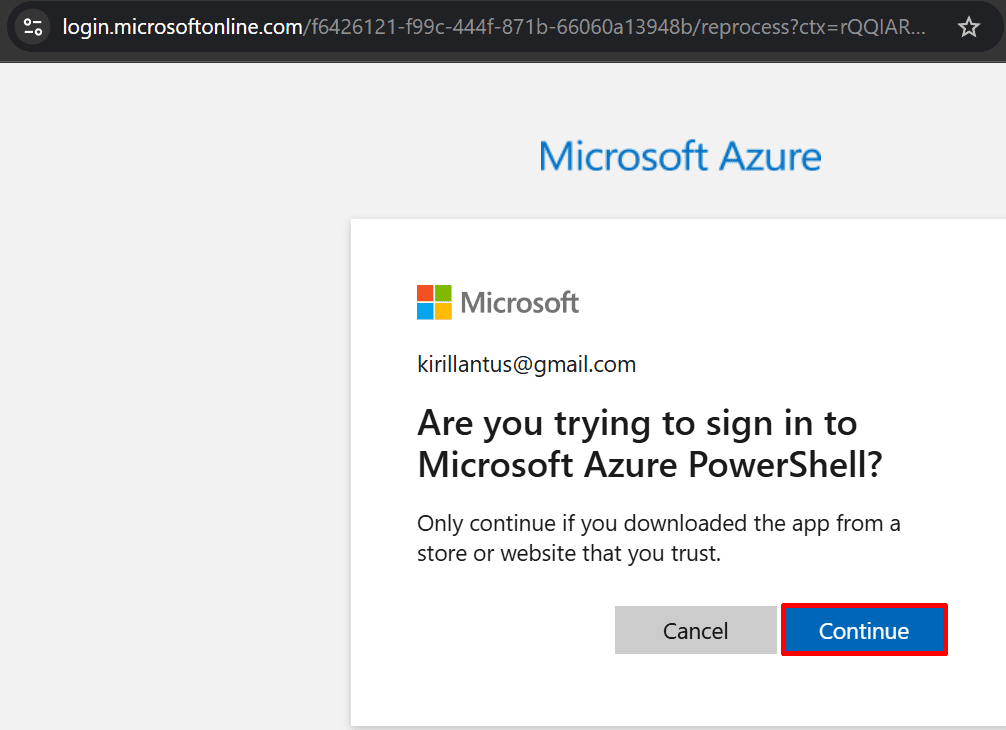
Use device code auth:
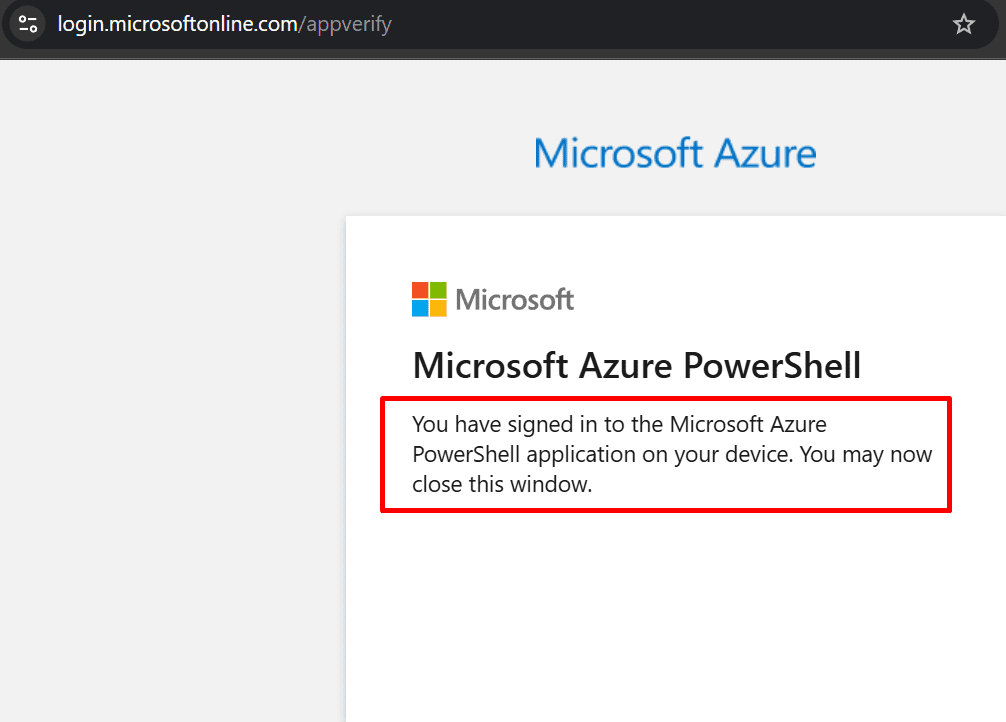
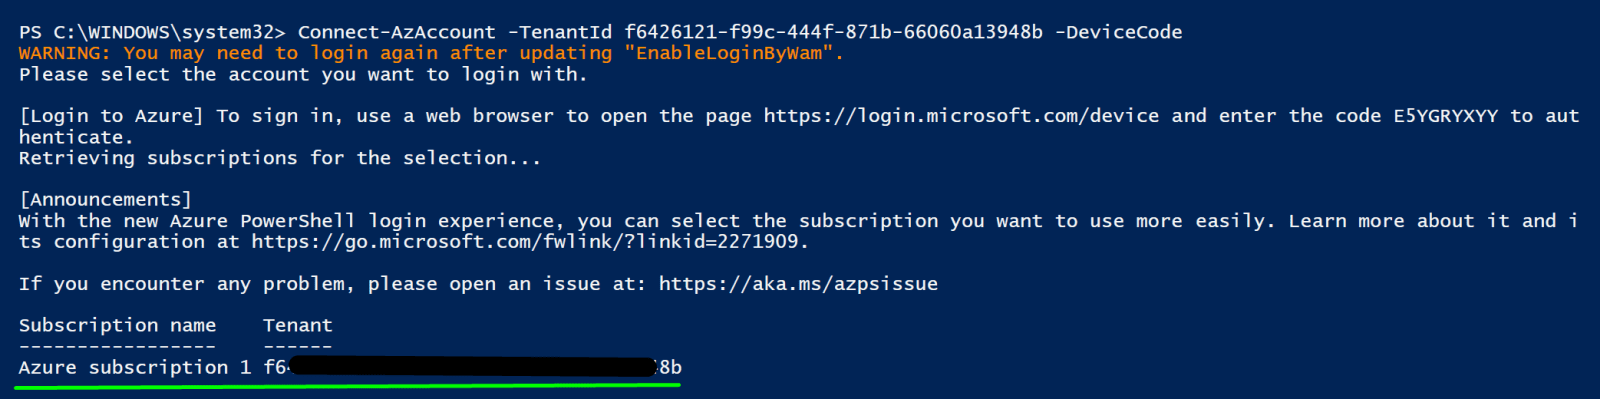
Connect-AzAccount -TenantId f6426121-f99c-444f-871b-66060a13948b -DeviceCodeNote: Connect-AzAccount -TenantId
it's an authentication method that supports your organization's sign-in requirements, including MFA (Multi-Factor Authentication) if it's enabled for your account. After entering the device code, you'll complete the normal Microsoft sign-in process, which may include MFA verification.

Enable Defender for Cloud AI services plan
Set-AzSecurityPricing -Name "AI" -PricingTier "Standard"
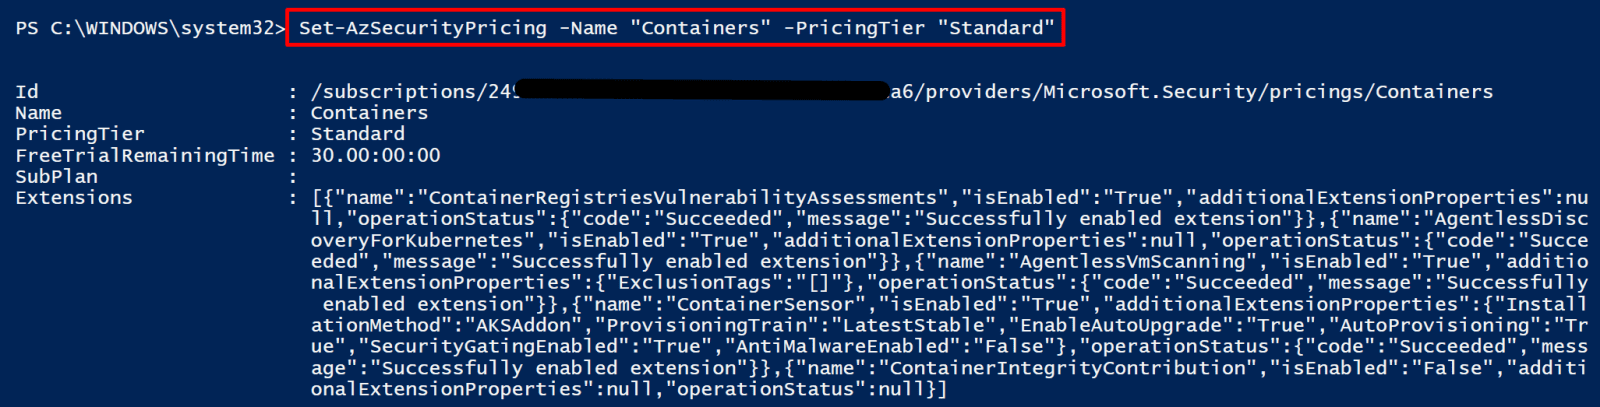
Enables the Containers protection plan
Set-AzSecurityPricing -Name "Containers" -PricingTier "Standard"Note: Containers (covers AKS, container workloads including ML containers)
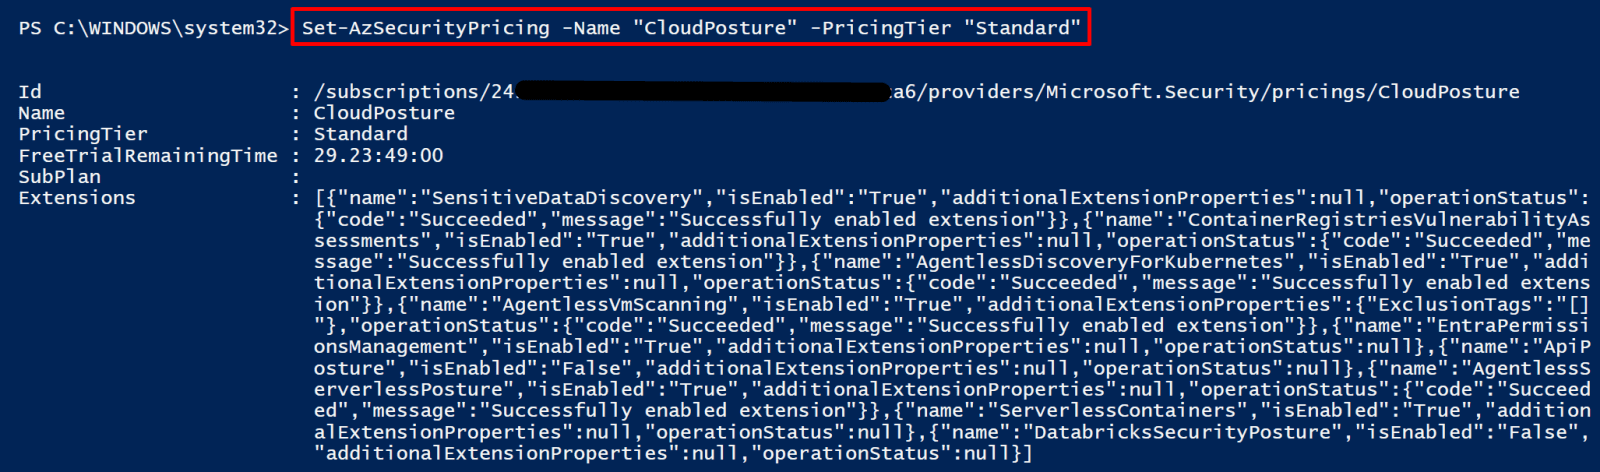
Enable Microsoft Defender for Cloud's Cloud Security Posture Management (CSPM). Cloud security posture (CSPM - catches misconfigs across all resources including ML)
Set-AzSecurityPricing -Name "CloudPosture" -PricingTier "Standard"Note: Standard tier, providing advanced security recommendations, attack path analysis, risk assessment, and compliance monitoring across your Azure environment.
Verify enabled plans
Get-AzSecurityPricing | Where-Object { $_.PricingTier -eq "Standard" } | Select-Object -ExpandProperty Name
Step 2 - Configure Alert Notifications
Alerts only matter if someone sees them. Set up an action group that sends critical AI security alerts to your SOC team immediately. Defender for AI generates alerts for things like: credentials appearing in prompts, model extraction via enumeration, access from Tor exit nodes, and anomalous token consumption.
Create email receiver object
$receiver = New-AzActionGroupEmailReceiverObject `
-Name "soc-lead" `
-EmailAddress "soc@yourcompany.com"
Create action group
$ag = New-AzActionGroup `
-Name "ag-ai-security-soc" `
-ResourceGroupName $env:RG `
-ShortName "AISecurity" `
-Location "global" `
-EmailReceiver $receiver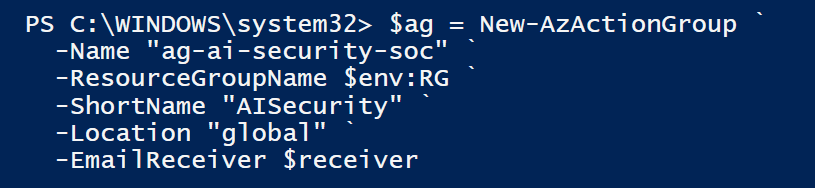
Build condition
$condition = New-AzActivityLogAlertAlertRuleAnyOfOrLeafConditionObject `
-Equal "Security" `
-Field "category"
Create activity log alert
Retrieve the Azure Resource ID of the Action Group named ag-ai-security-soc and store it in $AG_ID
$AG_ID = (Get-AzActionGroup -Name "ag-ai-security-soc" -ResourceGroupName $env:RG).Id
Write-Host $AG_IDNote: This command retrieves the Azure Resource ID of the Action Group named ag-ai-security-soc and stores it in $AG_ID so it can be used later when creating security alerts, monitoring rules, or automated notifications. The second line simply displays the ID on the screen.

Create an Action Group object from the Action Group ID stored in $AG_ID
$agObj = New-AzActivityLogAlertActionGroupObject -Id $AG_IDNote: This command creates an Action Group object from the Action Group ID stored in $AG_ID, so it can be attached to Azure Activity Log alerts and used to send notifications (email, SMS, webhook, etc.) when an alert is triggered.

Create and enable an Azure Activity Log Alert
New-AzActivityLogAlert `
-Name "ai-high-severity-defender-alert" `
-ResourceGroupName $env:RG `
-Location "global" `
-Scope "/subscriptions/$SUB_ID" `
-Condition $condition `
-Action $agObj `
-Enabled $true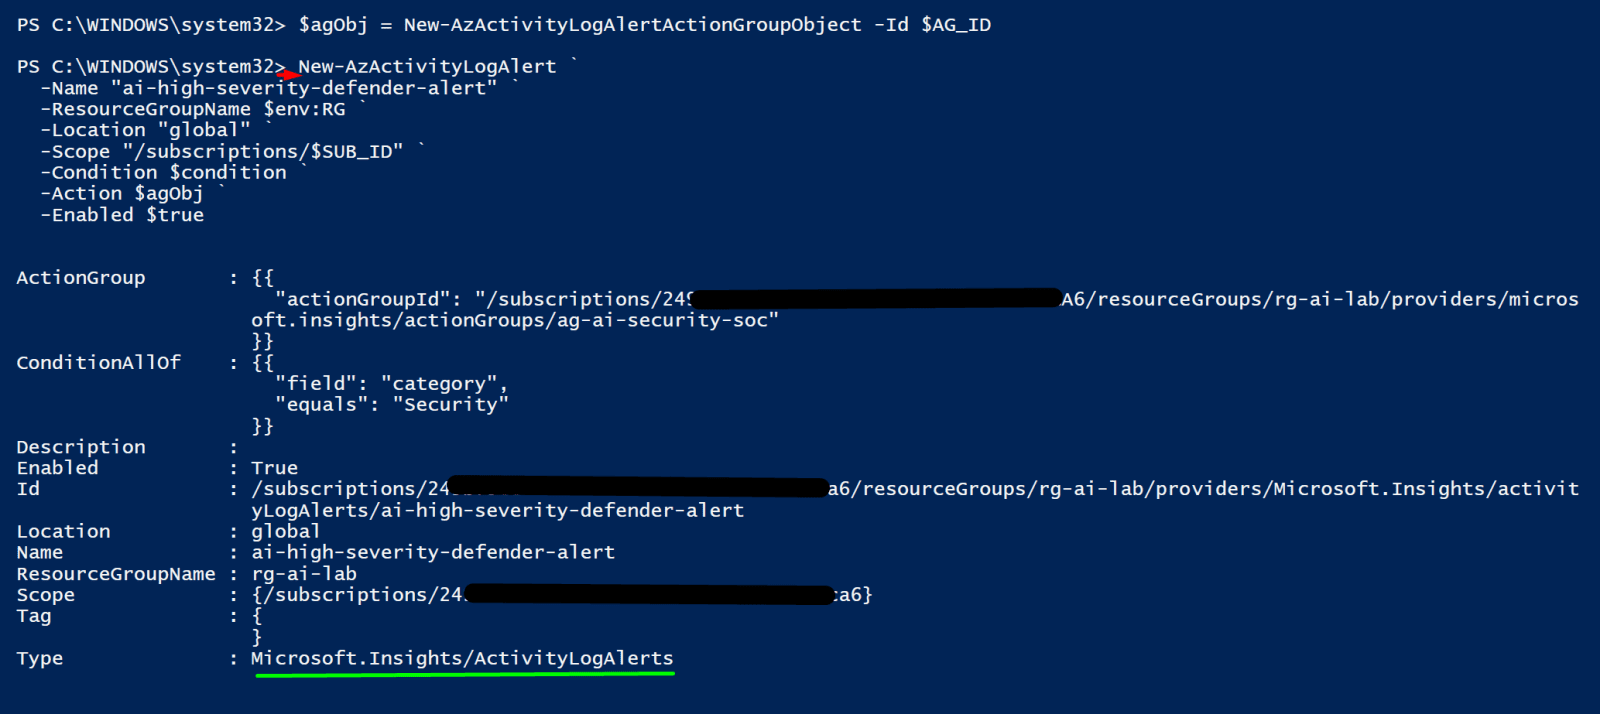
Step 3 - Integrate with Microsoft Sentinel
Go to azure portal → search Microsoft Sentinel
Click law-ai-security
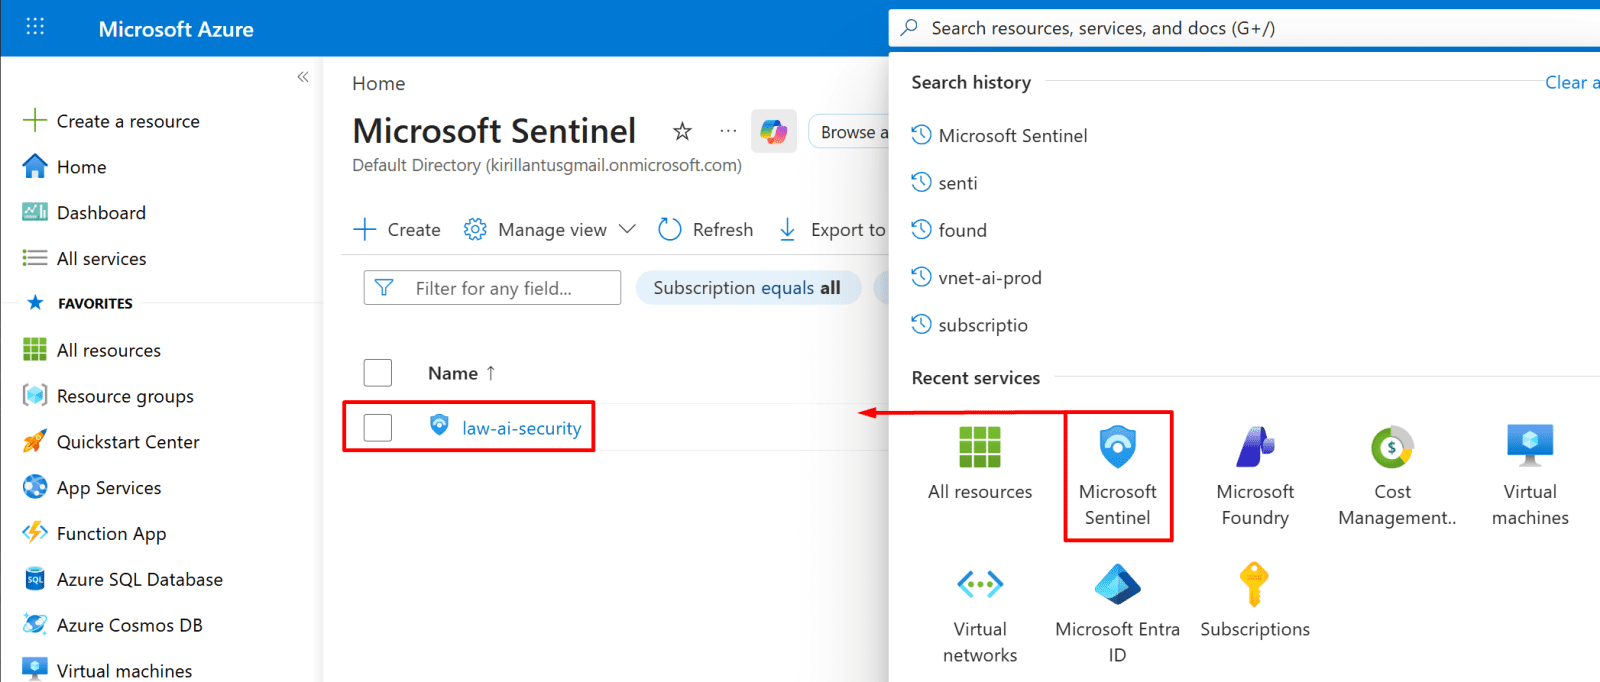
In the left menu click Data connectors
Click "More content at Content Hub"
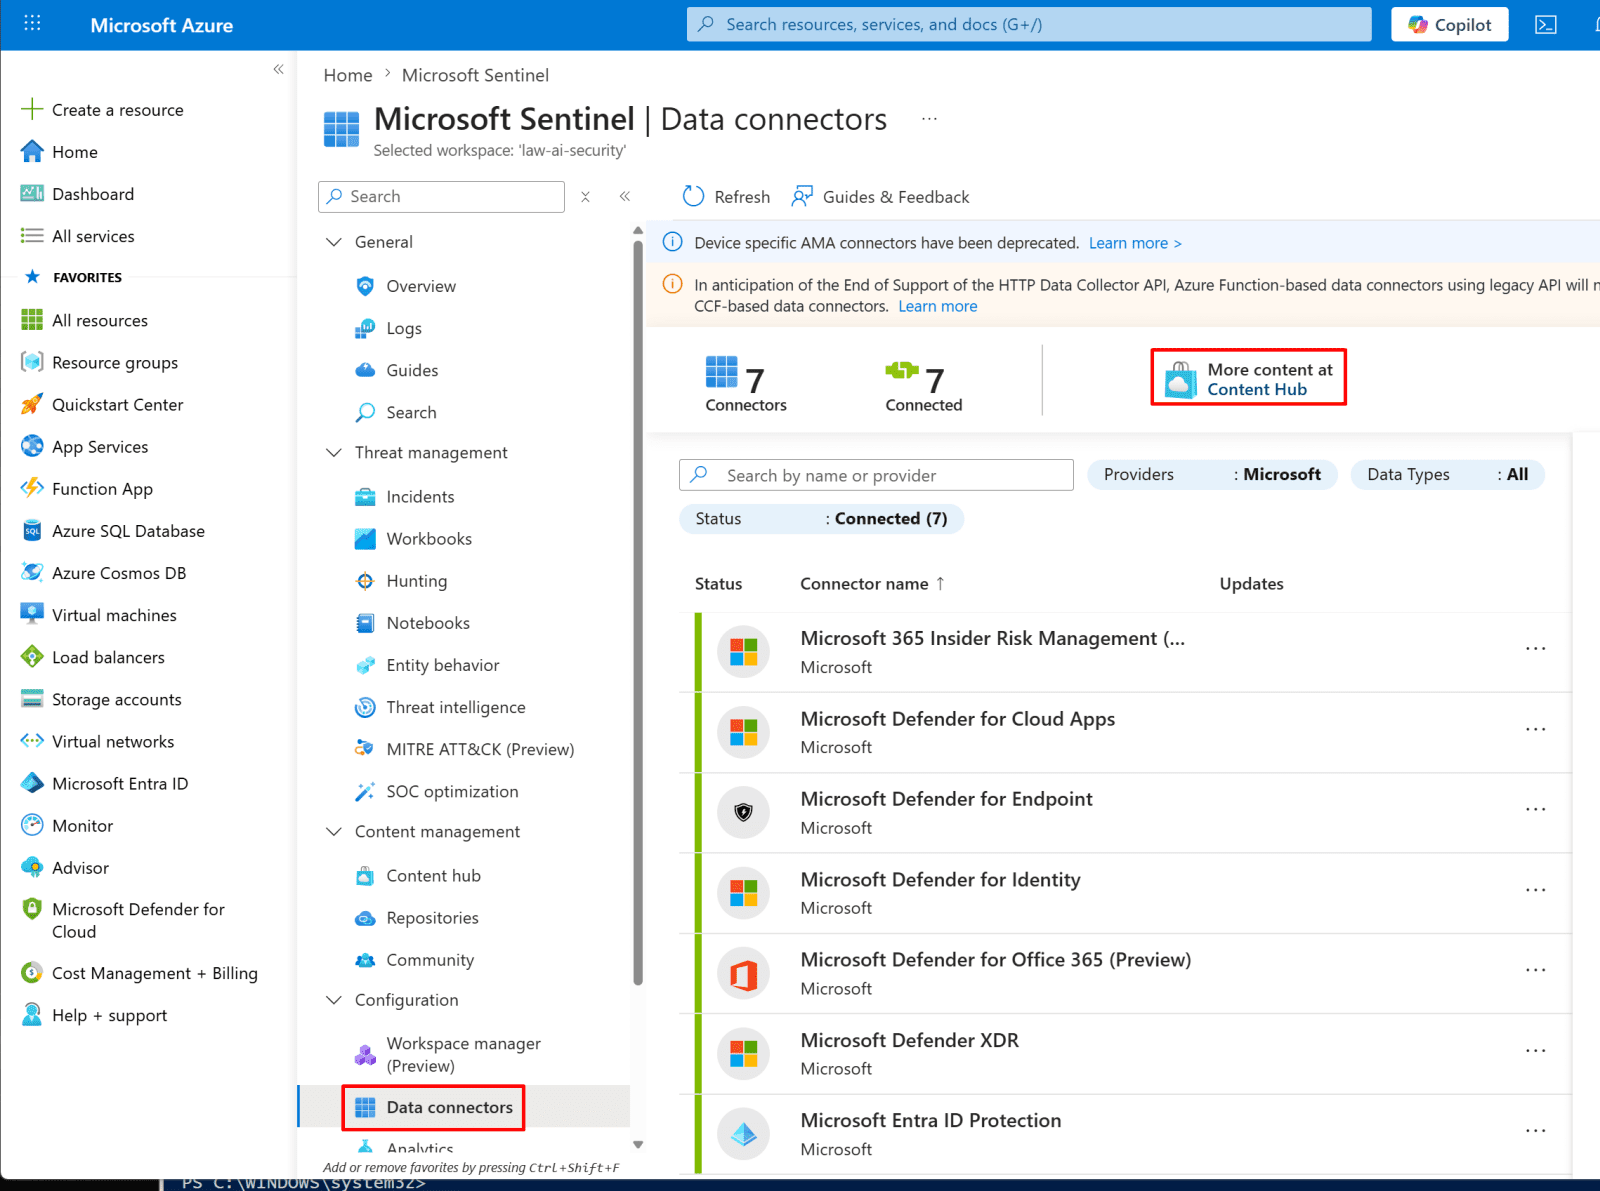
Search "Microsoft Defender for Cloud" → install it → Click manage
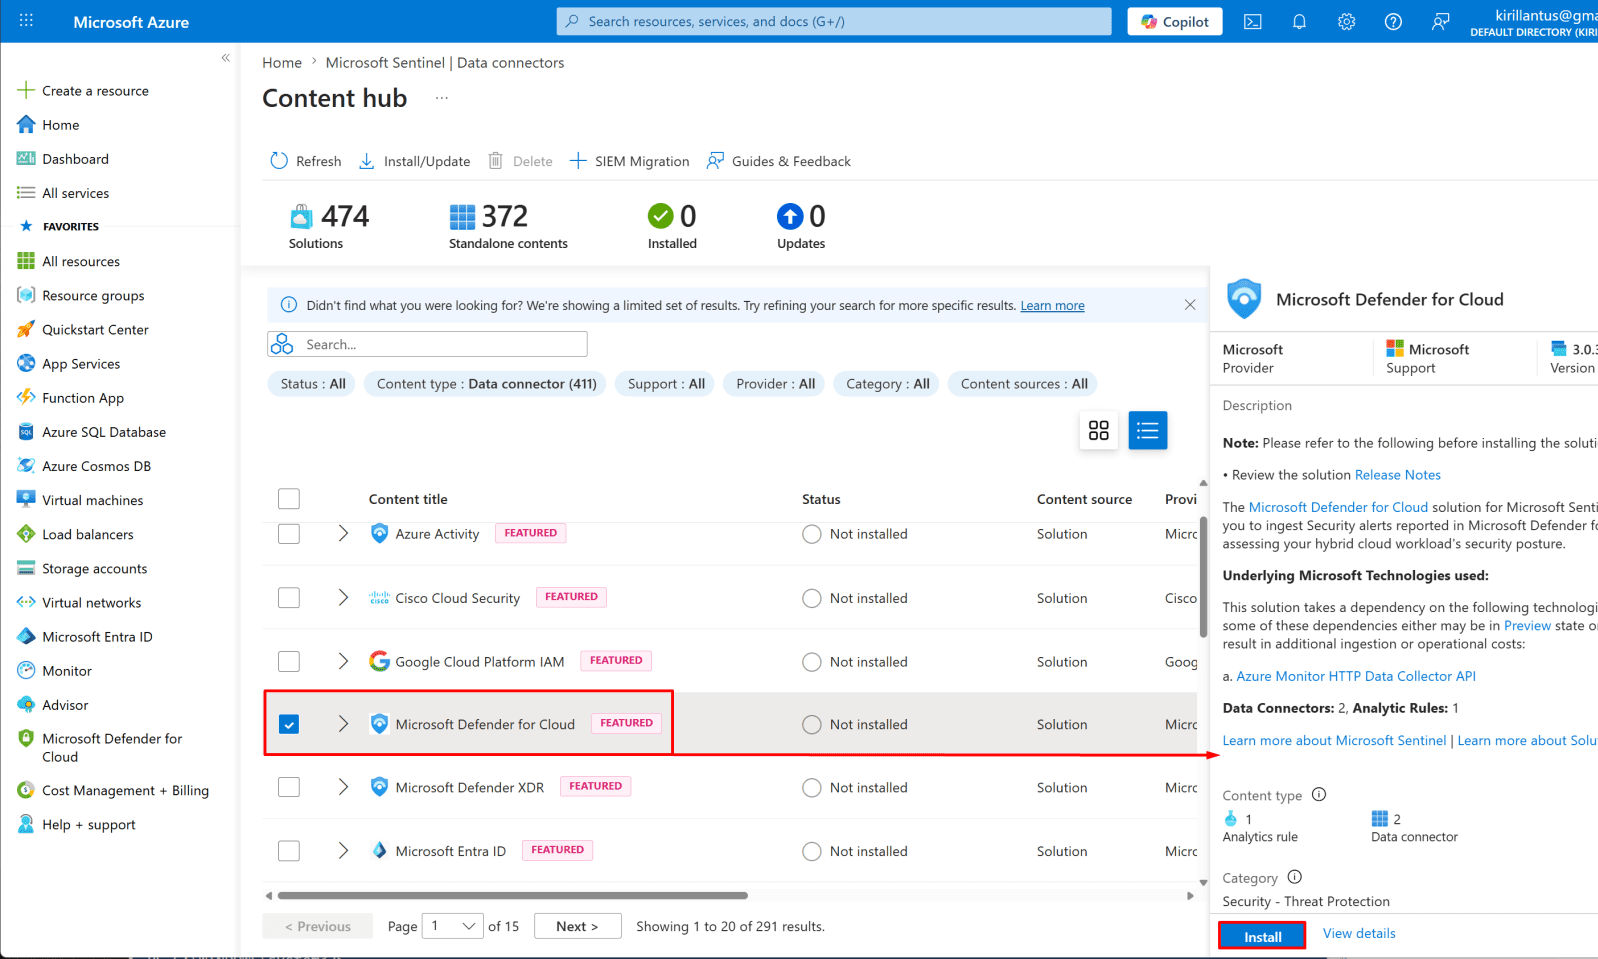
Connect your subscription.
Click Data connectors in the left menu
Clear the search filter
Find "Microsoft Defender for Cloud" → click it → Open connector page
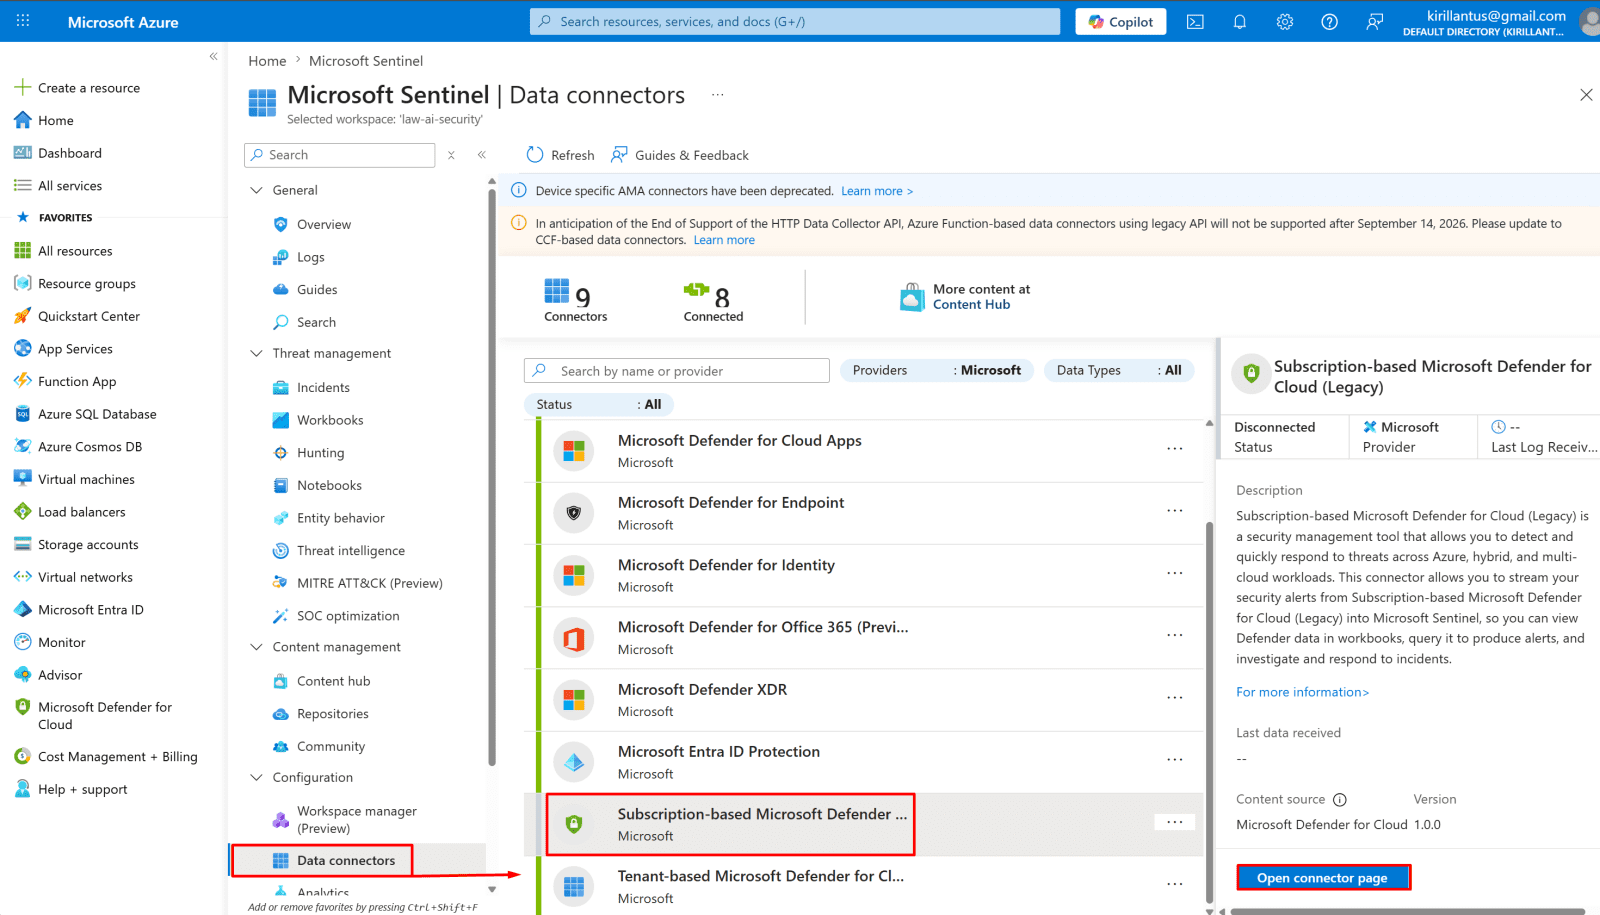
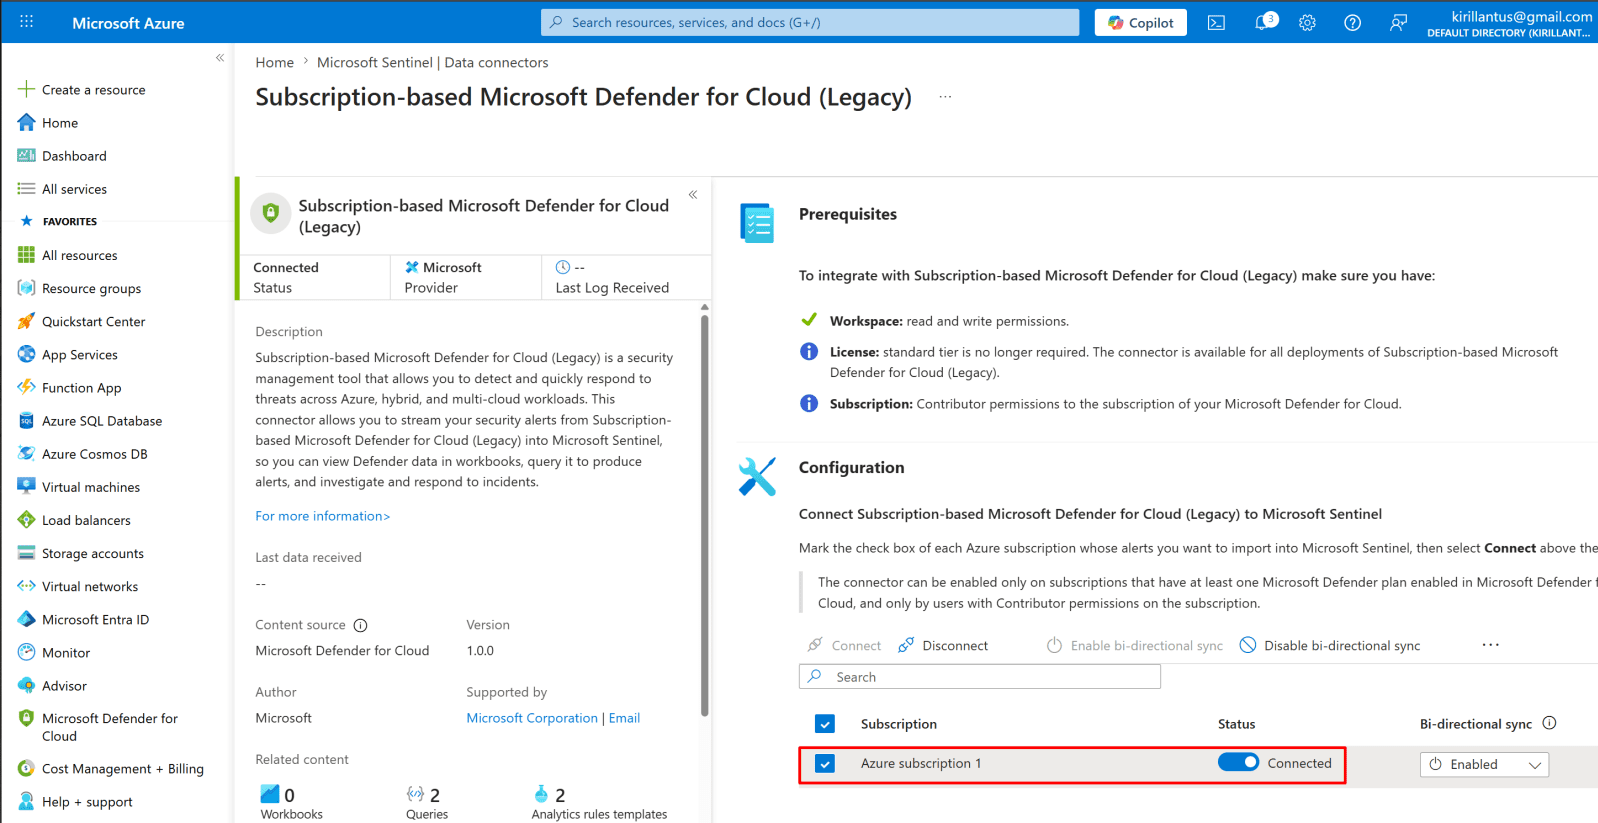
Under Configuration → select your subscription → click
Note: Connected. Azure subscription 1 shows status Connected with bi-directional sync enabled.
Red Team Lab - Attack Your Deployment
Every control from the previous chapters gets tested here. You attack your own Azure AI deployment to verify that hardening actually works. No surprises in production.
Lab Environment Only
Run all of these tests against a dedicated test subscription or resource group with no production data. Never run attack scripts against production deployments without written authorization. The goal is to confirm your controls work, not to cause an incident.
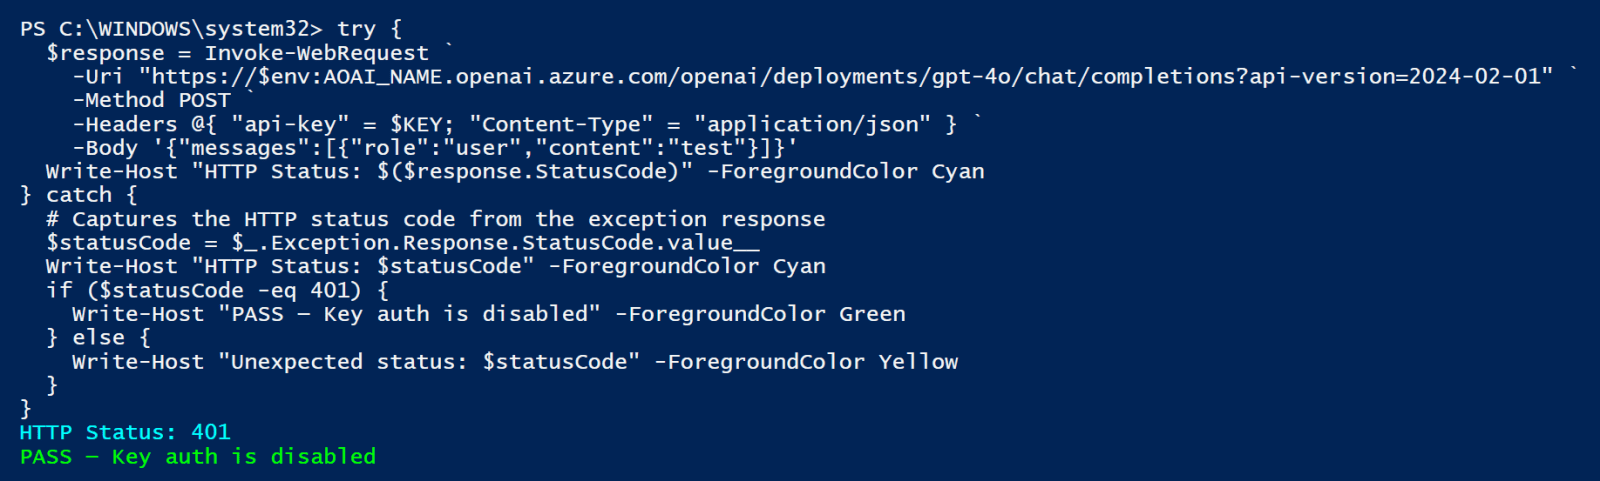
Test 1 - Verify API Keys Are Disabled
The first thing to confirm: raw API key calls should fail with 401. This tests Chapter 01's key-disabling step.
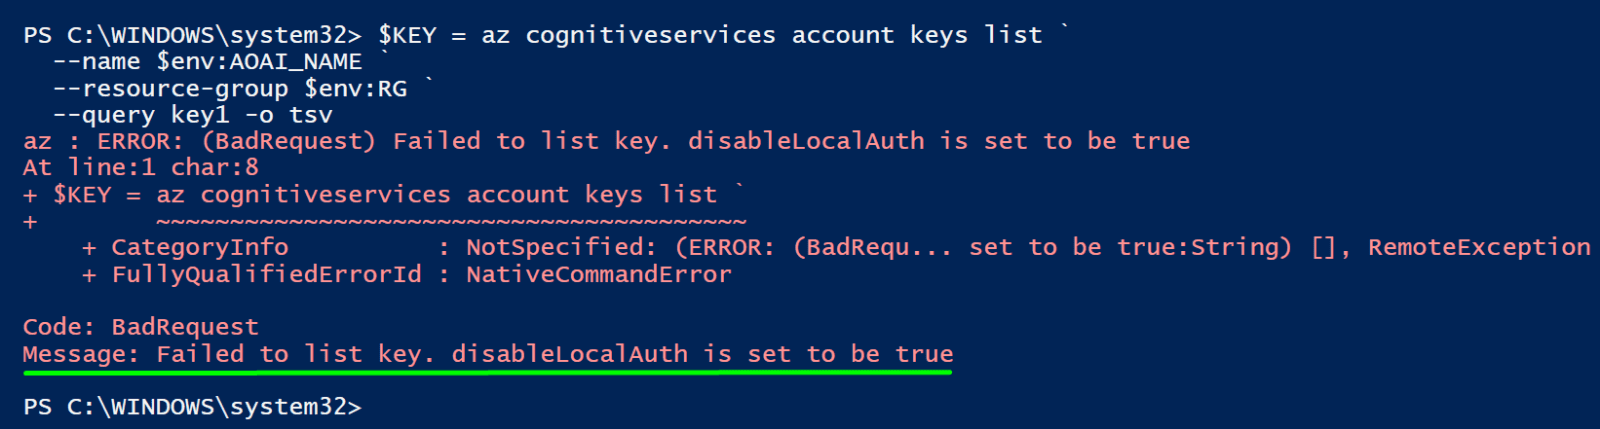
Retrieves one of the AOAI keys - they still exist in Azure but should be rejected if key auth was disabled in Chapter 01
$KEY = az cognitiveservices account keys list `
--name $env:AOAI_NAME `
--resource-group $env:RG `
--query key1 -o tsv
✅PASS Test 1 complete.
Key listing blocked at control plane level. disableLocalAuth=true prevents both key retrieval and key-based API calls. Chapter 01 hardening confirmed.
Attempt an API call using the raw key - expected to return 401 if hardening is in place
try {
$response = Invoke-WebRequest `
-Uri "https://$env:AOAI_NAME.openai.azure.com/openai/deployments/gpt-4o/chat/completions?api-version=2024-02-01" `
-Method POST `
-Headers @{ "api-key" = $KEY; "Content-Type" = "application/json" } `
-Body '{"messages":[{"role":"user","content":"test"}]}'
Write-Host "HTTP Status: $($response.StatusCode)" -ForegroundColor Cyan
} catch {
# Captures the HTTP status code from the exception response
$statusCode = $_.Exception.Response.StatusCode.value__
Write-Host "HTTP Status: $statusCode" -ForegroundColor Cyan
if ($statusCode -eq 401) {
Write-Host "PASS — Key auth is disabled" -ForegroundColor Green
} else {
Write-Host "Unexpected status: $statusCode" -ForegroundColor Yellow
}
}
✅PASS -HTTP Status: 401. Key auth is confirmed disabled.
Test 2 - Verify Public Endpoint is Blocked
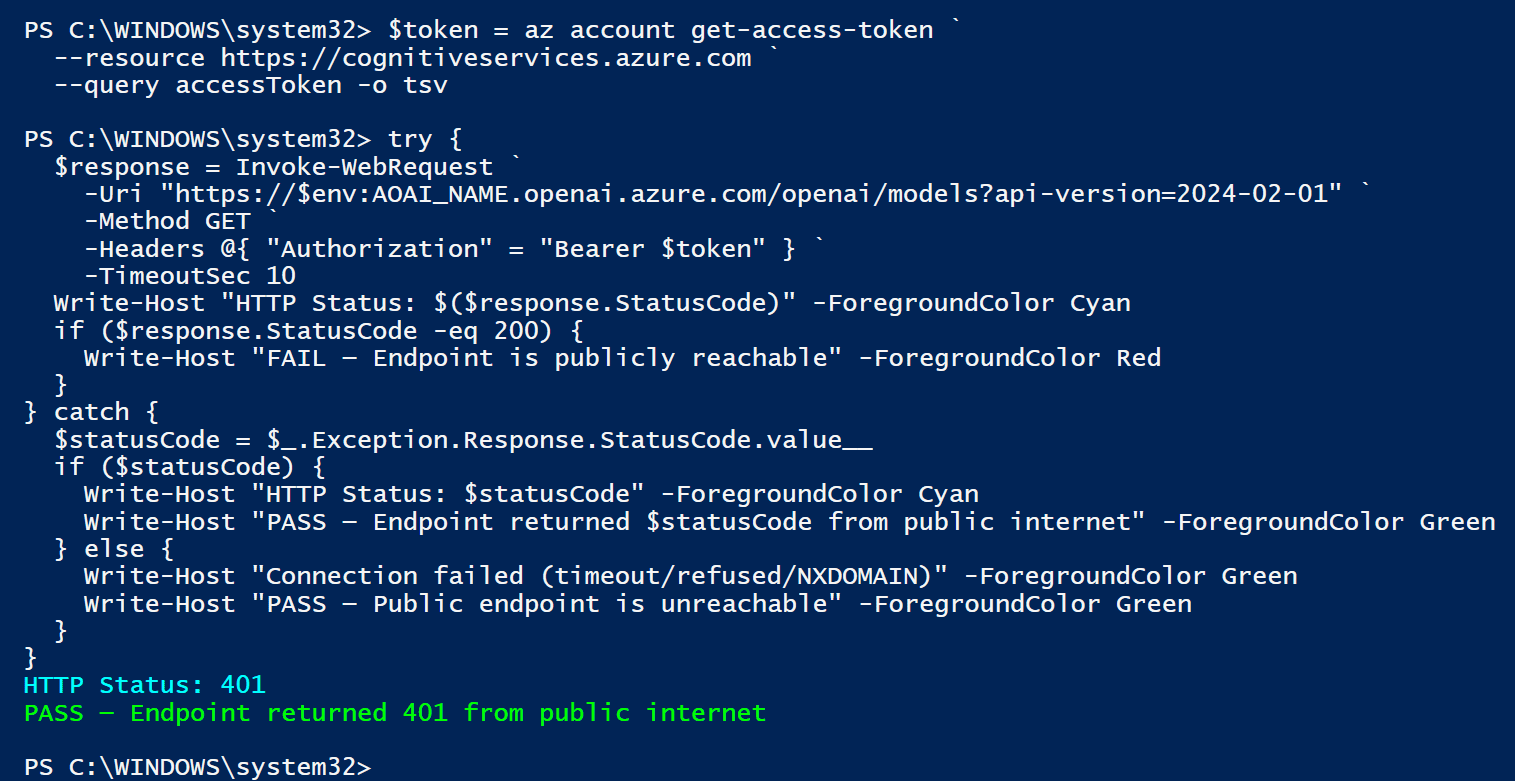
Test that the public endpoint is unreachable from outside the VNet. Run this from a machine outside your VNet (your workstation, a public cloud VM, etc.).
Test - public endpoint should be unreachable
1. Get a bearer token using your logged-in Azure identity
$token = az account get-access-token `
--resource https://cognitiveservices.azure.com `
--query accessToken -o tsv

Attempt to reach the public AOAI endpoint - should timeout or be refused if private endpoint is enforced
try {
$response = Invoke-WebRequest `
-Uri "https://$env:AOAI_NAME.openai.azure.com/openai/models?api-version=2024-02-01" `
-Method GET `
-Headers @{ "Authorization" = "Bearer $token" } `
-TimeoutSec 10
Write-Host "HTTP Status: $($response.StatusCode)" -ForegroundColor Cyan
if ($response.StatusCode -eq 200) {
Write-Host "FAIL — Endpoint is publicly reachable" -ForegroundColor Red
}
} catch {
$statusCode = $_.Exception.Response.StatusCode.value__
if ($statusCode) {
Write-Host "HTTP Status: $statusCode" -ForegroundColor Cyan
Write-Host "PASS — Endpoint returned $statusCode from public internet" -ForegroundColor Green
} else {
Write-Host "Connection failed (timeout/refused/NXDOMAIN)" -ForegroundColor Green
Write-Host "PASS — Public endpoint is unreachable" -ForegroundColor Green
}
}
✅PASS - HTTP Status: 401
401 returned from public internet — auth layer blocking confirmed. Network-level isolation verified via private endpoint configuration in Chapter 02.
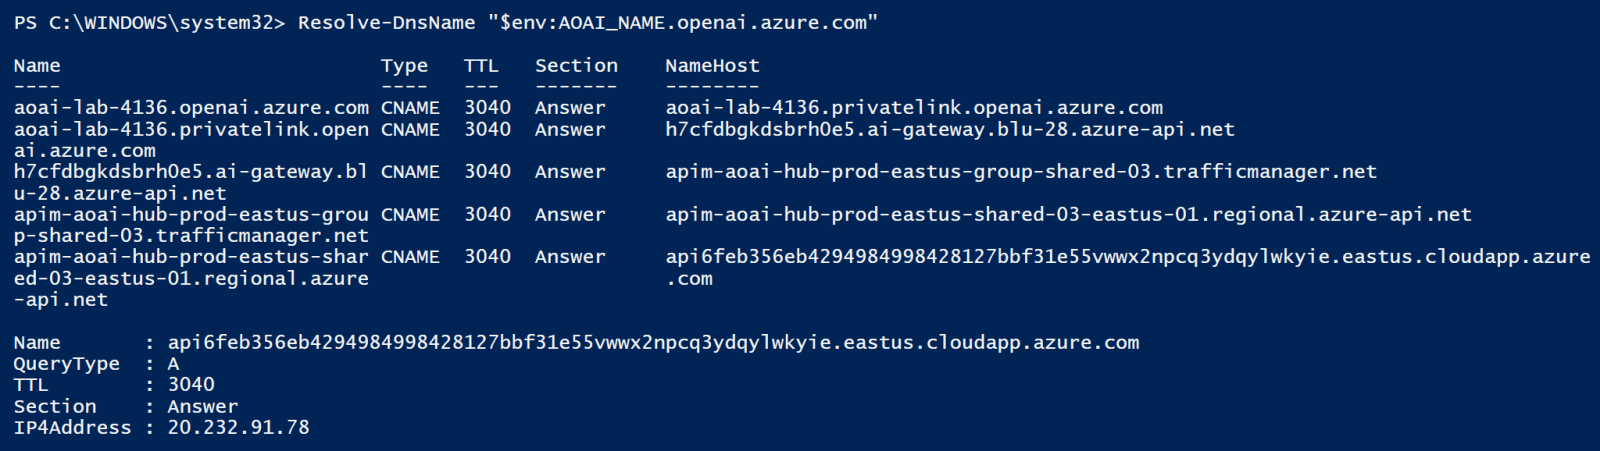
Checks what IP the AOAI hostname resolves to.
✅PASS - DNS from outside VNet resolves to public IP 20.232.91.78 — expected. Private DNS zone overrides this resolution from inside the VNet, returning a 10.x.x.x address. Privatelink CNAME chain confirmed in DNS response.
Skipped Tests
The following red team tests were deferred during initial lab execution due to environmental or dependency constraints. Each is documented with the reason for deferral and recommended follow-up action.
Test 3 - Prompt Injection Against Content Safety
Status: Deferred
Content Safety Prompt Shield REST API returned errors during lab execution. Prompt Shield configuration was completed in Chapter 08 via portal. Functional testing deferred to a dedicated Content Safety validation exercise using the Azure Content Safety Studio or Python SDK in an isolated environment.
Test 4 - Security Trimming Verification
Status: Deferred
Requires two separate Azure AD test users with different group memberships and a populated AI Search index with ACL-filtered documents. This test is Python-dependent and requires the full RAG pipeline to be operational with document-level ACLs applied. Deferred to a dedicated AI Search ACL validation exercise.
Test 5 - RBAC Privilege Escalation Check
Status: Deferred
Requires a separate reader-only service principal provisioned and authenticated independently from the current admin session. Testing with the current Owner-level identity would not produce a meaningful 403 result. Deferred to a dedicated RBAC validation exercise using a scoped test identity with Cognitive Services Reader role only.