Azure AI Implementation Guide
Windows Edition
Start with a blank Azure subscription on Windows. End with a fully working RAG chatbot backed by Azure OpenAI, Azure AI Search, Key Vault, and a document store - every command written for native PowerShell 7. No WSL or Git Bash required.
What You Will Build
By the end of Chapter 09 you will have a working RAG chatbot that accepts questions in natural language, retrieves relevant chunks from your own documents using Azure AI Search, passes the retrieved context to Azure OpenAI GPT-4o, and returns a grounded answer - all deployed from your Windows machine using PowerShell.
Guide Structure
Running through this guide will cost approximately $5-15 USD. Azure OpenAI GPT-4o and AI Search are the main cost drivers. Delete the resource group when done to stop all charges.
Prerequisites & Azure CLI Setup
Install every tool you need on Windows, log into Azure, register the required resource providers, and set up your environment variables. Every subsequent chapter assumes this chapter is complete.
Step 1 - Install Azure CLI
The Azure CLI is the primary tool for this guide. Everything that can be done in the portal can also be done with the CLI, and the CLI gives you repeatable, scriptable commands you can verify and audit. Install it once, and it handles every service in this guide.
winget install Microsoft.AzureCLI
az --version

Step 2 - Install Python & Dependencies
The RAG pipeline in Chapters 08 and 09 is written in Python 3.11+. Install Python and the Azure SDK packages. We'll use a virtual environment to keep things clean.
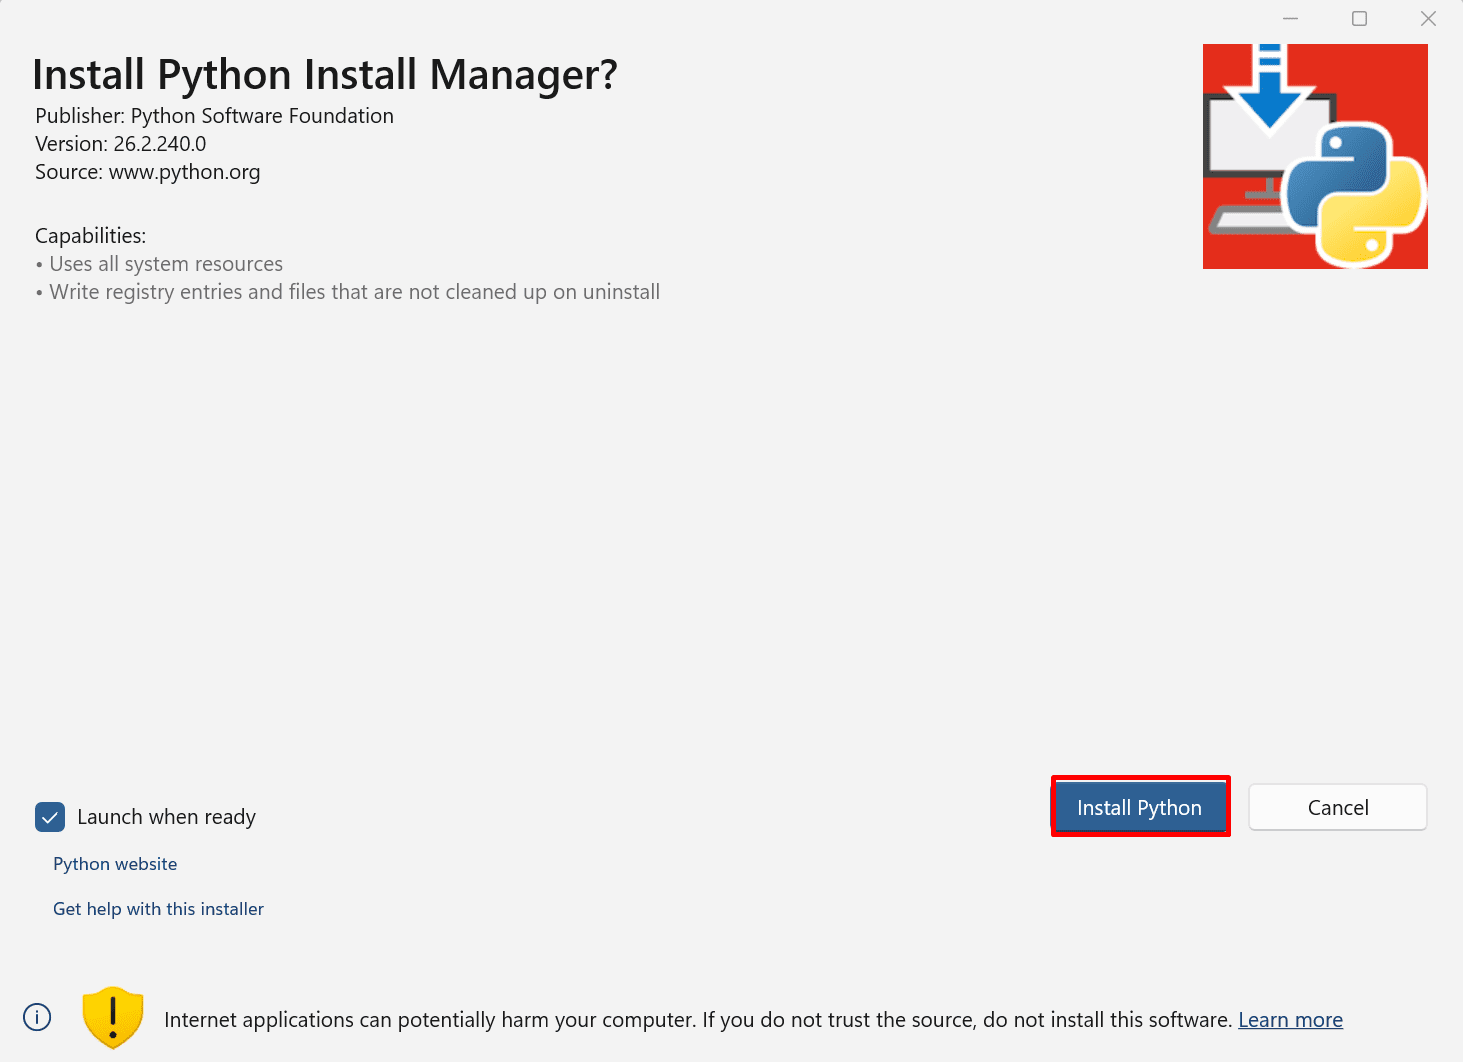
1. Install Python from https://python.org/downloads
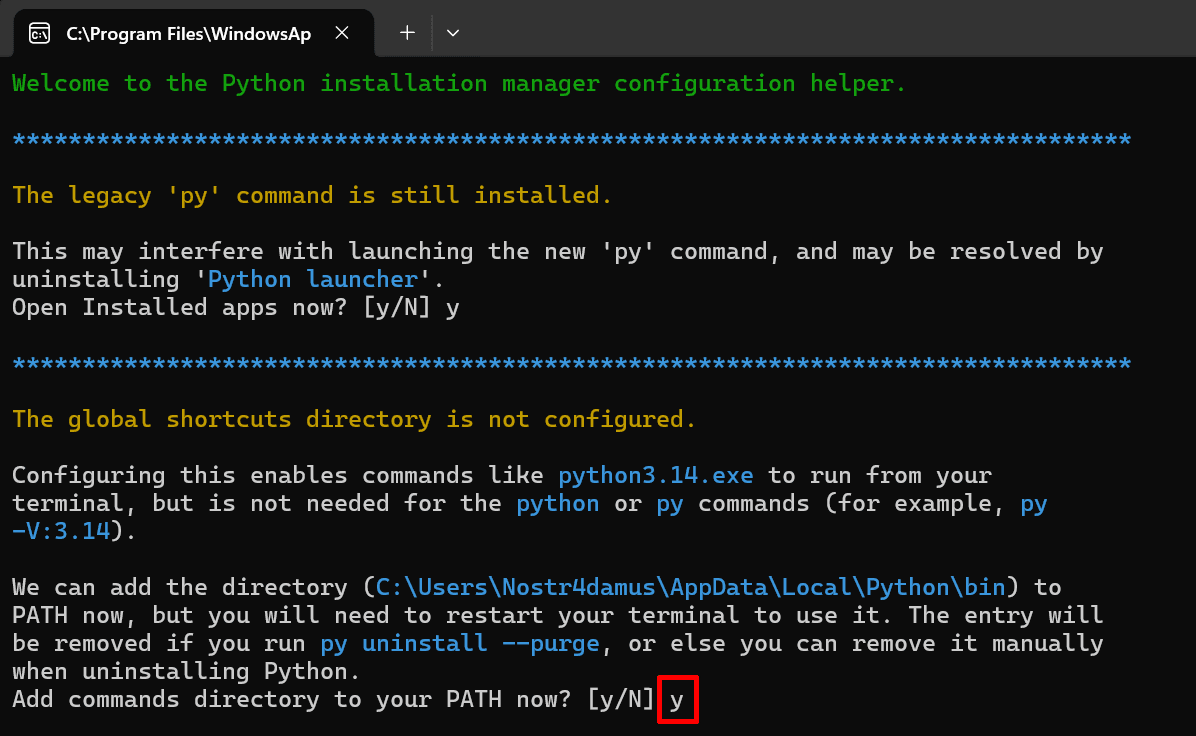
2. Add it to PATH
3. Check the installed version
python --version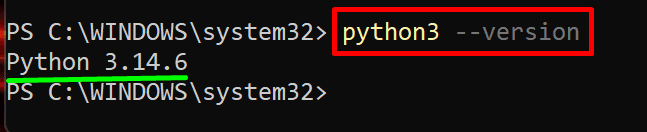
4. Create project directory and virtual environment
New-Item -ItemType Directory -Path C:\azure-rag -Force
Set-Location C:\azure-rag
python -m venv .venv
Set-ExecutionPolicy -ExecutionPolicy RemoteSigned -Scope CurrentUser
.\.venv\Scripts\Activate.ps1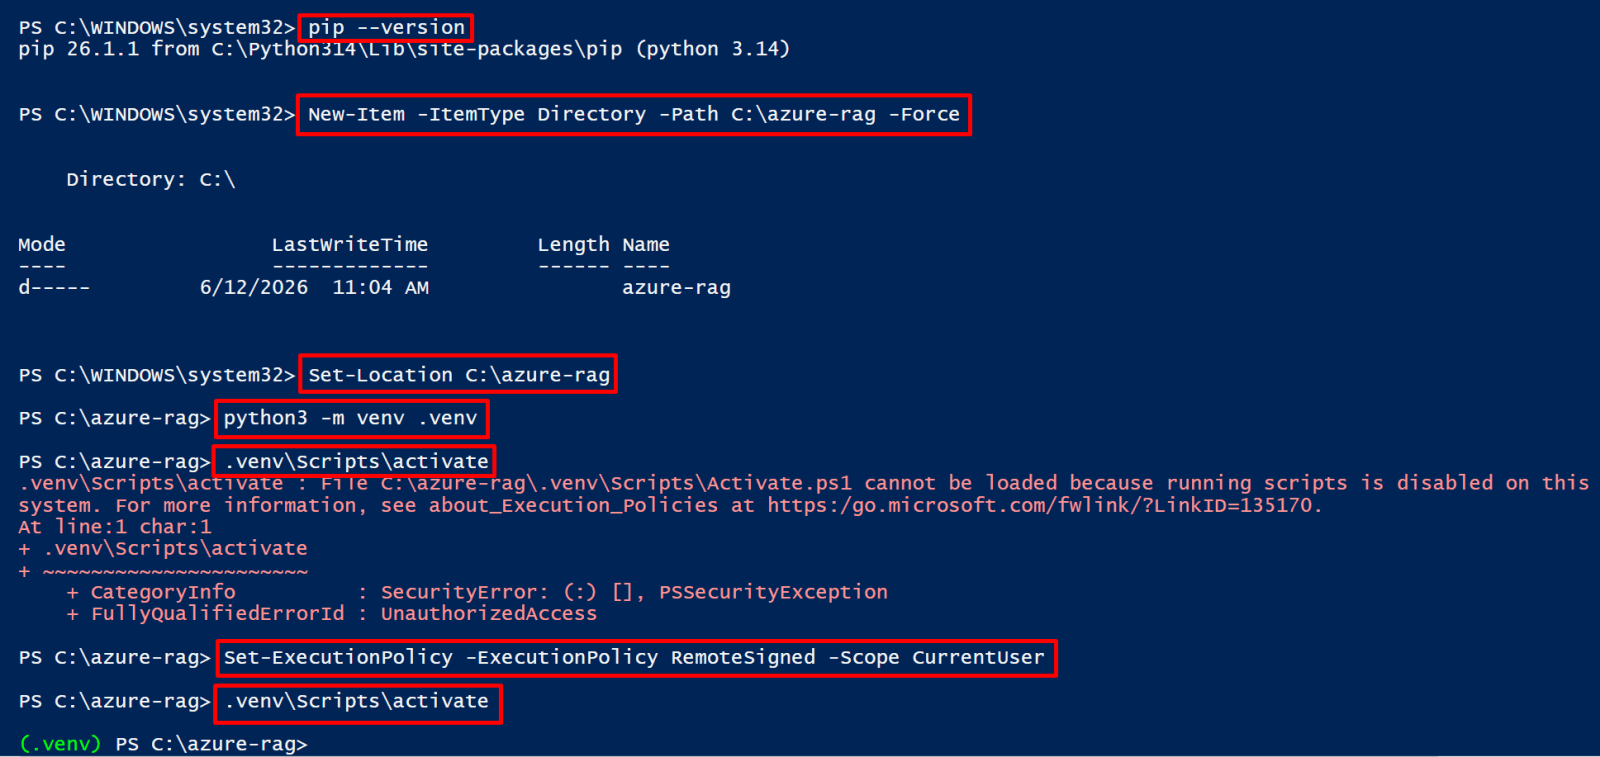
5. Install all required packages
pip install --upgrade pip
pip install `
  openai `
  azure-identity `
  azure-keyvault-secrets `
  azure-storage-blob `
  azure-search-documents `
  python-dotenv `
  tiktoken `
  rich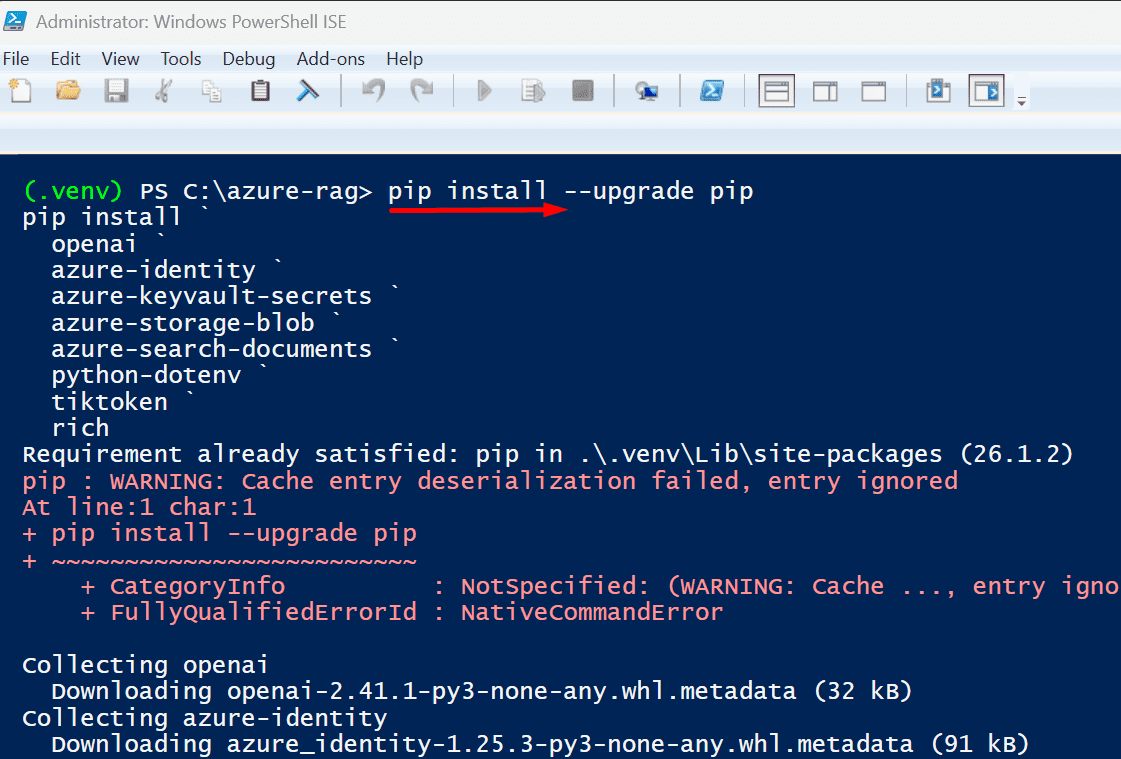
6. Confirm packages installed
pip list | Select-String "azure"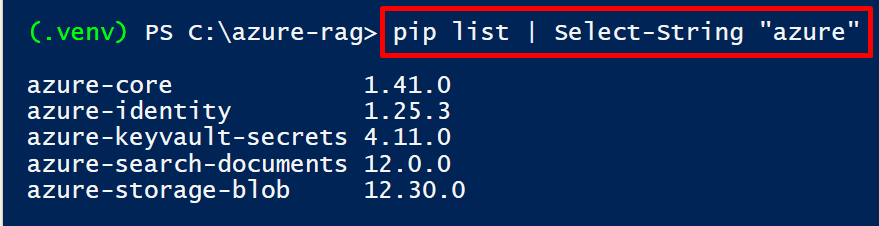
Step 3 - Log In to Azure
This opens a browser window for interactive login. After authenticating, the CLI stores a token locally. All subsequent commands use this token automatically - you stay logged in for ~8 hours before needing to re-authenticate.
1. Get your tenant ID from the Azure portal
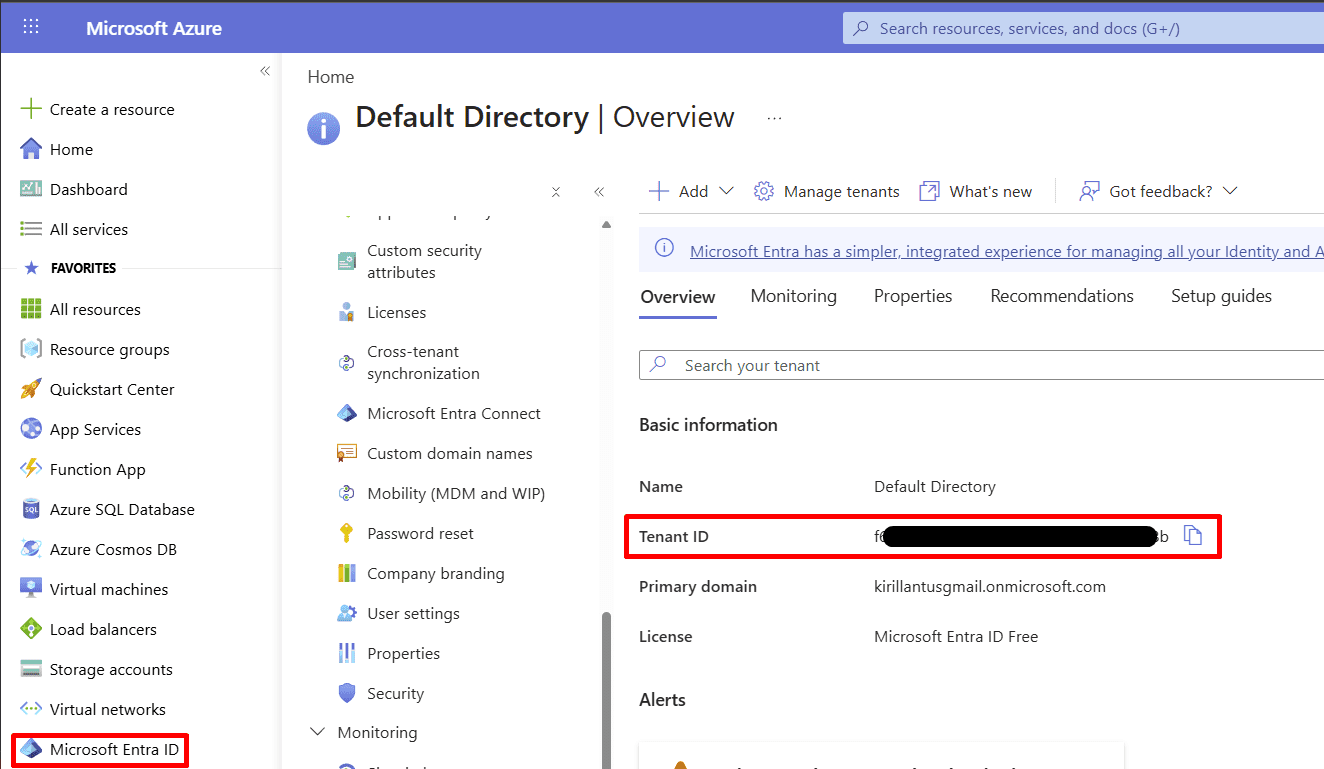
2. Log in directly to your personal tenant and set your subscription then verify
az login --tenant f6426121-f99c-444f-871b-66060a13948b

az account show --query "{Name:name, User:user.name, State:state}" -o table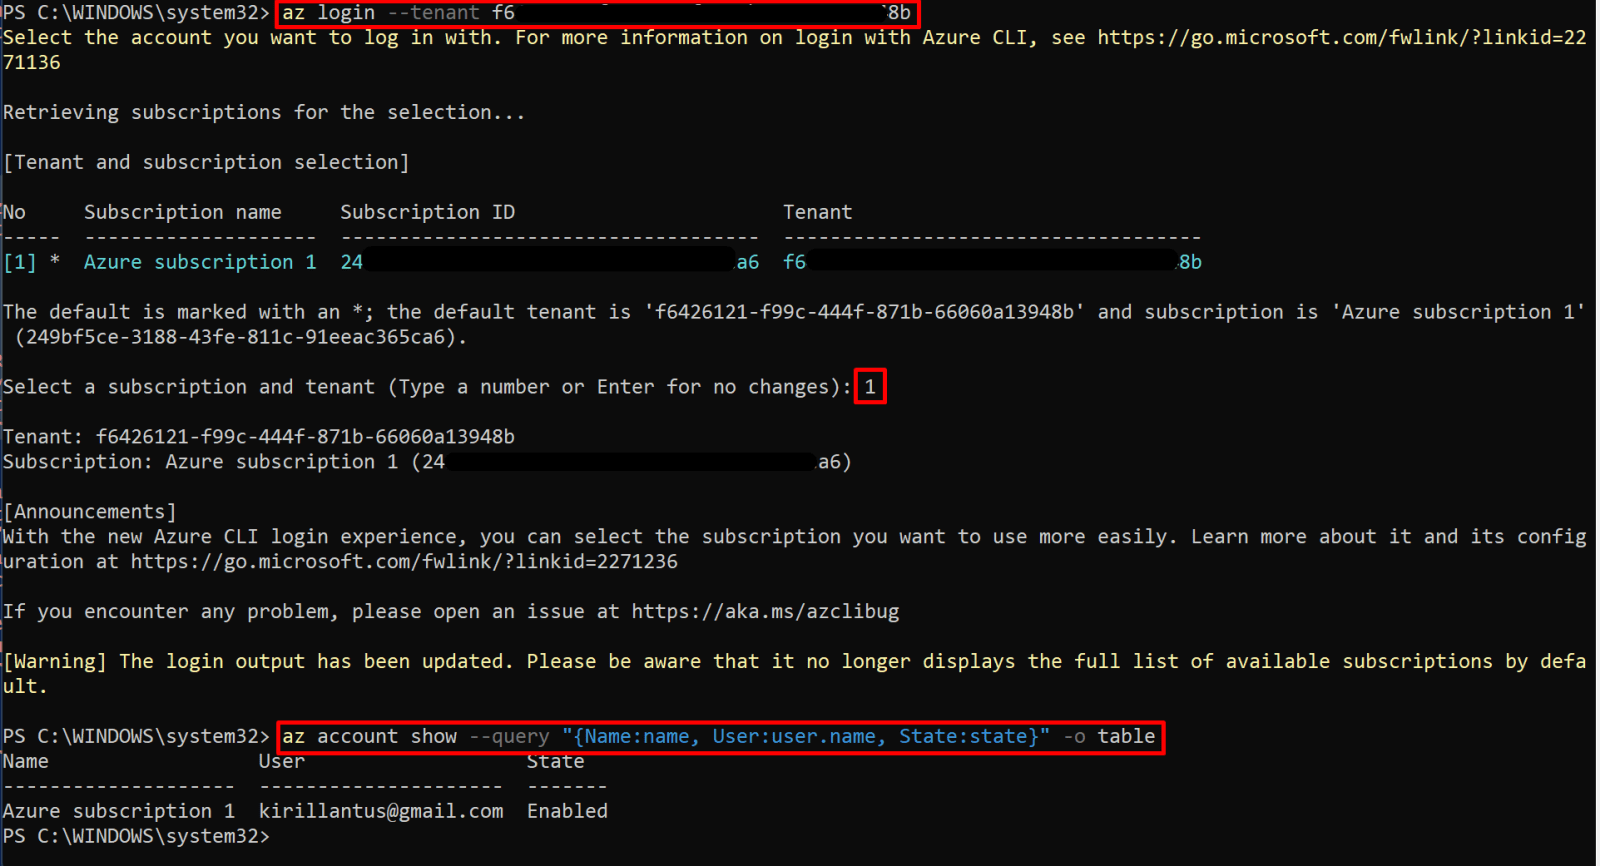
Step 4 - Set Your Subscription and Environment Variables
Copy this block and fill in your subscription ID. This is the only place you'll need to change your actual subscription ID - every other command in the guide uses these variables.
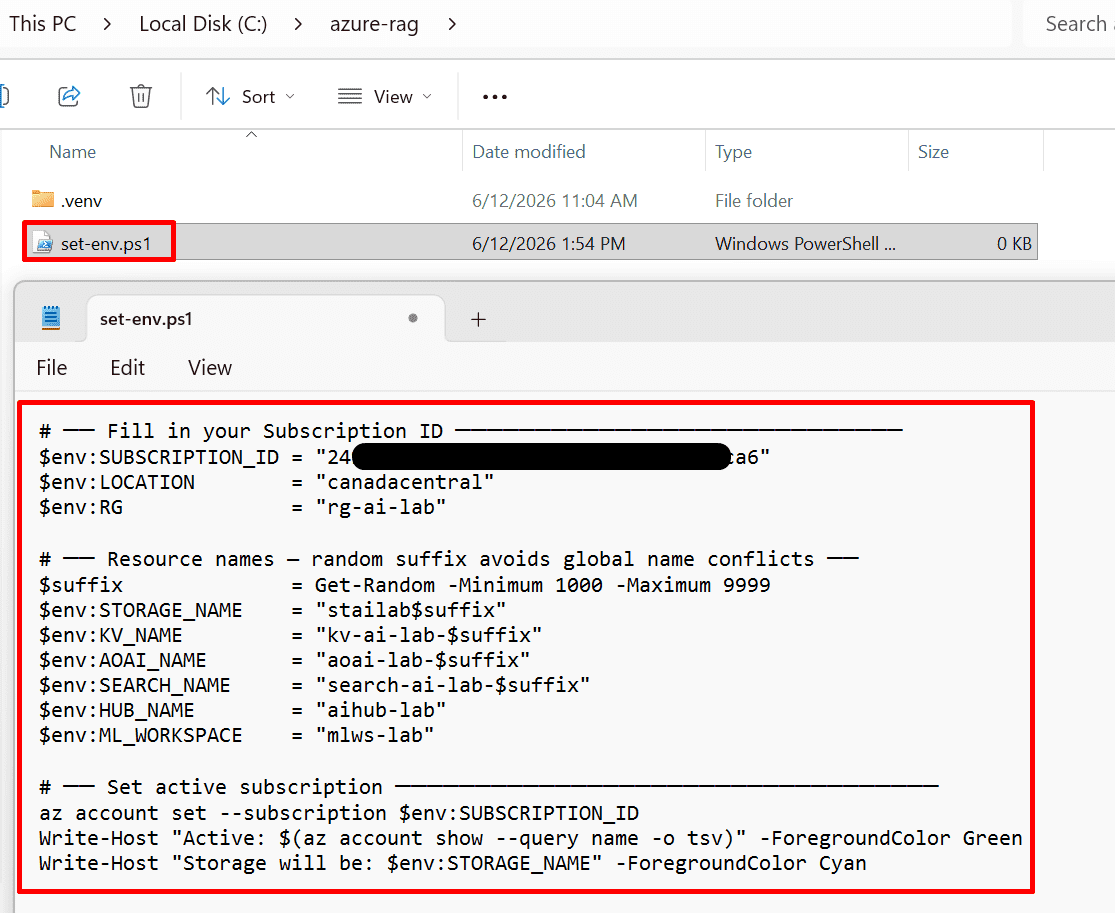
1. Create set-env.ps1 - fill in YOUR Subscription ID and save this file in C:\azure-rag
# -- Fill in your Subscription ID --
$env:SUBSCRIPTION_ID = "xxxxxxxx-xxxx-xxxx-xxxx-xxxxxxxxxxxx"
$env:LOCATION        = "canadacentral"
$env:RG              = "rg-ai-lab"

# -- Resource names - random suffix avoids global name conflicts --
$suffix              = Get-Random -Minimum 1000 -Maximum 9999
$env:STORAGE_NAME    = "stailab$suffix"
$env:KV_NAME         = "kv-ai-lab-$suffix"
$env:AOAI_NAME       = "aoai-lab-$suffix"
$env:SEARCH_NAME     = "search-ai-lab-$suffix"
$env:HUB_NAME        = "aihub-lab"
$env:ML_WORKSPACE    = "mlws-lab"

# -- Set active subscription --
az account set --subscription $env:SUBSCRIPTION_ID
Write-Host "Active: $(az account show --query name -o tsv)" -ForegroundColor Green
Write-Host "Storage will be: $env:STORAGE_NAME" -ForegroundColor CyanUse your subscription ID and location instead.
PowerShell $env: variables are session-only - they die when you close the window or restart. That's exactly why the guide has you save everything to set-env.ps1. Every session starts with these three commands: cd C:\azure-rag / . .\set-env.ps1 / ..\.venv\Scripts\Activate.ps1
2. Dot-source to load variables into your current session
cd C:\azure-rag
. .\set-env.ps1
.\.venv\Scripts\Activate.ps1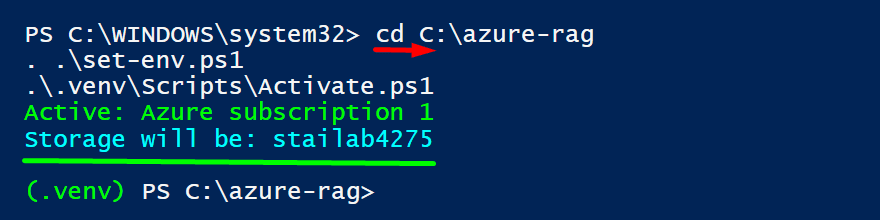
Step 5 - Register Required Resource Providers
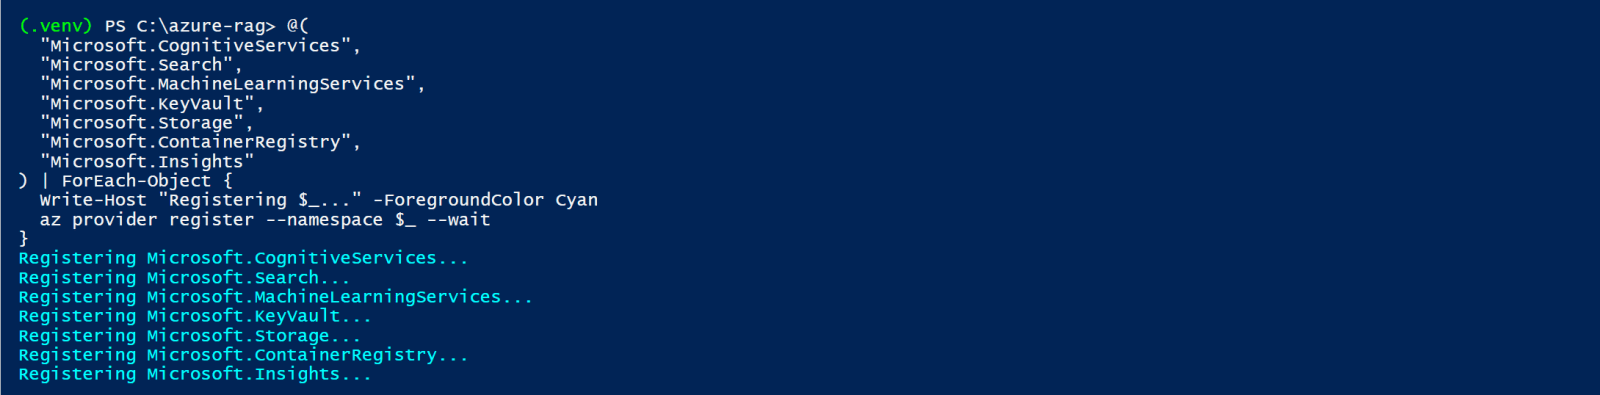
Azure subscriptions don't have every resource provider enabled by default. This is a one-time operation per subscription and takes 1-3 minutes per provider. The --wait flag blocks until each registration completes.
1. Run this code in PowerShell
@(
  "Microsoft.CognitiveServices",
  "Microsoft.Search",
  "Microsoft.MachineLearningServices",
  "Microsoft.KeyVault",
  "Microsoft.Storage",
  "Microsoft.ContainerRegistry",
  "Microsoft.Insights"
) | ForEach-Object {
  Write-Host "Registering $_..." -ForegroundColor Cyan
  az provider register --namespace $_ --wait
}
2. Verify the key ones are registered
az provider list `
  --query "[?namespace=='Microsoft.CognitiveServices' || namespace=='Microsoft.Search' || namespace=='Microsoft.MachineLearningServices'].{Provider:namespace,State:registrationState}" `
  -o table
Step 6 - Install Azure CLI Extensions
Several Azure CLI commands for AI services live in extensions that are not bundled with the base install. The ml extension covers Azure ML and AI Foundry.
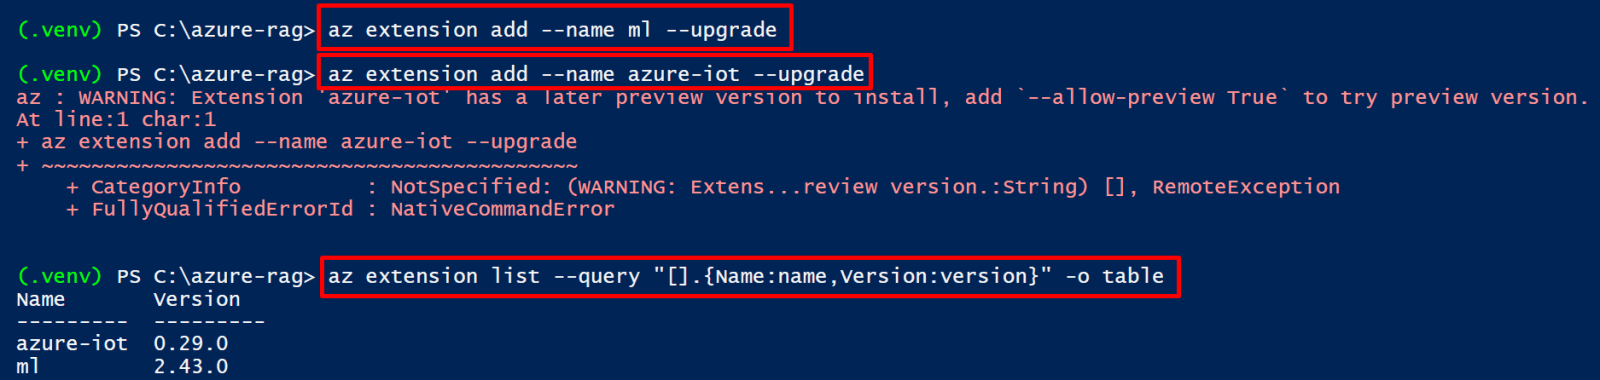
1. Install required CLI extensions & verify extensions
az extension add --name ml --upgrade
az extension add --name azure-iot --upgrade

az extension list --query "[].{Name:name,Version:version}" -o tableThat's just a warning, not an error - the extension installed fine. You can safely ignore it and move on.
Azure CLI installed, Python venv with SDK packages, active login, subscription set, all providers registered, extensions installed. Move to Chapter 02.
Resource Group & Storage Account
Create the resource group that will contain everything in this guide, and a Storage Account to hold the documents your RAG pipeline will index. Also create a documents Blob container and upload 3 sample docs.
Step 1 - Create the Resource Group
A resource group is a logical container for all your Azure resources. When you delete a resource group, everything inside it is deleted too - which makes cleanup easy. Put all resources from this guide in the same resource group so you can tear everything down with one command.
1. Create resource group
az group create `
  --name $env:RG `
  --location $env:LOCATION `
  --tags purpose=ai-lab guide=volume1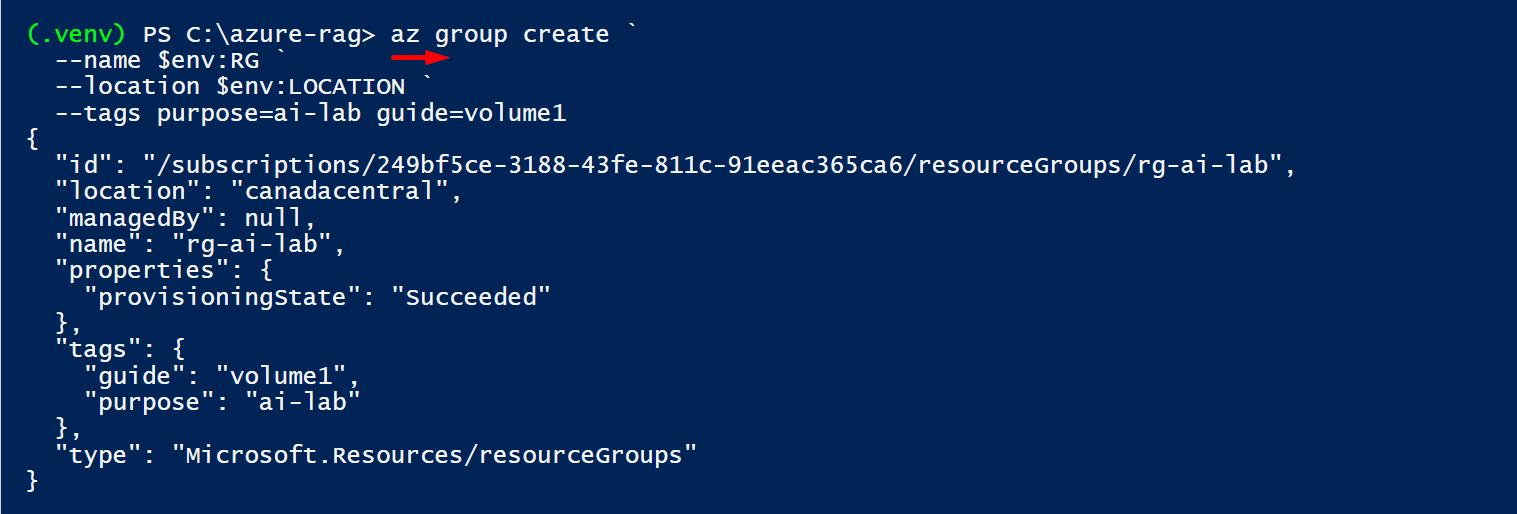
2. Verify it was created
az group show --name $env:RG --query "{Name:name,Location:location,State:properties.provisioningState}" -o table
Step 2 - Create the Storage Account
The Storage Account holds the raw documents you'll upload and index. The RAG pipeline reads documents from a Blob container, chunks them, embeds them, and pushes vectors to AI Search. The --sku Standard_LRS gives locally-redundant storage which is sufficient for a lab - use ZRS or GRS for production.
1. Create storage account
az storage account create `
  --name $env:STORAGE_NAME `
  --resource-group $env:RG `
  --location $env:LOCATION `
  --sku Standard_LRS `
  --kind StorageV2 `
  --access-tier Hot `
  --allow-blob-public-access false `
  --https-only true `
  --min-tls-version TLS1_2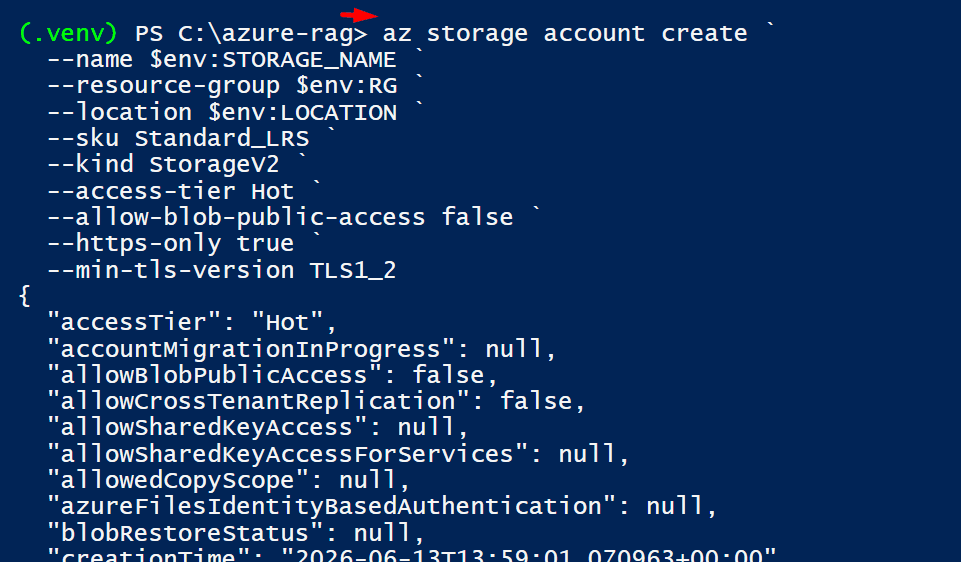
2. Get the connection string and verify (we'll store this in Key Vault later)
$env:STORAGE_CONN = $(az storage account show-connection-string `
  --name $env:STORAGE_NAME `
  --resource-group $env:RG `
  --query connectionString -o tsv)
3. Verify it captured the value
$env:STORAGE_CONN | Select-Object -First 1
4. Create a container for documents
az storage container create `
  --name "documents" `
  --account-name $env:STORAGE_NAME `
  --connection-string "$env:STORAGE_CONN"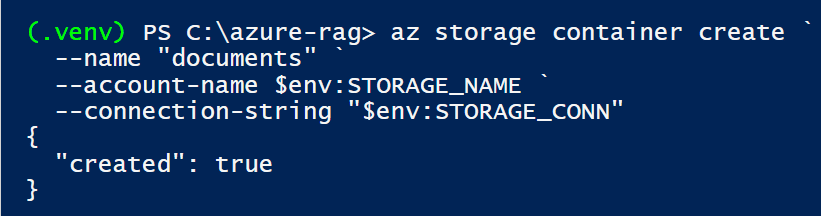
5. Verify container "documents" was created
az storage container list `
  --account-name $env:STORAGE_NAME `
  --connection-string "$env:STORAGE_CONN" `
  --query "[].name" -o tsv
Step 3 - Upload Sample Documents
The RAG chatbot needs something to search through. Create a few sample text files locally and upload them to the storage container. In a real deployment these would be your company's PDFs, Word docs, or knowledge base articles.
1. Create sample documents locally
New-Item -ItemType Directory -Path C:\azure-rag\docs -Force

# Document 1 - IT Security Policy
Set-Content -Path C:\azure-rag\docs\it-policy.txt -Value @"
IT Security Policy - Antusnet Labs

Password Requirements:
All passwords must be at least 16 characters and include uppercase, lowercase,
numbers, and special characters. Passwords expire every 90 days.
Multi-factor authentication is mandatory for all accounts.

Remote Access:
VPN is required for all remote access to internal systems.
Personal devices must be enrolled in MDM before accessing company resources.
SSH keys must be 4096-bit RSA or ED25519.

Data Classification:
Public: marketing materials, public documentation
Internal: operational data, internal communications
Confidential: customer PII, financial records, source code
Restricted: cryptographic keys, authentication credentials
"@

# Document 2 - Azure Architecture Guide
Set-Content -Path C:\azure-rag\docs\azure-architecture.txt -Value @"
Azure AI Architecture Reference - Antusnet Labs

Approved AI Services:
- Azure OpenAI Service: GPT-4o for chat, text-embedding-3-small for embeddings
- Azure AI Search: Vector search index for RAG workloads
- Azure AI Foundry: Workspace for model evaluation and prompt engineering
- Azure ML: Training pipelines and batch inference

Naming Conventions: rg-{workload}-{env} / st{workload}{env}{suffix} / kv-{workload}-{env}-{suffix}
Approved Regions: eastus, eastus2, westeurope
Cost Controls: All OpenAI deployments must have TPM quotas. Budget alerts at 80% and 100%.
"@

# Document 3 - Incident Response
Set-Content -Path C:\azure-rag\docs\incident-response.txt -Value @"
Incident Response Playbook - Antusnet Labs

Severity Levels:
P1 Critical: Full service outage, active breach - 15 min response SLA
P2 High: Partial outage, suspected breach - 1 hour response SLA
P3 Medium: Degraded performance - 4 hour response SLA
P4 Low: Minor issue - next business day

AI-Specific Incidents:
Prompt injection: Block source IP, review Content Safety logs, rotate API keys.
Model credential exposure: Rotate all OpenAI API keys, audit logs, disable local key auth.
Data exfiltration via AI: Isolate endpoint, capture logs, preserve evidence first.

Escalation Contacts: security@antusnet.ca / Azure P1 support ticket
"@

Write-Host "Sample documents created in C:\azure-rag\docs\" -ForegroundColor Green
2. Upload the docs to container "documents"
Get-ChildItem -Path C:\azure-rag\docs -Filter *.txt | ForEach-Object {
  az storage blob upload `
    --file $_.FullName `
    --name $_.Name `
    --container-name documents `
    --account-name $env:STORAGE_NAME `
    --connection-string $env:STORAGE_CONN `
    --overwrite
  Write-Host "Uploaded: $($_.Name)" -ForegroundColor Cyan
}The az : warnings are harmless PowerShell stderr formatting - the actual uploads all completed at 100%: azure-architecture.txt, incident-response.txt, it-policy.txt

Resource group created, storage account deployed, documents container created, 3 sample docs uploaded. Move to Chapter 03.
Azure Key Vault with RBAC
Key Vault is a cloud-managed secrets store. Instead of hardcoding API keys and connection strings in your application code, you store them in Key Vault and retrieve them with kv_secrets.py at runtime using your Azure identity. No secrets in code, no secrets in environment files.
Step 1 - Create the Key Vault
Key Vault uses a globally unique name (like storage accounts). We set up soft delete with 7-day retention, which means if you accidentally delete a secret it's recoverable for 7 days. For production use 90 days.
1. Create Key Vault
az keyvault create `
  --name $env:KV_NAME `
  --resource-group $env:RG `
  --location $env:LOCATION `
  --sku standard `
  --retention-days 7 `
  --enable-rbac-authorization true
2. Get the vault URI - you'll need this in your application
$env:KV_URI = $(az keyvault show `
  --name $env:KV_NAME `
  --resource-group $env:RG `
  --query properties.vaultUri -o tsv)

Write-Host "Key Vault URI: $env:KV_URI"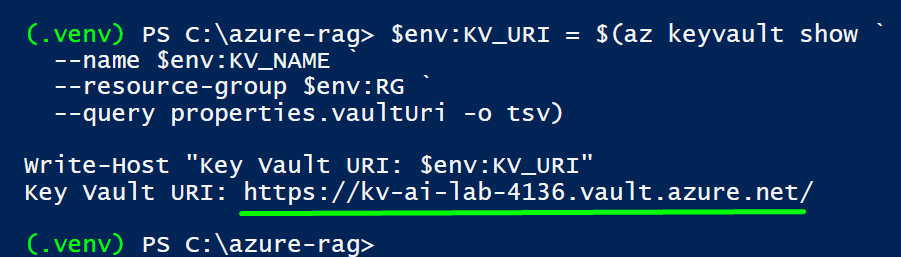
Step 2 - Grant Yourself Access to Set Secrets
Because we enabled RBAC authorization on the vault (not the legacy access policies model), we need to explicitly assign a role to ourselves before we can read or write secrets. The Key Vault Secrets Officer role allows creating, updating, and reading secrets.
1. Assign Key Vault access to your own identity
# Get your own Azure AD object ID
$env:MY_OBJECT_ID = $(az ad signed-in-user show --query id -o tsv)

# Get the Key Vault resource ID
$env:KV_ID = $(az keyvault show --name $env:KV_NAME --resource-group $env:RG --query id -o tsv)

# Assign Key Vault Secrets Officer to yourself
az role assignment create `
  --assignee-object-id $env:MY_OBJECT_ID `
  --assignee-principal-type User `
  --role "Key Vault Secrets Officer" `
  --scope $env:KV_ID

Write-Host "Access granted. Waiting 30 seconds for RBAC to propagate..." -ForegroundColor Yellow
Start-Sleep -Seconds 30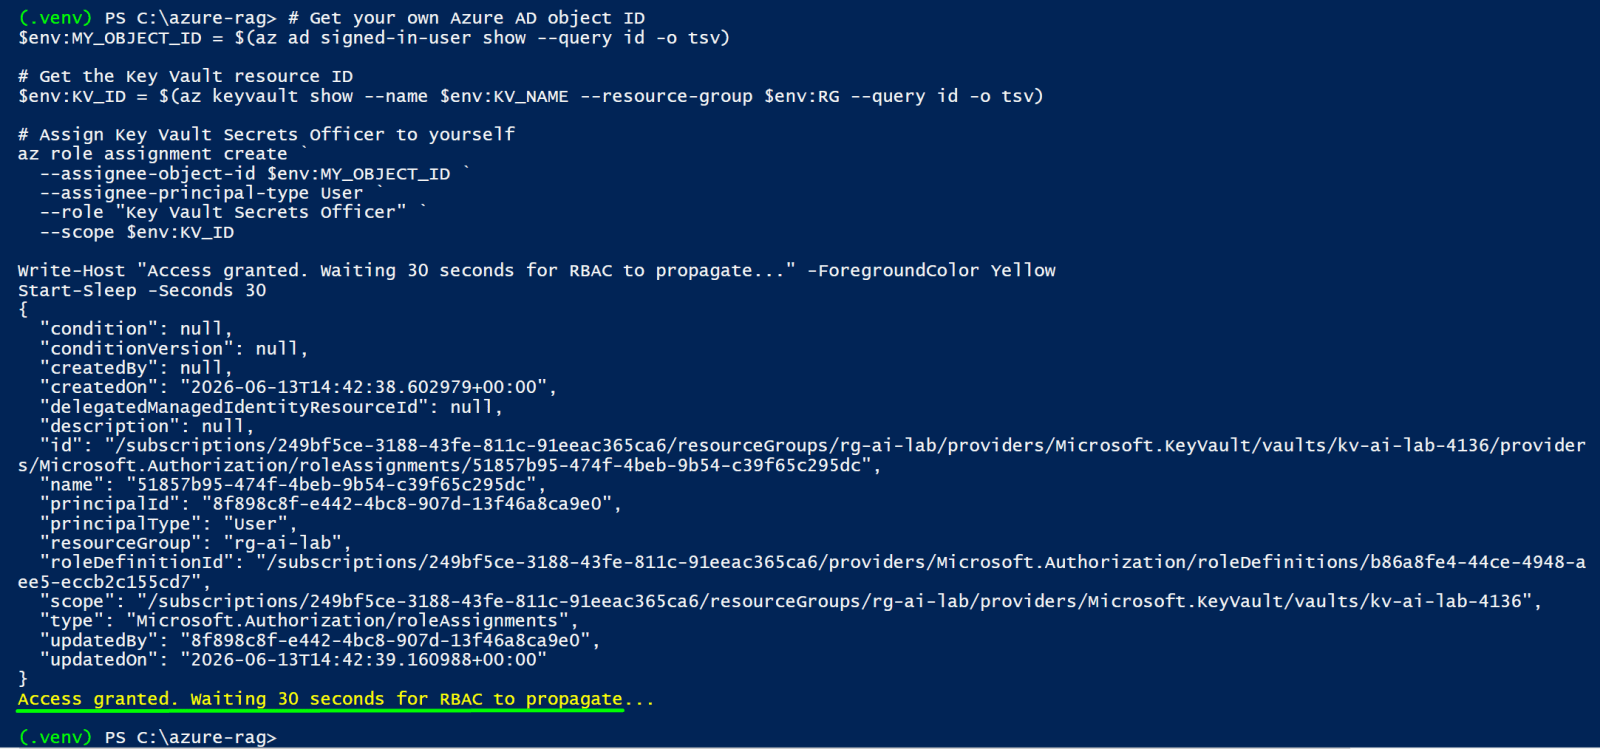
Step 3 - Store the Storage Connection String
The first secret to store is the Storage Account connection string. Storing it in Key Vault means the RAG application never has the connection string hardcoded - it fetches it at startup using its Azure identity.
1. Store storage connection string in Key Vault
az keyvault secret set `
  --vault-name $env:KV_NAME `
  --name "storage-connection-string" `
  --value $env:STORAGE_CONN
2. Verify it's there
az keyvault secret show `
  --vault-name $env:KV_NAME `
  --name "storage-connection-string" `
  --query "{Name:name,Version:id}" -o table
Step 4 - Python: Retrieve Secrets from Key Vault
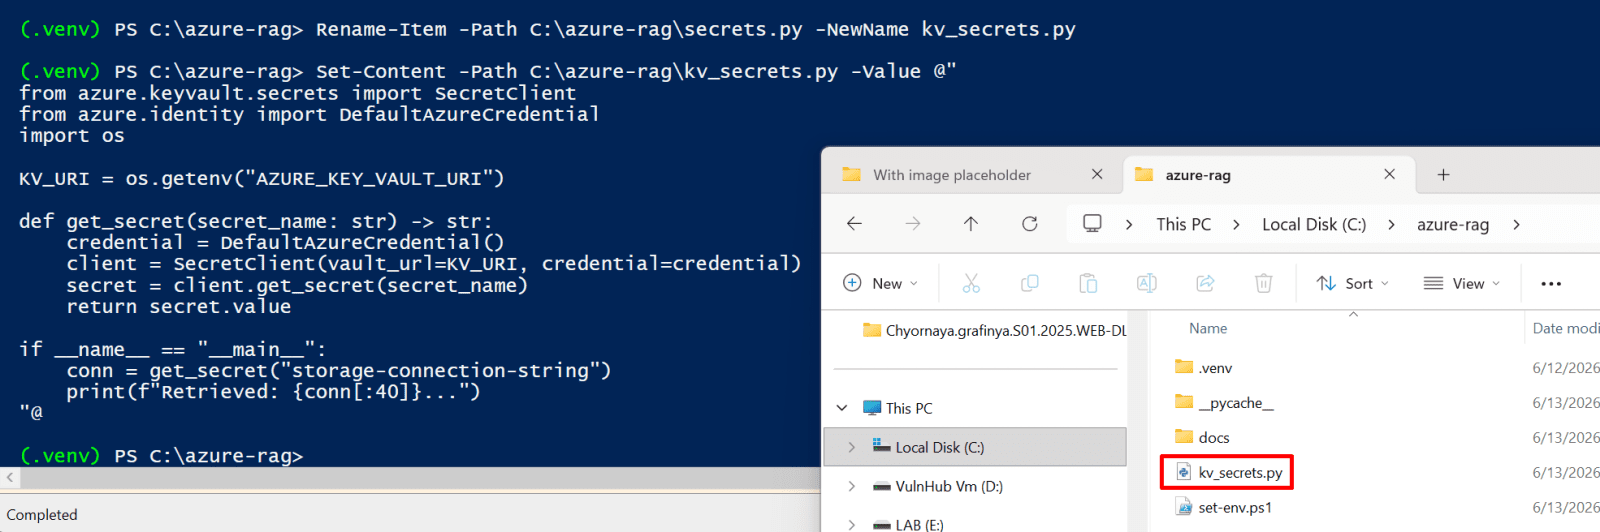
Here's how the application retrieves secrets at runtime. The DefaultAzureCredential uses your logged-in CLI identity when running locally, and the managed identity when running in Azure. No secrets in the code, no secrets in environment variables.
1. Save the Python file as C:\azure-rag\kv_secrets.py
Set-Content -Path C:\azure-rag\kv_secrets.py -Value @"
from azure.keyvault.secrets import SecretClient
from azure.identity import DefaultAzureCredential
import os

KV_URI = os.getenv("AZURE_KEY_VAULT_URI")

def get_secret(secret_name: str) -> str:
    credential = DefaultAzureCredential()
    client = SecretClient(vault_url=KV_URI, credential=credential)
    secret = client.get_secret(secret_name)
    return secret.value

if __name__ == "__main__":
    conn = get_secret("storage-connection-string")
    print(f"Retrieved: {conn[:40]}...")
"@
2. Add the KV URI to your session and test
Add-Content -Path C:\azure-rag\set-env.ps1 -Value "`$env:AZURE_KEY_VAULT_URI = '$env:KV_URI'"
$env:AZURE_KEY_VAULT_URI = $env:KV_URI

python kv_secrets.pyThe retrieved connection string confirms DefaultAzureCredential authenticated successfully using your CLI login and pulled the secret from Key Vault.

Key Vault deployed with RBAC, access granted, storage connection string stored, kv_secrets.py retrieves successfully. Move to Chapter 04.
Azure OpenAI Service
Create the Azure OpenAI resource, deploy two models - GPT-4o for chat and text-embedding-3-small for embeddings - and verify both with a test call. These two deployments power the entire RAG pipeline.
canadacentral location does not have GPT-4o quota. You need to create the OpenAI resource in eastus instead. Everything else (Storage, Key Vault, Search) stays in canadacentral.
Step 1 - Create the Azure OpenAI Resource
The Azure OpenAI resource is the container for your model deployments. Creating the resource does not deploy any models yet - that happens separately in Step 2.
1. Update location to eastus for OpenAI only
$env:AOAI_LOCATION = "eastus"2. Create Azure OpenAI resource in eastus
az cognitiveservices account create `
  --name $env:AOAI_NAME `
  --resource-group $env:RG `
  --kind OpenAI `
  --sku S0 `
  --location $env:AOAI_LOCATION `
  --yes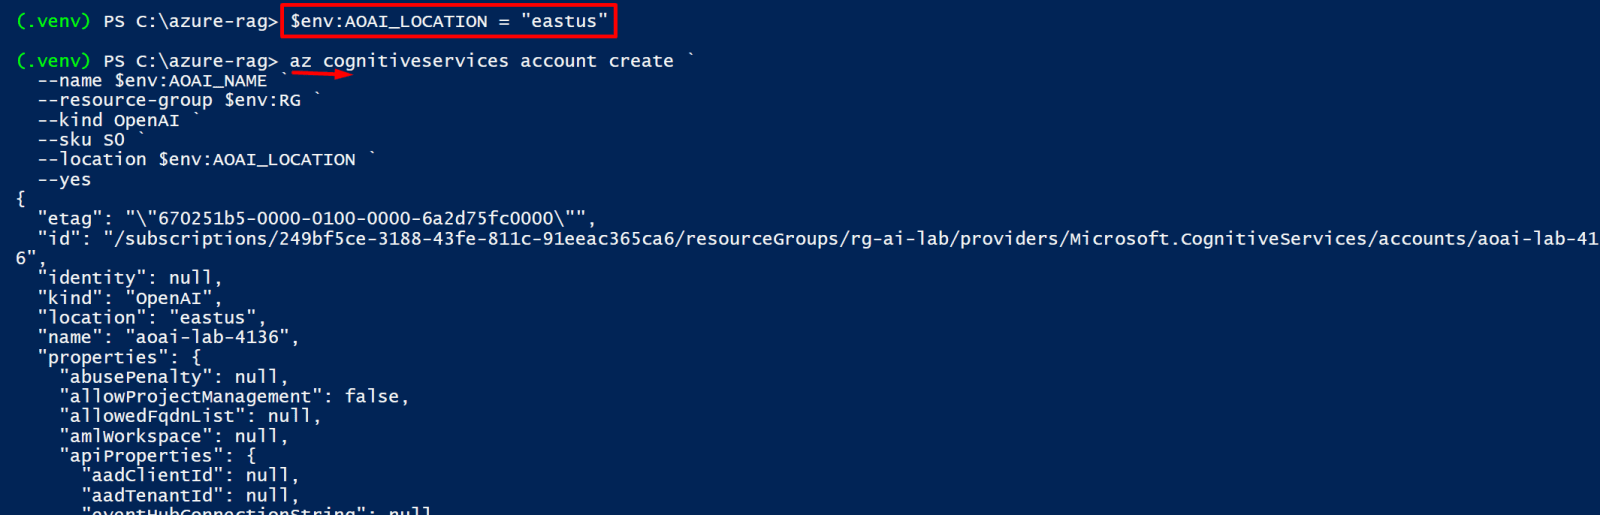
3. Get the endpoint - this is the base URL for all API calls
$env:AOAI_ENDPOINT = $(az cognitiveservices account show `
  --name $env:AOAI_NAME `
  --resource-group $env:RG `
  --query properties.endpoint -o tsv)
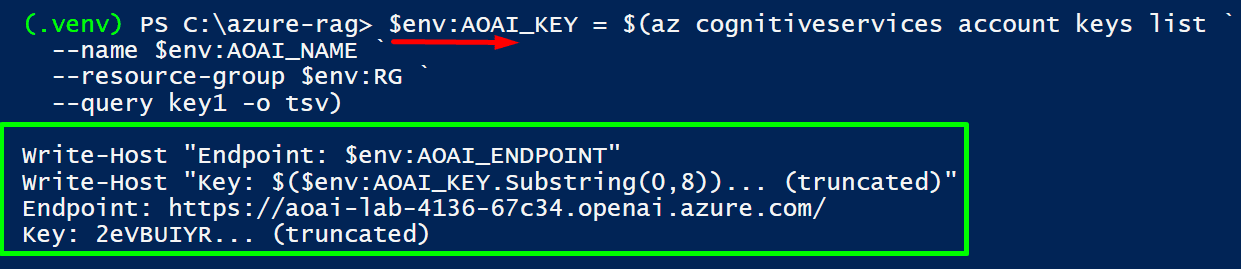
4. Get the API key
$env:AOAI_KEY = $(az cognitiveservices account keys list `
  --name $env:AOAI_NAME `
  --resource-group $env:RG `
  --query key1 -o tsv)

Write-Host "Endpoint: $env:AOAI_ENDPOINT"
Write-Host "Key: $($env:AOAI_KEY.Substring(0,8))... (truncated)"Endpoint: https://aoai-lab-4136-2f21f.openai.azure.com/ / Key: captured and truncated for safety
Step 2 - Deploy GPT-4o (Chat Model)
Model deployments are what you actually call in your application. Each deployment has a name you choose (this is what goes in your model parameter in API calls), a model and version, and a capacity measured in tokens-per-minute (TPM). We set 30K TPM which is a reasonable lab limit.
1. Deploy GPT-4o model
az cognitiveservices account deployment create `
  --name $env:AOAI_NAME `
  --resource-group $env:RG `
  --deployment-name "gpt-4o" `
  --model-name "gpt-4o" `
  --model-version "2024-11-20" `
  --model-format OpenAI `
  --sku-name "GlobalStandard" `
  --sku-capacity 30
2. Check deployment status
az cognitiveservices account deployment show `
  --name $env:AOAI_NAME `
  --resource-group $env:RG `
  --deployment-name "gpt-4o" `
  --query "{Model:properties.model.name,Status:properties.provisioningState,Capacity:sku.capacity}" `
-o tableStatus shows Succeeded with 30K TPM capacity.

Step 3 - Deploy text-embedding-3-small (Embedding Model)
Embeddings convert text into numerical vectors. The RAG pipeline uses this model to: (1) embed your documents when you index them, and (2) embed the user's query at search time. text-embedding-3-small produces 1536-dimensional vectors and is the best price-performance option for most use cases.
1. Deploy embedding model
az cognitiveservices account deployment create `
  --name $env:AOAI_NAME `
  --resource-group $env:RG `
  --deployment-name "text-embedding-3-small" `
  --model-name "text-embedding-3-small" `
  --model-version "1" `
  --model-format OpenAI `
  --sku-name "GlobalStandard" `
  --sku-capacity 120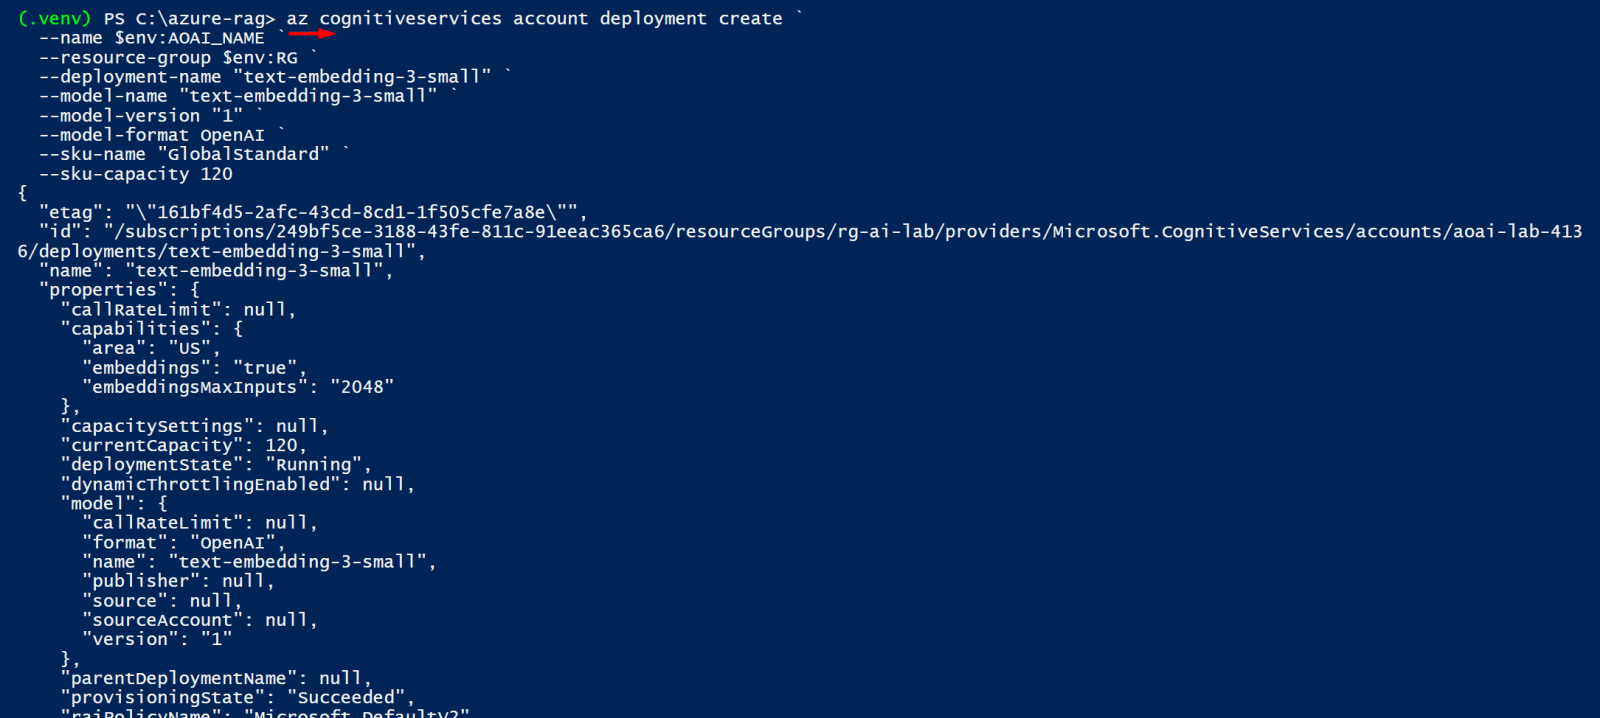
2. List all deployments - both should show Succeeded
az cognitiveservices account deployment list `
  --name $env:AOAI_NAME `
  --resource-group $env:RG `
  --query "[].{Deployment:name,Model:properties.model.name,State:properties.provisioningState}" `
  -o table
Step 4 - Test Both Models
Before wiring everything together, verify both deployments respond correctly. These test calls use the API key for simplicity.
1. Create test_openai.py in C:\azure-rag with the following content
import os
from openai import AzureOpenAI

client = AzureOpenAI(
    azure_endpoint=os.environ["AOAI_ENDPOINT"],
    api_key=os.environ["AOAI_KEY"],
    api_version="2024-02-01"
)

# Test 1: Chat completion
print("Testing GPT-4o...")
response = client.chat.completions.create(
    model="gpt-4o",
    messages=[{"role": "user", "content": "Say 'Azure OpenAI is working' and nothing else."}],
    max_tokens=20
)
print(f"Chat response: {response.choices[0].message.content}")

# Test 2: Embedding
print("\nTesting text-embedding-3-small...")
embed_response = client.embeddings.create(
    model="text-embedding-3-small",
    input="This is a test document for embedding."
)
vector = embed_response.data[0].embedding
print(f"Embedding dimensions: {len(vector)}")  # Should print: 1536
print(f"First 5 values: {vector[:5]}")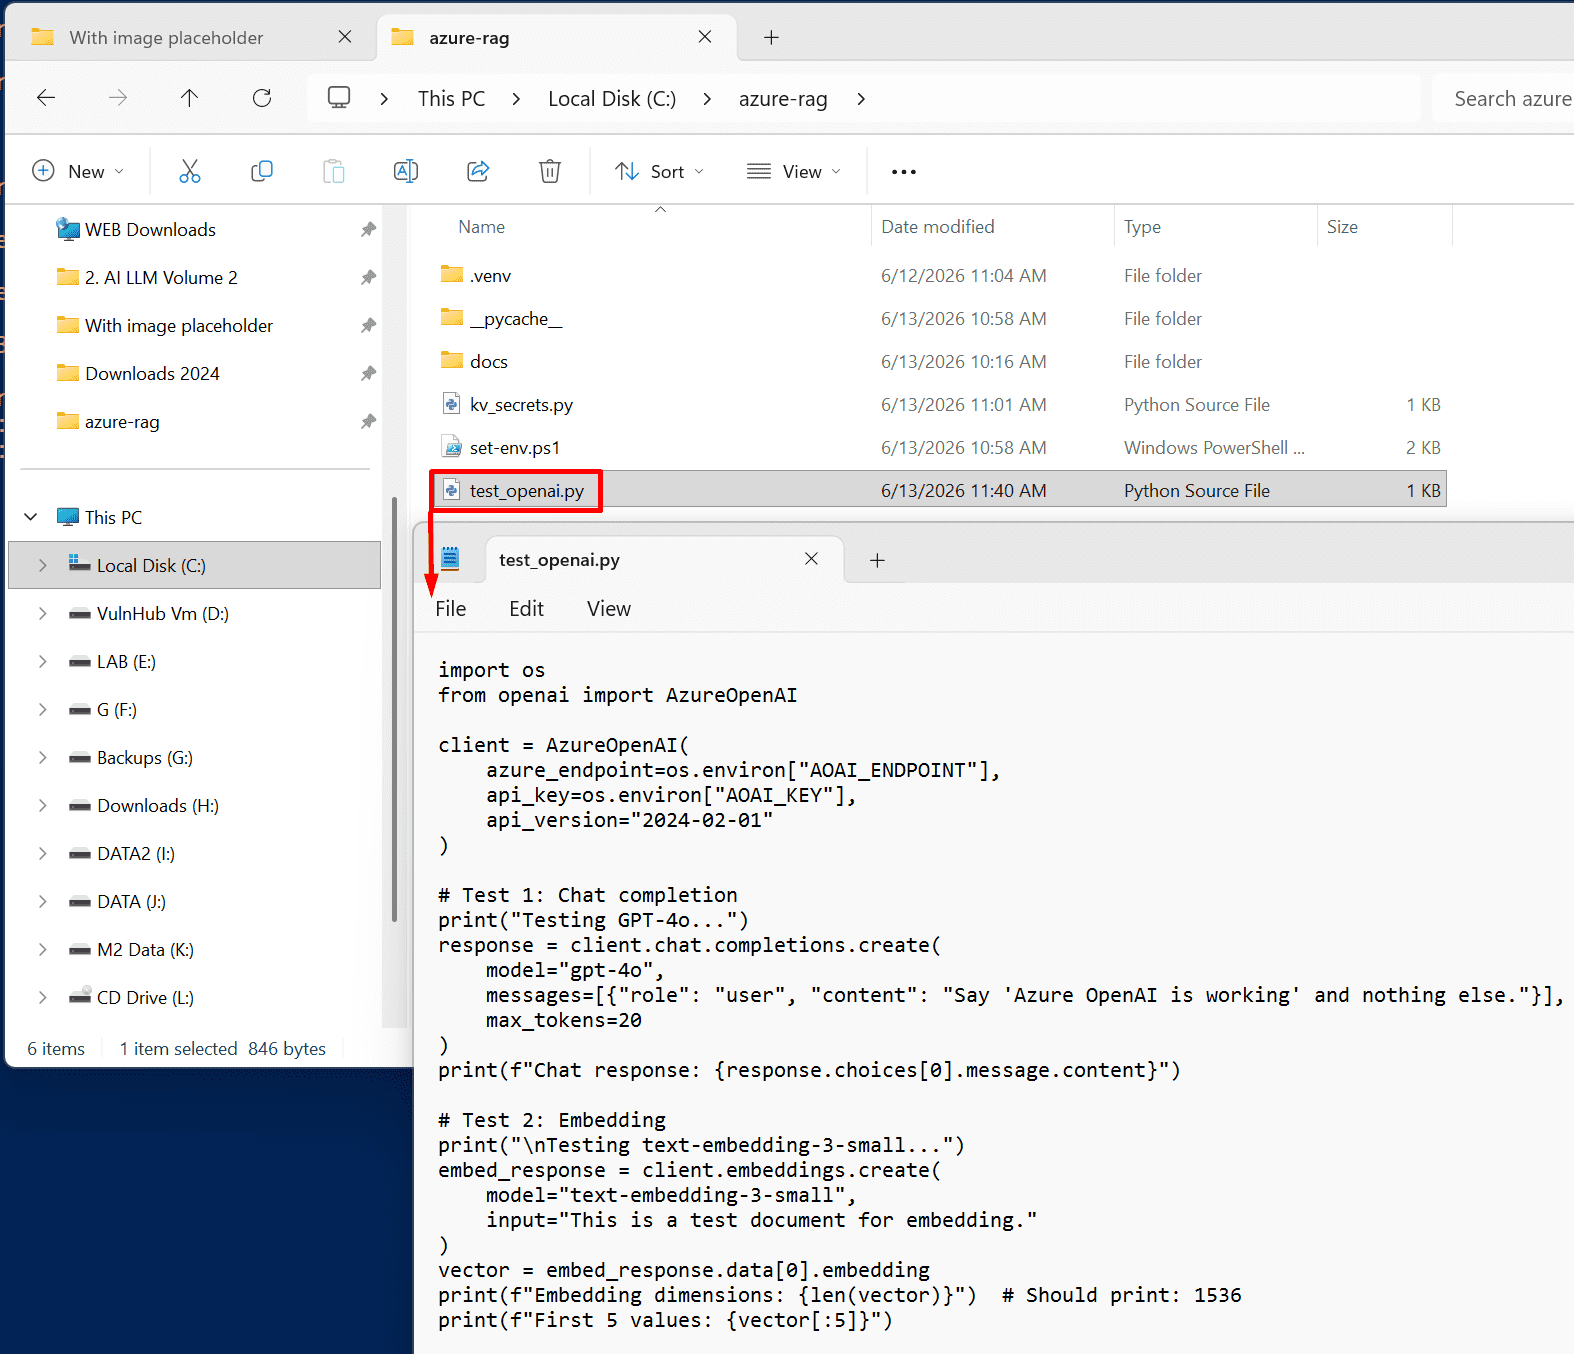
2. Run the test
python test_openai.pyGPT-4o: "Azure OpenAI is working." / text-embedding-3-small: 1536 dimensions

Step 5 - Store Keys in Key Vault
Now that we've confirmed the models work, store the endpoint and key in Key Vault. The application will always fetch from Key Vault - never from environment variables.
1. Store OpenAI credentials in Key Vault
az keyvault secret set --vault-name $env:KV_NAME --name "aoai-endpoint" --value $env:AOAI_ENDPOINT
az keyvault secret set --vault-name $env:KV_NAME --name "aoai-key" --value $env:AOAI_KEY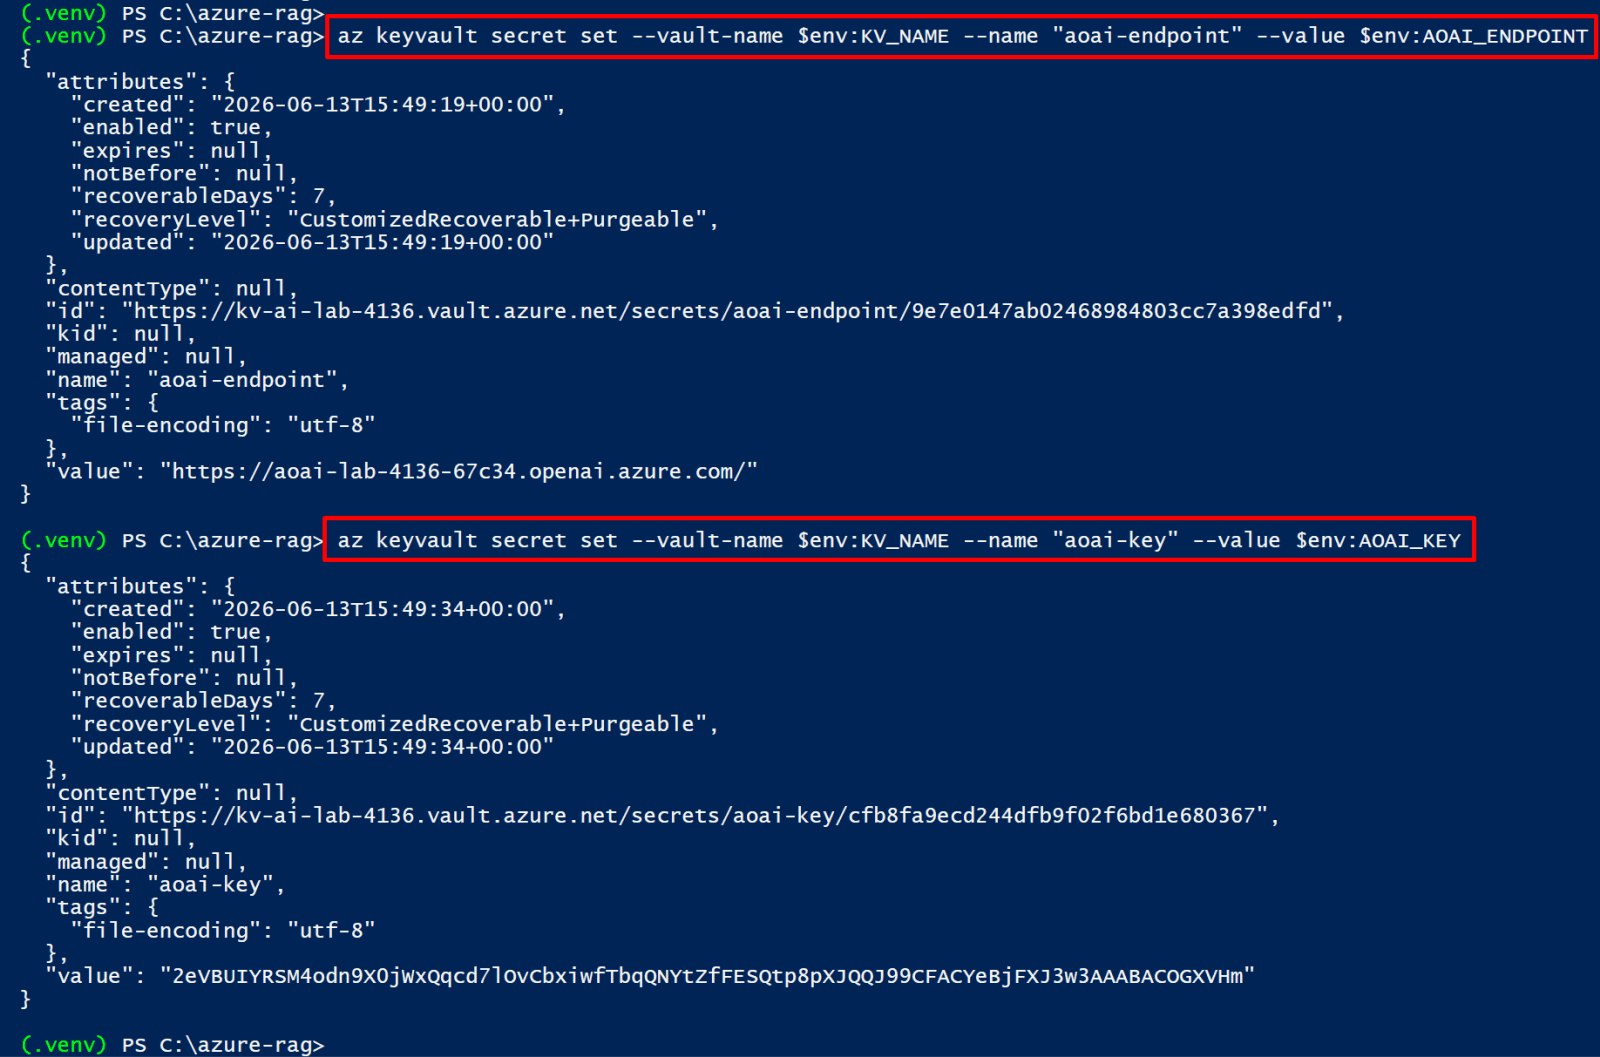
2. Save deployment names to set-env.ps1
Add-Content -Path C:\azure-rag\set-env.ps1 -Value "`$env:AOAI_DEPLOYMENT_CHAT  = 'gpt-4o'"
Add-Content -Path C:\azure-rag\set-env.ps1 -Value "`$env:AOAI_DEPLOYMENT_EMBED = 'text-embedding-3-small'"
Write-Host "Keys stored in Key Vault. Deployment names saved to set-env.ps1." -ForegroundColor Green
Azure OpenAI deployed in eastus, GPT-4o and text-embedding-3-small both verified, all credentials stored in Key Vault. Move to Chapter 05.
Azure AI Search
Create an Azure AI Search service, define a vector-capable index schema, and verify the service is ready to receive document embeddings. AI Search is the retrieval engine in the RAG pipeline - it finds the most semantically relevant document chunks for each user query.
Step 1 - Create the Search Service
The basic SKU is sufficient for a lab. It supports up to 2GB of index storage and 3 indexes. For production use standard or higher. AI Search resource names must be globally unique and only contain lowercase letters, numbers, and hyphens.
1. Create AI Search service
az search service create `
  --name $env:SEARCH_NAME `
  --resource-group $env:RG `
  --location $env:LOCATION `
  --sku basic `
  --partition-count 1 `
  --replica-count 1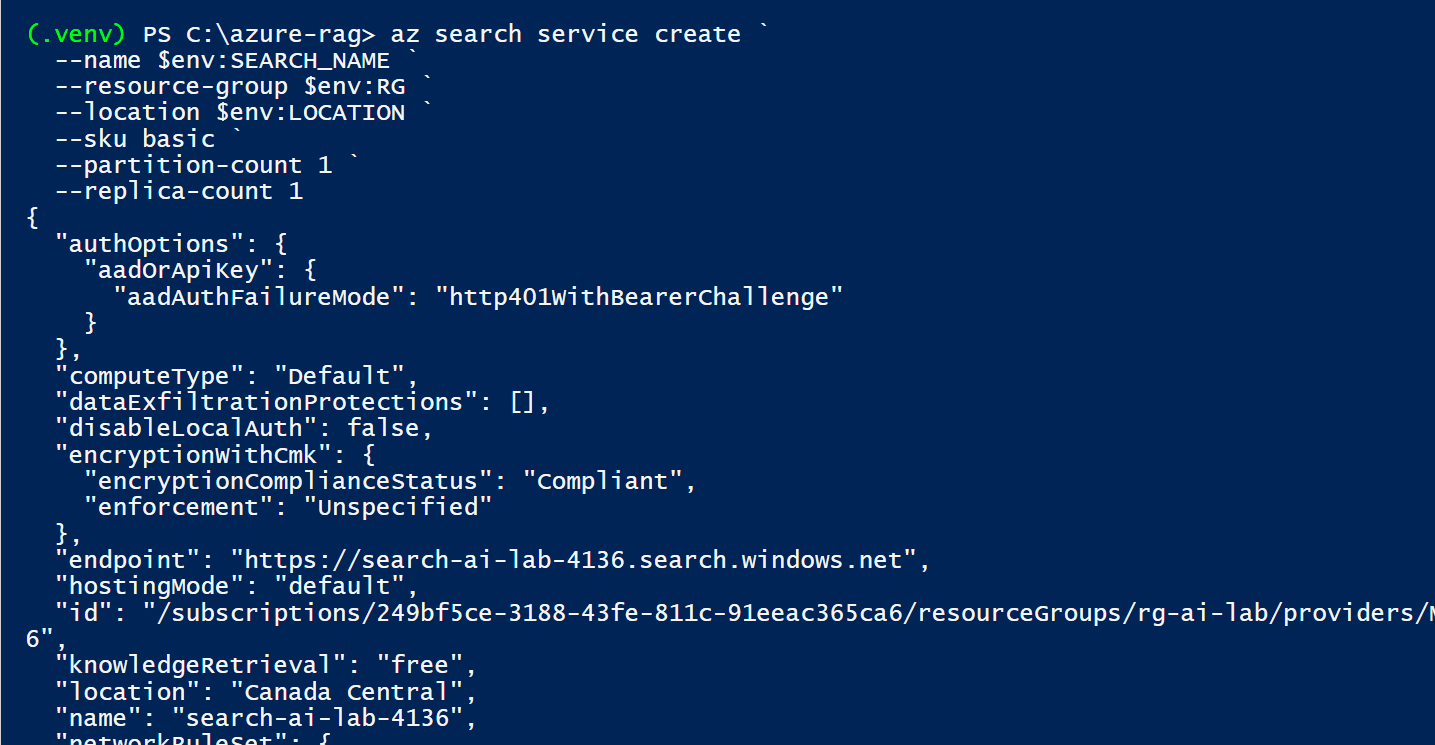
2. Get the admin key for initial setup
$env:SEARCH_KEY = $(az search admin-key show `
  --service-name $env:SEARCH_NAME `
  --resource-group $env:RG `
  --query primaryKey -o tsv)

$env:SEARCH_ENDPOINT = "https://$($env:SEARCH_NAME).search.windows.net"

Write-Host "Search endpoint: $env:SEARCH_ENDPOINT"
Write-Host "Admin key: $($env:SEARCH_KEY.Substring(0,8))..."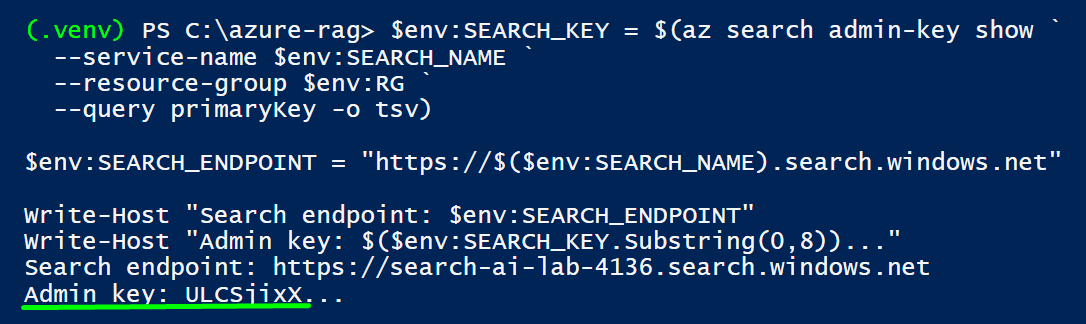
3. Store in Key Vault
az keyvault secret set --vault-name $env:KV_NAME --name "search-endpoint" --value $env:SEARCH_ENDPOINT
az keyvault secret set --vault-name $env:KV_NAME --name "search-admin-key" --value $env:SEARCH_KEY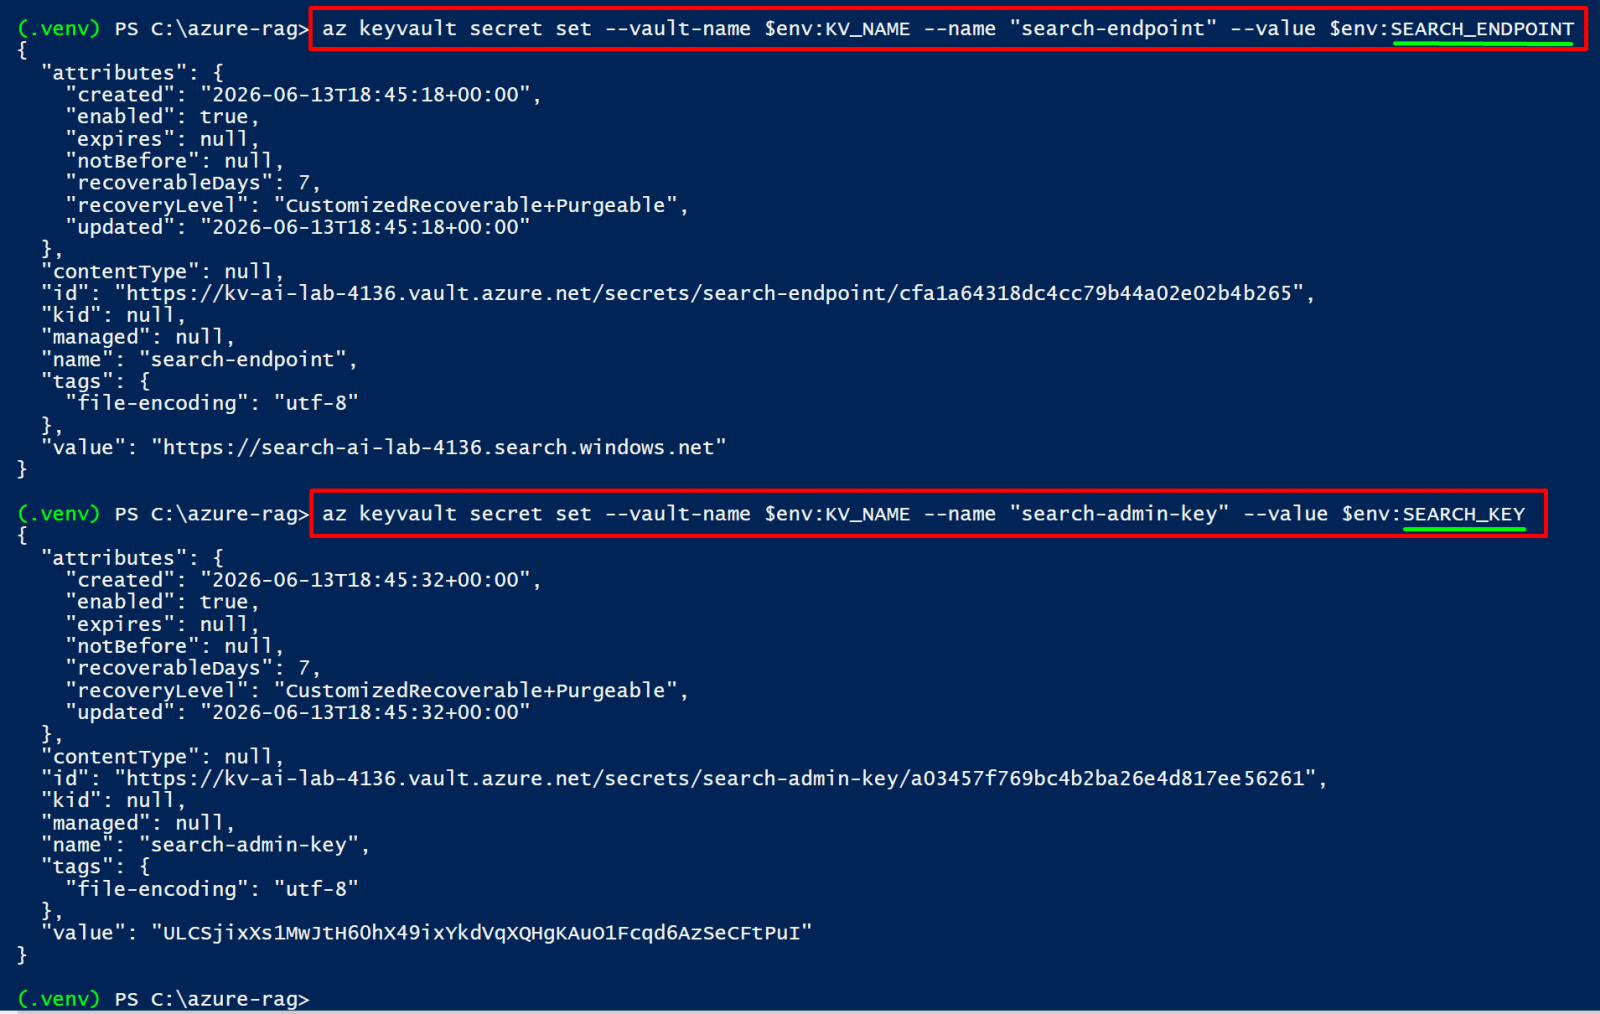

Step 2 - Create the Vector Index
The index schema defines what fields each document has and how they're stored and searched. The most important part is the content_vector field - it stores the 1536-dimensional embedding for each document chunk, and the vectorSearch configuration tells AI Search how to do approximate nearest-neighbor search using the HNSW algorithm.
Think of it like a database table. Each document chunk has: id, source_file, chunk_index, title, content (the text), and content_vector (1536 numbers representing the meaning). HNSW makes finding similar vectors fast without comparing against every document one by one.
1. Create index.py in C:\azure-rag - paste this code into PowerShell ISE
Set-Content -Path C:\azure-rag\index.py -Value @'
import os
from azure.search.documents.indexes import SearchIndexClient
from azure.search.documents.indexes.models import (
    SearchIndex, SearchField, SearchFieldDataType,
    SimpleField, SearchableField, VectorSearch,
    HnswAlgorithmConfiguration, HnswParameters, VectorSearchProfile,
    SemanticConfiguration, SemanticPrioritizedFields,
    SemanticField, SemanticSearch
)
from azure.core.credentials import AzureKeyCredential

endpoint  = os.environ["SEARCH_ENDPOINT"]
key       = os.environ["SEARCH_KEY"]
index_name = "rag-documents"

client = SearchIndexClient(endpoint=endpoint, credential=AzureKeyCredential(key))

fields = [
    SimpleField(name="id", type=SearchFieldDataType.String, key=True, filterable=True),
    SimpleField(name="source_file", type=SearchFieldDataType.String, filterable=True),
    SimpleField(name="chunk_index", type=SearchFieldDataType.Int32, filterable=True),
    SearchableField(name="content", type=SearchFieldDataType.String, analyzer_name="en.microsoft"),
    SearchableField(name="title", type=SearchFieldDataType.String),
    SearchField(
        name="content_vector",
        type=SearchFieldDataType.Collection(SearchFieldDataType.Single),
        searchable=True,
        vector_search_dimensions=1536,
        vector_search_profile_name="hnsw-profile"
    )
]

vector_search = VectorSearch(
    algorithms=[HnswAlgorithmConfiguration(
        name="hnsw-algo",
        parameters=HnswParameters(m=4, ef_construction=400, ef_search=500, metric="cosine")
    )],
    profiles=[VectorSearchProfile(name="hnsw-profile", algorithm_configuration_name="hnsw-algo")]
)

semantic_config = SemanticSearch(configurations=[
    SemanticConfiguration(
        name="default",
        prioritized_fields=SemanticPrioritizedFields(
            title_field=SemanticField(field_name="title"),
            content_fields=[SemanticField(field_name="content")]
        )
    )
])

index = SearchIndex(
    name=index_name,
    fields=fields,
    vector_search=vector_search,
    semantic_search=semantic_config
)

client.create_or_update_index(index)
print(f"Index '{index_name}' created successfully.")
print(f"Fields: {[f.name for f in fields]}")
'@The HnswParameters class is required in newer SDK versions. The old dict-based parameters={...} syntax will throw an error on API version 2026-04-01+.


2. Run index.py
python index.py
AI Search service deployed, rag-documents vector index created with HNSW and semantic search configured, credentials stored in Key Vault. Move to Chapter 06.
Azure AI Foundry Hub & Project
AI Foundry (formerly Azure AI Studio) provides a unified workspace for building, testing, and iterating on AI applications. You create a Hub (the organizational container) and a Project inside it, then connect your OpenAI resource.
Step 1 - Create the AI Hub
1. Create AI Foundry Hub - this takes 5-10 minutes
az ml workspace create `
  --name $env:HUB_NAME `
  --resource-group $env:RG `
  --kind hub `
  --location $env:LOCATION `
  --display-name "AI Lab Hub" `
  --description "Hub for Azure AI lab workloads"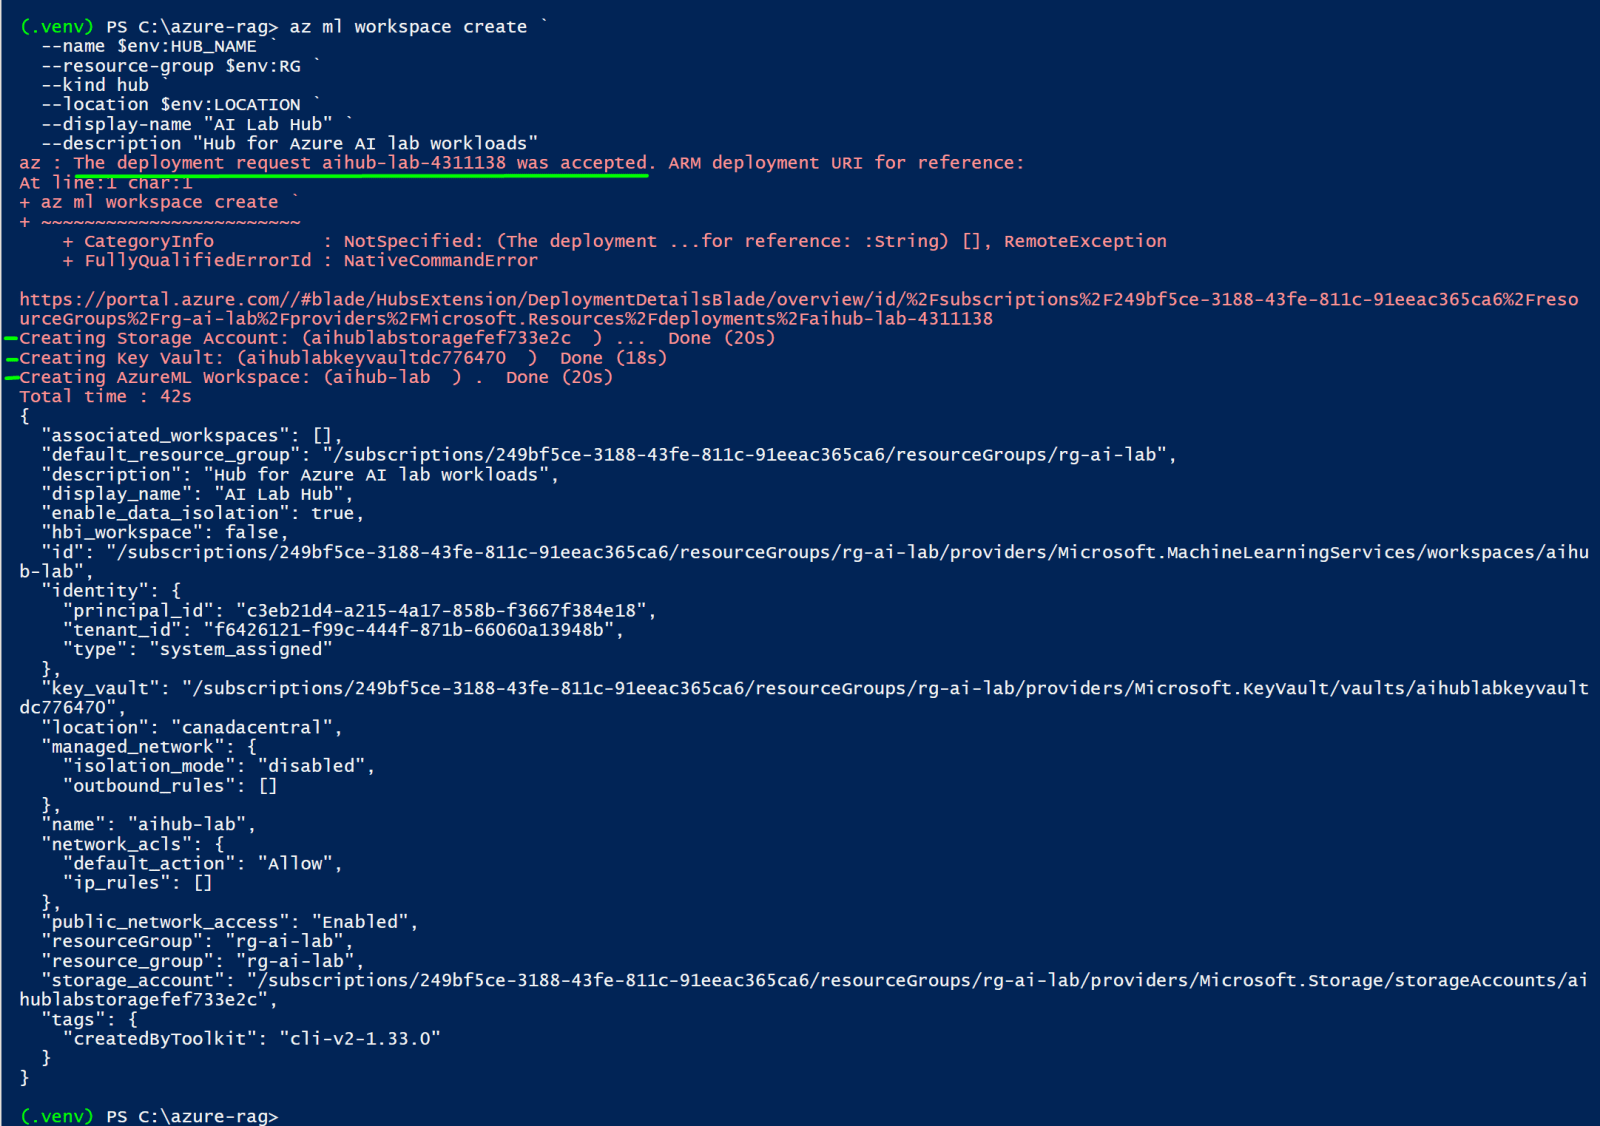
2. Check hub status
az ml workspace show `
  --name $env:HUB_NAME `
  --resource-group $env:RG `
  --query "{Name:name,Kind:kind,State:provisioningState,Location:location}" `
  -o table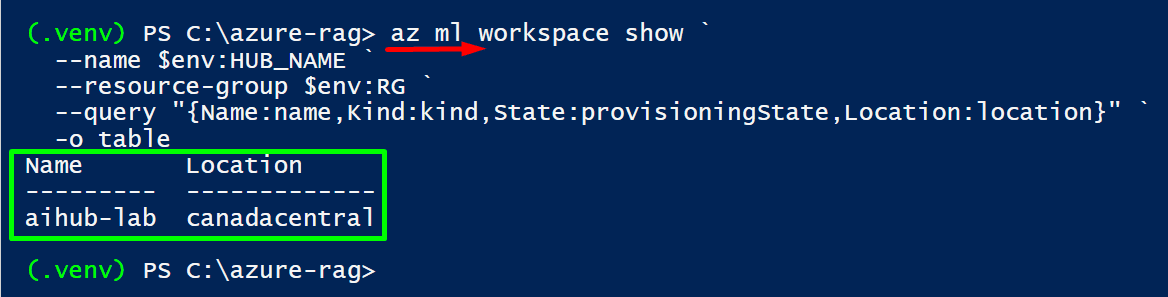
Step 2 - Create a Project Inside the Hub
A project is where you actually work - it contains your prompt flow definitions, evaluation runs, and connections to AI services. The project inherits the hub's infrastructure but has its own access controls.
1. Create project name environment variable
$env:PROJECT_NAME = "rag-lab-project"
2. Capture hub ID first, then create the project
$env:HUB_ID = $(az ml workspace show `
  --name $env:HUB_NAME `
  --resource-group $env:RG `
  --query id -o tsv)

az ml workspace create `
  --name $env:PROJECT_NAME `
  --resource-group $env:RG `
  --kind project `
  --hub-id $env:HUB_ID `
  --display-name "RAG Lab Project" `
  --description "RAG chatbot development project"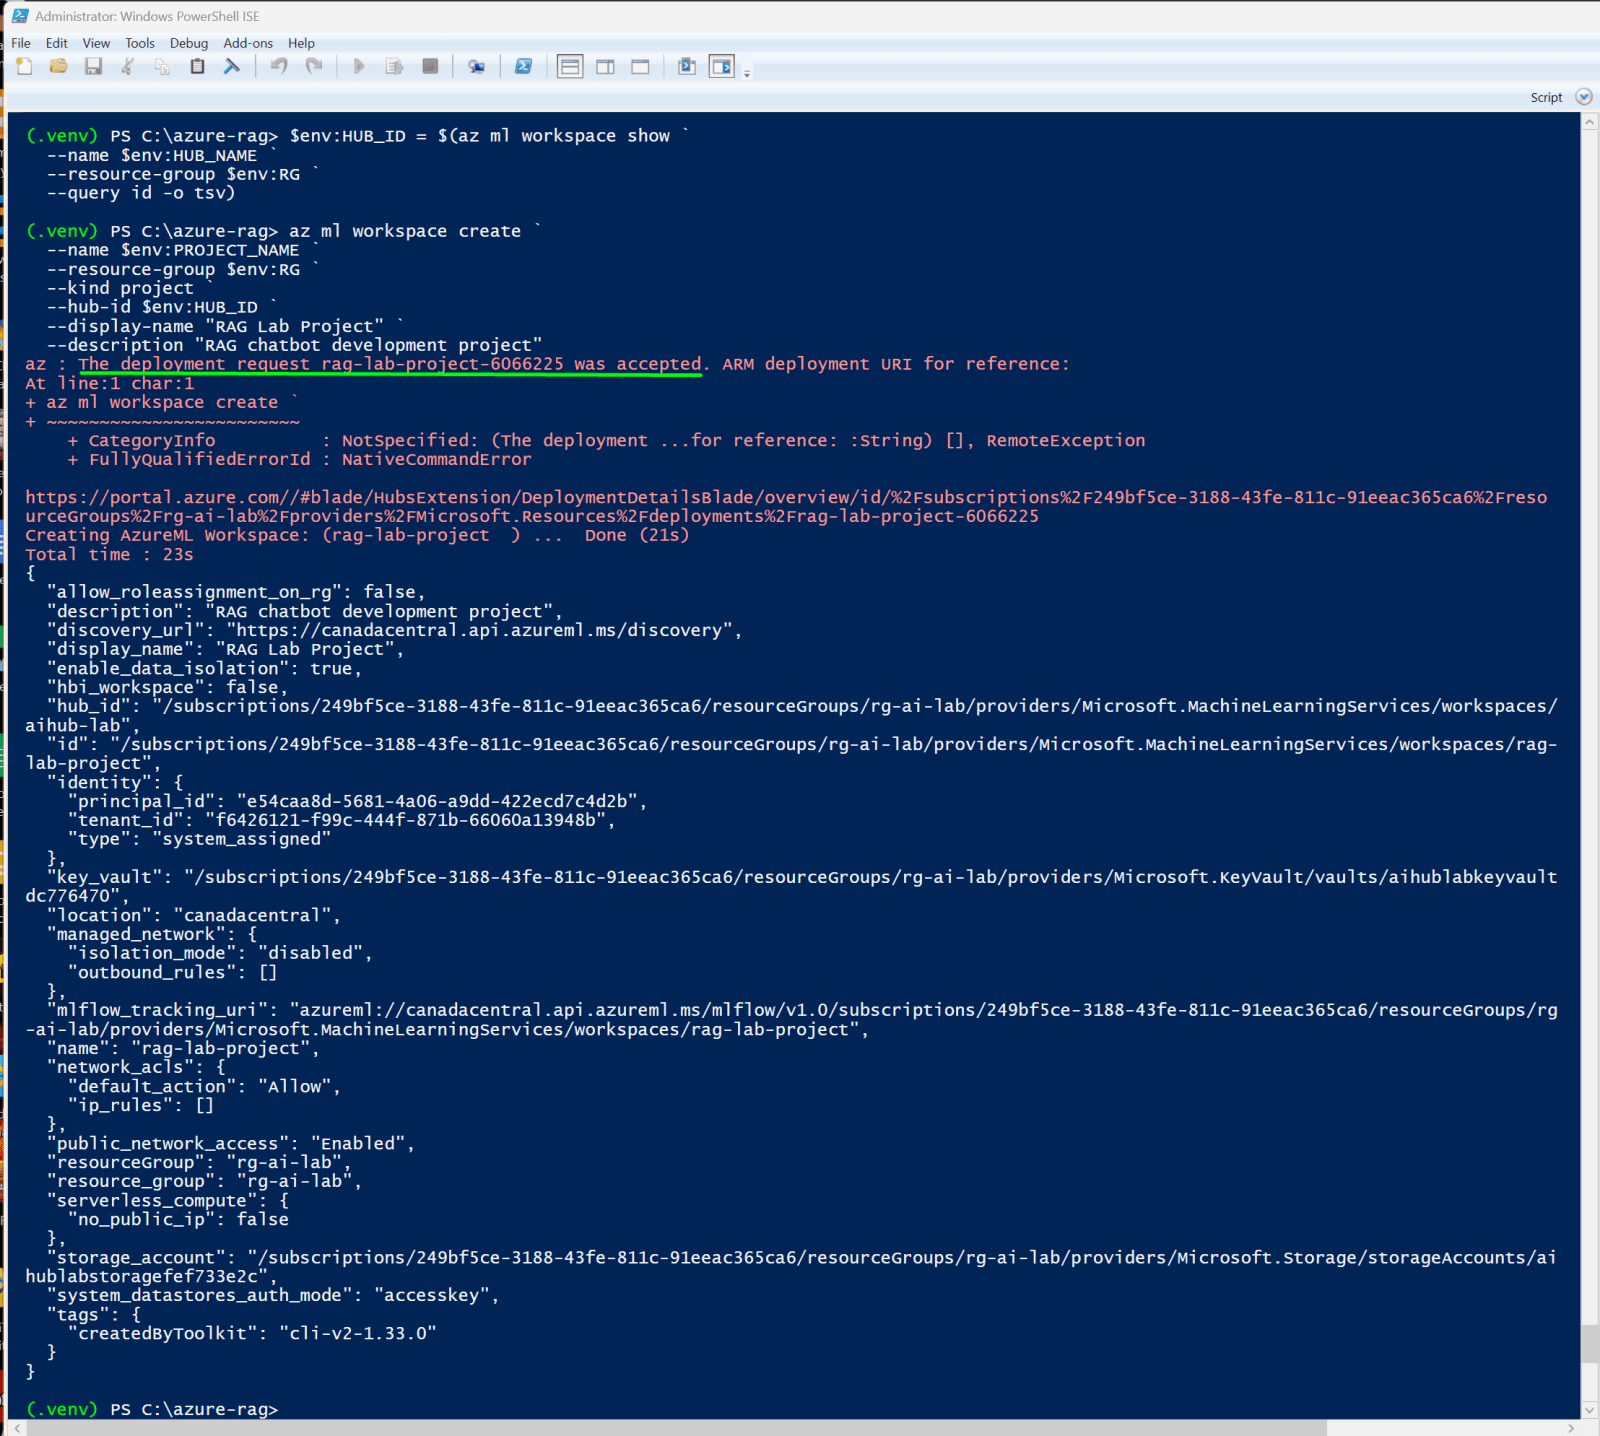
3. List all workspaces to see hub + project
az ml workspace list `
  --resource-group $env:RG `
  --query "[].{Name:name,Kind:kind,State:provisioningState}" `
  -o table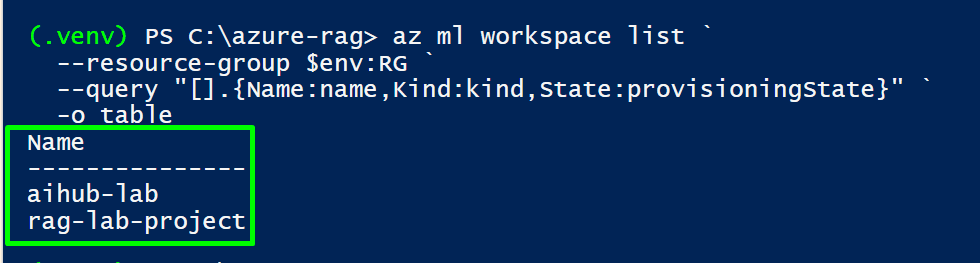
Step 3 - Connect Azure OpenAI to the Hub
Connections let AI Foundry reference your deployed services without you re-entering credentials every time. This connection appears in the AI Foundry UI under "Connections" and lets you use your GPT-4o deployment directly in the Prompt Flow editor.
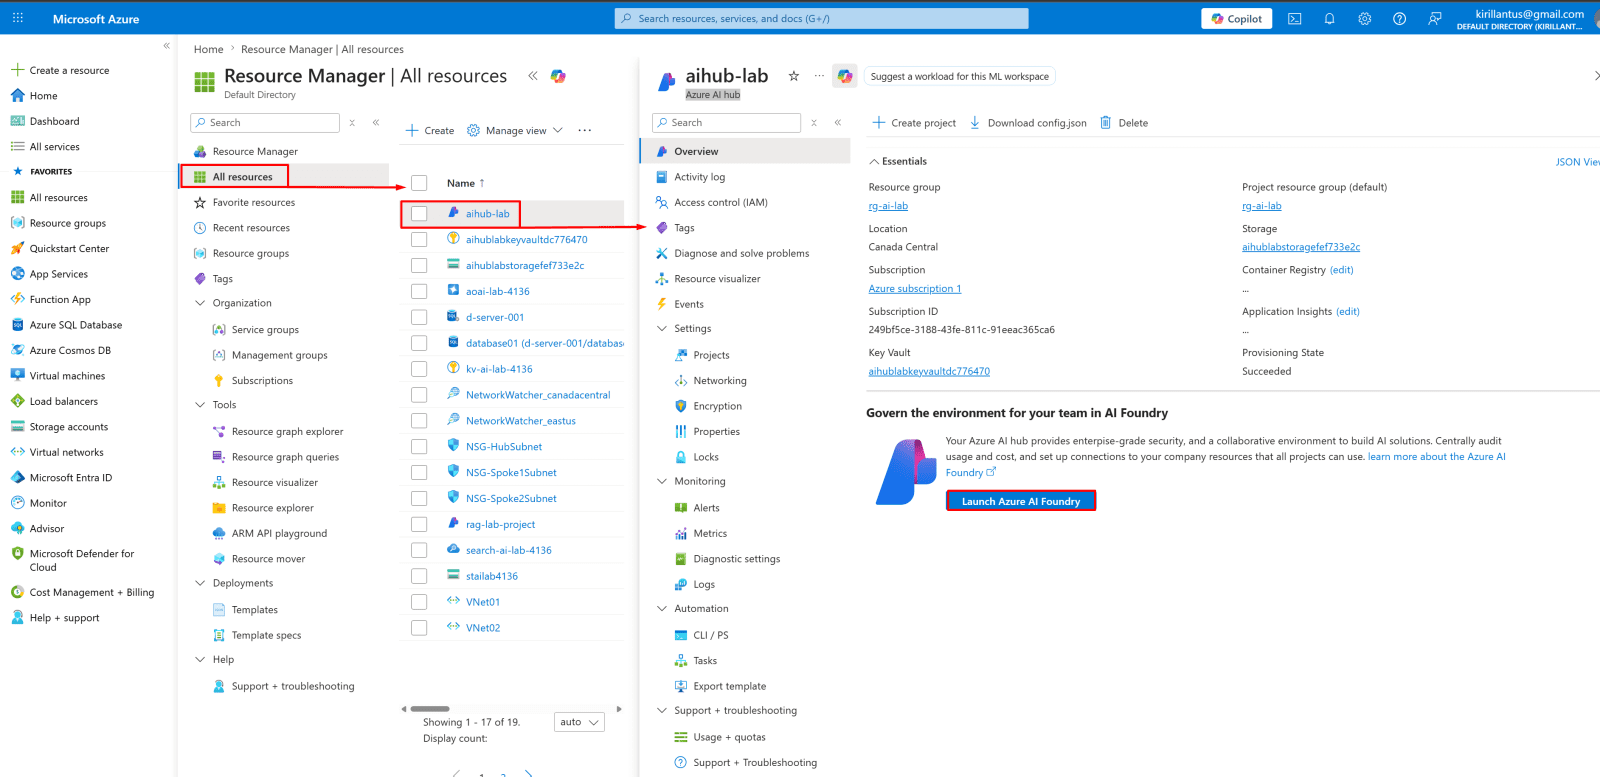
1. Go to the Azure portal, click your hub, then click Launch Azure AI Foundry
That takes you directly to ai.azure.com with your hub already selected, then you'll see the Connected resources option in the left sidebar.

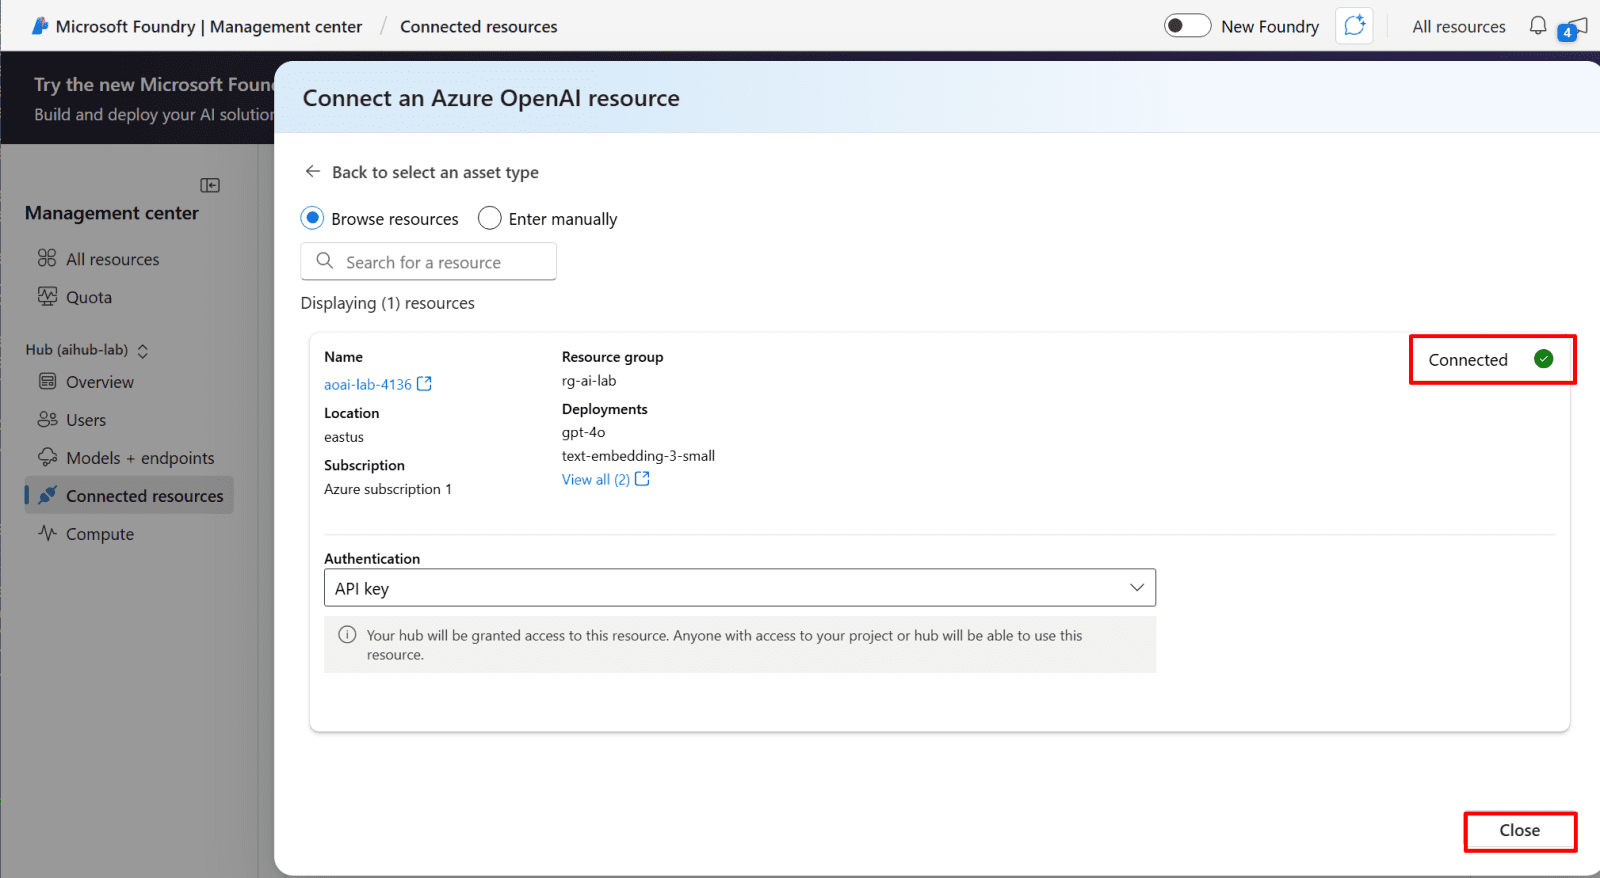
2. Click + New connection then:
- Select Azure OpenAI
- Select your
aoai-lab-xxxxresource from the dropdown - Leave authentication as API key
- Click Add connection

AI Foundry Hub and Project created, Azure OpenAI connected. Move to Chapter 07.
Azure ML Workspace & Compute
Azure ML provides managed compute for running experiments, training jobs, and batch inference. For this guide we create a standalone ML workspace and verify all resources are deployed before moving to the integration chapters.
Step 1 - Create a Standalone ML Workspace
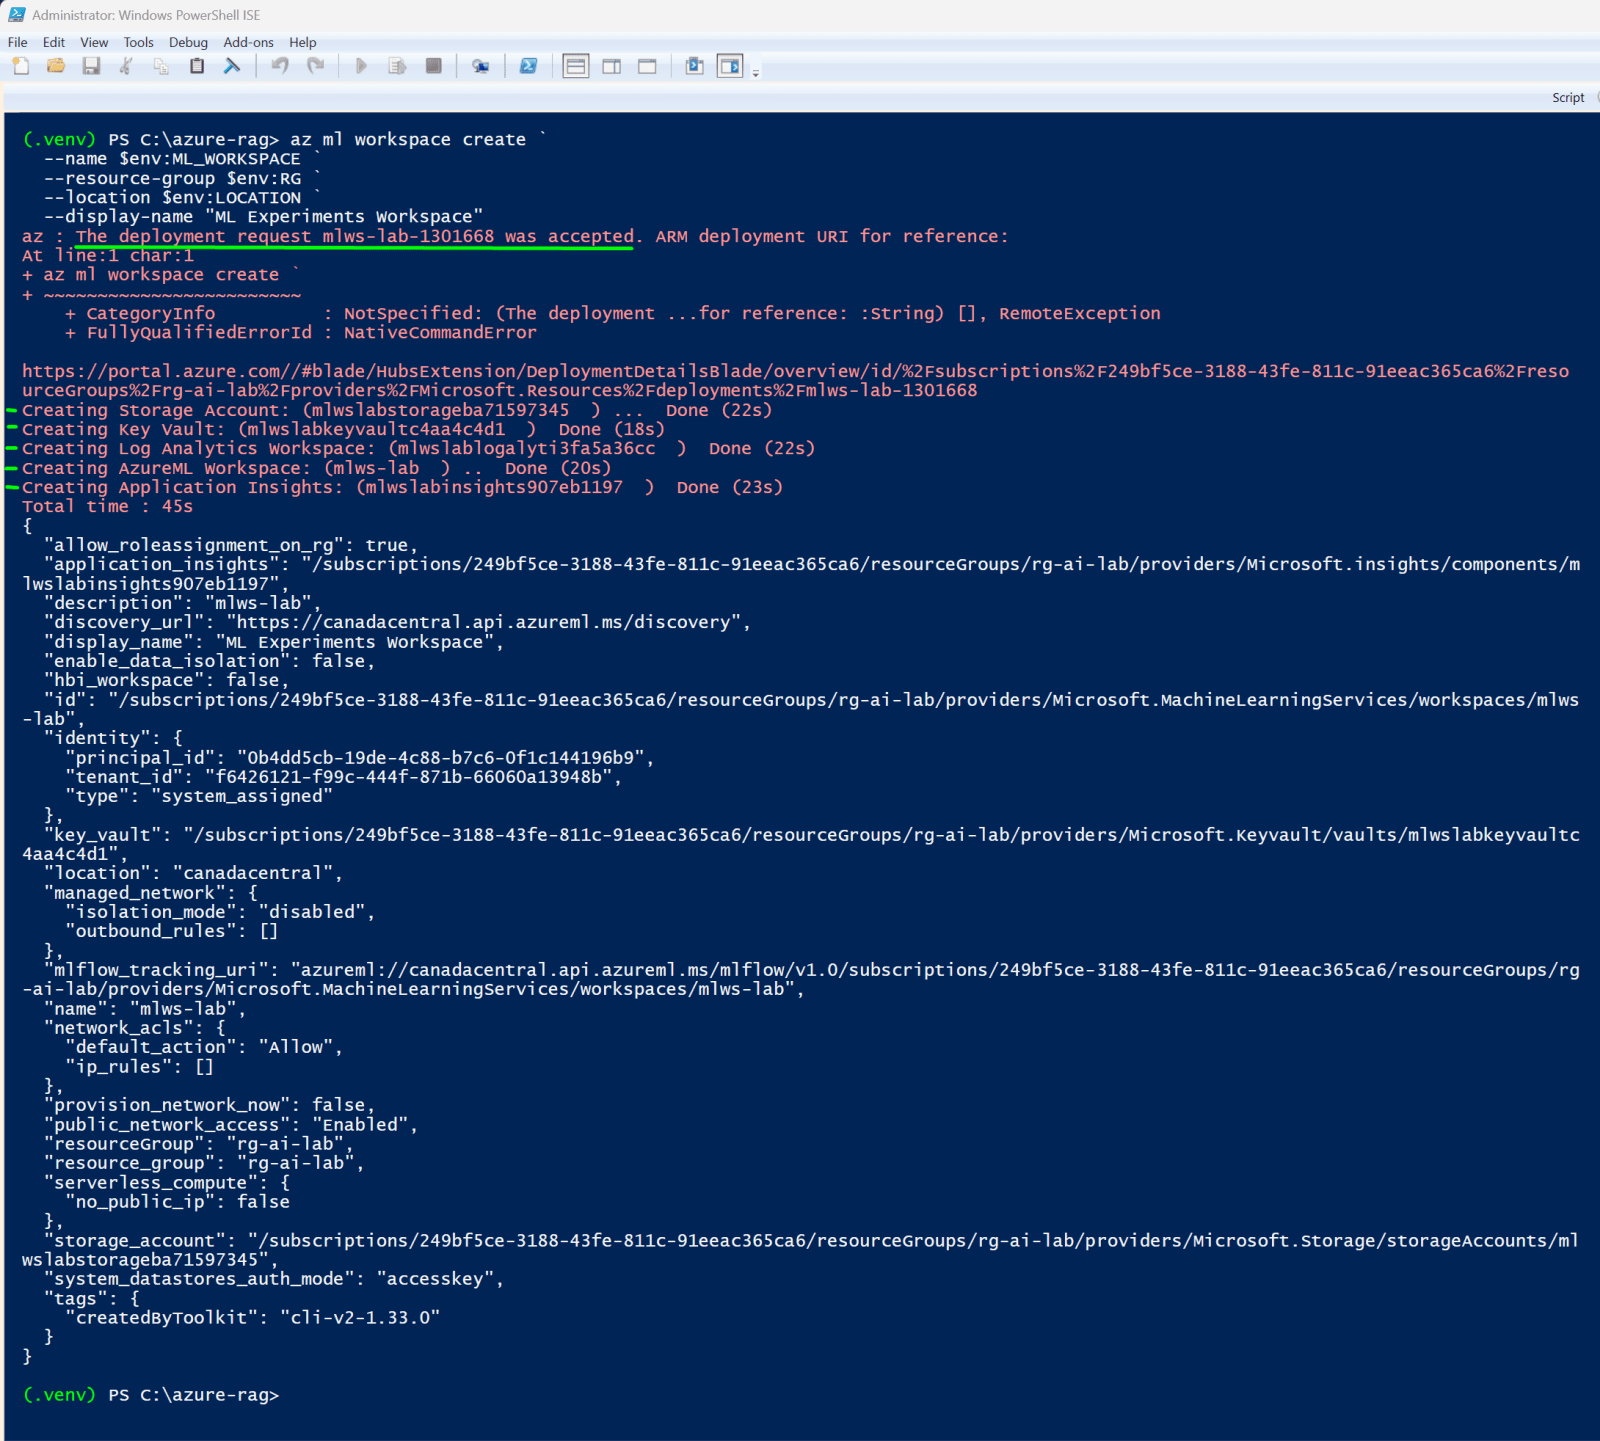
1. Create Azure ML workspace
az ml workspace create `
  --name $env:ML_WORKSPACE `
  --resource-group $env:RG `
  --location $env:LOCATION `
--display-name "ML Experiments Workspace"All supporting resources auto-provisioned: Storage Account, Key Vault, Log Analytics Workspace, Application Insights, and the mlws-lab workspace itself.
Step 2 - List All Deployed Resources
Run this to get a full inventory of everything in your resource group before moving to the integration chapters.
az resource list `
  --resource-group $env:RG `
  --query "[].{Name:name,Type:type,State:properties.provisioningState}" `
  -o table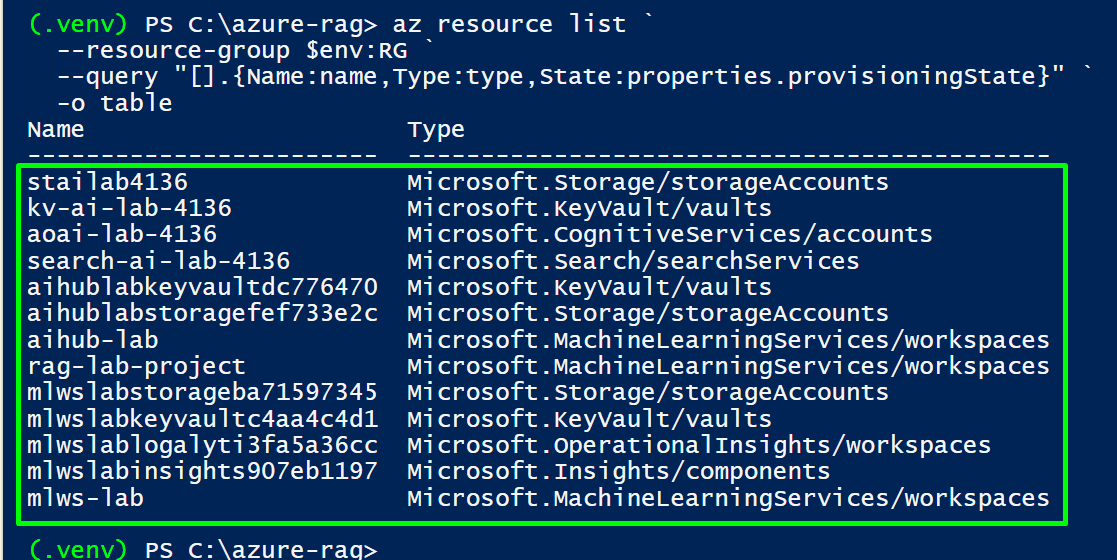
Storage, Key Vault, Azure OpenAI, AI Search, AI Foundry Hub+Project, and Azure ML Workspace are all running. Move to Chapter 08 to wire them together.
Build the RAG Pipeline
Write three scripts that connect all your deployed services: an ingestion script that reads documents from Blob Storage, chunks and embeds them, and pushes vectors to AI Search. Then a retrieval function that embeds a query and fetches the most relevant chunks.
How the Pipeline Works
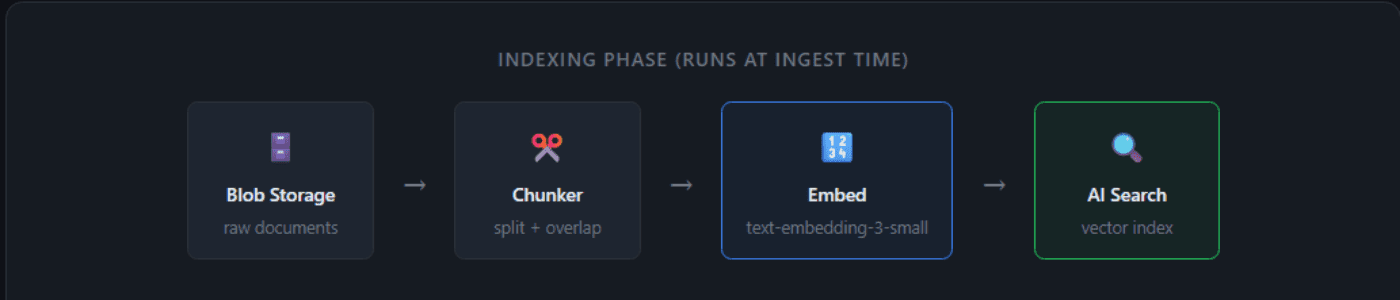
The RAG pipeline has two phases. The indexing phase runs once (and whenever documents change): read each document from Blob Storage, split it into overlapping chunks, embed each chunk using the embedding model, upload chunks + vectors to AI Search. The query phase runs on every user question: embed the question, send it to AI Search, get back the top-5 most similar chunks, pass those chunks + the question to GPT-4o, return the grounded answer.
Step 1 - Write the Ingestion Script
This script does the complete indexing job in one run. It connects to Blob Storage using the connection string from Key Vault, downloads each document, splits it into overlapping chunks of ~500 tokens (the overlap prevents relevant context from being cut off at chunk boundaries), embeds each chunk, and uploads everything to AI Search.
1. Create ingest.py in C:\azure-rag with the following content
import os, hashlib
from azure.storage.blob import BlobServiceClient
from azure.search.documents import SearchClient
from azure.core.credentials import AzureKeyCredential
from openai import AzureOpenAI
from kv_secrets import get_secret

CHUNK_SIZE    = 500
CHUNK_OVERLAP = 50
INDEX_NAME    = "rag-documents"

def get_clients():
    aoai = AzureOpenAI(
        azure_endpoint=get_secret("aoai-endpoint"),
        api_key=get_secret("aoai-key"),
        api_version="2024-02-01"
    )
    search = SearchClient(
        endpoint=get_secret("search-endpoint"),
        index_name=INDEX_NAME,
        credential=AzureKeyCredential(get_secret("search-admin-key"))
    )
    storage = BlobServiceClient.from_connection_string(
        get_secret("storage-connection-string")
    )
    return aoai, search, storage

def chunk_text(text, chunk_size=CHUNK_SIZE, overlap=CHUNK_OVERLAP):
    """Split text into overlapping word-based chunks."""
    words = text.split()
    chunks, start = [], 0
    while start < len(words):
        end = start + chunk_size
        chunk = " ".join(words[start:end])
        chunks.append(chunk)
        start += chunk_size - overlap
    return [c for c in chunks if len(c.strip()) > 50]

def embed_texts(aoai_client, texts):
    """Embed a batch of texts. Azure OpenAI allows up to 16 per call."""
    all_vectors = []
    for i in range(0, len(texts), 16):
        batch = texts[i:i + 16]
        response = aoai_client.embeddings.create(model="text-embedding-3-small", input=batch)
        all_vectors.extend([d.embedding for d in response.data])
    return all_vectors

def ingest_documents():
    print("Starting ingestion pipeline...")
    aoai, search, storage = get_clients()
    container = storage.get_container_client("documents")
    all_docs = []

    for blob in container.list_blobs():
        print(f"  Processing: {blob.name}")
        content = container.download_blob(blob.name).readall().decode("utf-8", errors="ignore")
        chunks = chunk_text(content)
        print(f"    -> {len(chunks)} chunks")
        vectors = embed_texts(aoai, chunks)
        for i, (chunk, vector) in enumerate(zip(chunks, vectors)):
            doc_id = hashlib.md5(f"{blob.name}-{i}".encode()).hexdigest()
            all_docs.append({
                "id": doc_id, "source_file": blob.name, "chunk_index": i,
                "title": blob.name.replace(".txt", "").replace("-", " ").title(),
                "content": chunk, "content_vector": vector
            })

    for i in range(0, len(all_docs), 100):
        batch = all_docs[i:i + 100]
        search.upload_documents(batch)
        print(f"  Uploaded batch {i//100 + 1}: {len(batch)} chunks")

    print(f"\nIngestion complete. Total chunks indexed: {len(all_docs)}")

if __name__ == "__main__":
    ingest_documents()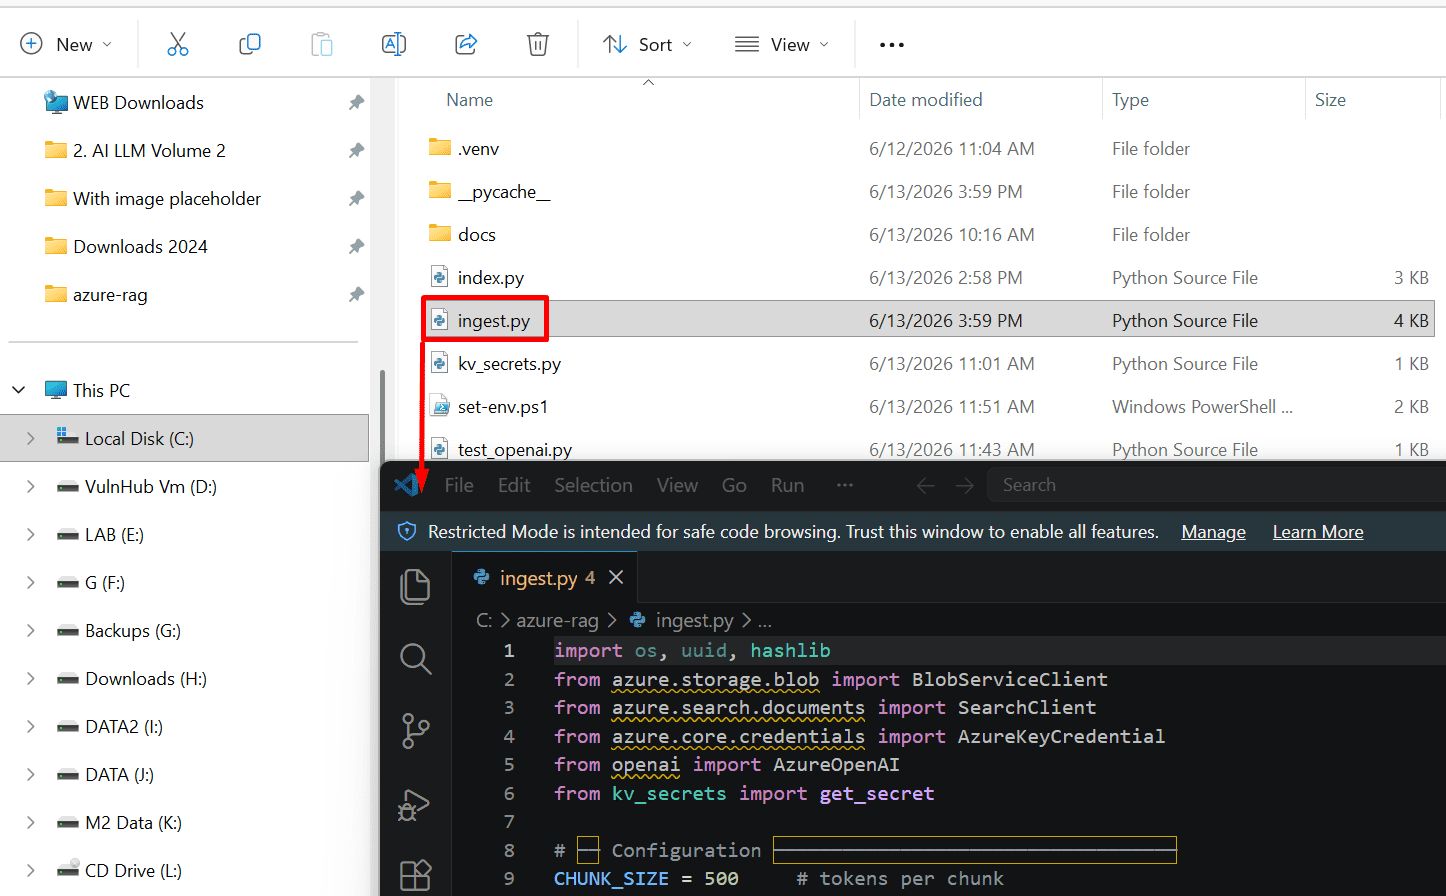
2. Run the ingestion
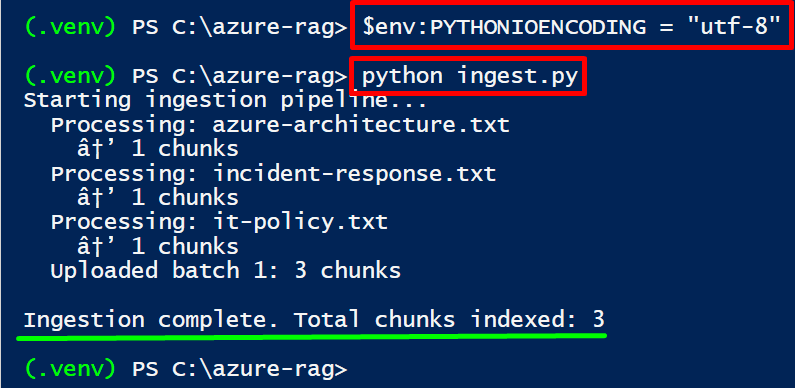
$env:PYTHONIOENCODING = "utf-8"
python ingest.pyThe arrow character in print statements cannot display in Windows terminal default encoding. Setting $env:PYTHONIOENCODING = "utf-8" tells Python to use UTF-8 when writing to the terminal, which allows it to correctly display arrows, checkmarks, and other Unicode characters.
3 documents processed and indexed. The garbled arrow character is just a terminal rendering issue - the actual ingestion worked perfectly.
Step 2 - Write the Retrieval Function
The retrieval function takes a user's question, embeds it with the same model used during indexing, then sends the vector to AI Search in a hybrid search - combining vector similarity with keyword matching. Hybrid search consistently outperforms pure vector search because it catches exact terminology that vectors sometimes miss.
1. Create retrieve.py in C:\azure-rag with the following content
from azure.search.documents import SearchClient
from azure.search.documents.models import VectorizedQuery
from azure.core.credentials import AzureKeyCredential
from openai import AzureOpenAI
from kv_secrets import get_secret

def retrieve(query: str, top_k: int = 5) -> list[dict]:
    """
    Retrieve the top-k most relevant document chunks for a query.
    Uses hybrid search: vector similarity + keyword matching.
    """
    aoai = AzureOpenAI(
        azure_endpoint=get_secret("aoai-endpoint"),
        api_key=get_secret("aoai-key"),
        api_version="2024-02-01"
    )
    search = SearchClient(
        endpoint=get_secret("search-endpoint"),
        index_name="rag-documents",
        credential=AzureKeyCredential(get_secret("search-admin-key"))
    )

    # Embed the query using the same model as during indexing
    query_vector = aoai.embeddings.create(
        model="text-embedding-3-small",
        input=query
    ).data[0].embedding

    # Hybrid search: send both the text query AND the vector
    vector_query = VectorizedQuery(
        vector=query_vector,
        k_nearest_neighbors=top_k,
        fields="content_vector"
    )

    results = search.search(
        search_text=query,             # keyword component
        vector_queries=[vector_query], # vector component
        select=["id", "source_file", "title", "content"],
        top=top_k
    )

    chunks = []
    for r in results:
        chunks.append({
            "source": r["source_file"],
            "title": r["title"],
            "content": r["content"],
            "score": r["@search.score"]
        })
    return chunks

if __name__ == "__main__":
    # Quick test
    results = retrieve("What is the password policy?")
    for r in results:
        print(f"[{r['score']:.3f}] {r['source']}: {r['content'][:100]}...")
2. Test retrieval
python retrieve.py
Ingest pipeline ran - 3 documents chunked and indexed in AI Search. Retrieval working - semantically relevant chunks returned for test query. Move to Chapter 09 for the full chatbot.
RAG Chatbot App
The finished application. A terminal-based chatbot that accepts questions in natural language, retrieves relevant document chunks from AI Search, and gets GPT-4o to answer using only that retrieved context. Ask it anything that's in your indexed documents.
The Complete chatbot.py
This is the main application. It loops on user input, calls retrieve() to get relevant chunks, builds a system prompt that includes those chunks as context, calls GPT-4o, and prints the answer along with source citations. The system prompt instructs GPT-4o to answer only from the provided context - if the answer isn't in the retrieved documents, it says so instead of hallucinating.
1. Create chatbot.py in C:\azure-rag - paste into PowerShell ISE or use Set-Content
from openai import AzureOpenAI
from retrieve import retrieve
from kv_secrets import get_secret

SYSTEM_PROMPT = """You are a helpful assistant for Antusnet Labs.
Answer questions ONLY using the provided document context below.
If the answer is not in the context, say "I don't have information on that in the current documents."
Do not make up information. Always cite which document you got information from.

Context:
{context}"""

def format_context(chunks):
    parts = []
    for i, chunk in enumerate(chunks, 1):
        parts.append(f"[Document {i}: {chunk['title']} ({chunk['source']})]")
        parts.append(chunk["content"])
        parts.append("")
    return "\n".join(parts)

def chat(question, conversation_history):
    aoai = AzureOpenAI(
        azure_endpoint=get_secret("aoai-endpoint"),
        api_key=get_secret("aoai-key"),
        api_version="2024-02-01"
    )
    chunks = retrieve(question, top_k=4)
    context = format_context(chunks)
    messages = [{"role": "system", "content": SYSTEM_PROMPT.format(context=context)}]
    messages.extend(conversation_history[-8:])
    messages.append({"role": "user", "content": question})
    response = aoai.chat.completions.create(
        model="gpt-4o", messages=messages, temperature=0.1, max_tokens=800
    )
    return response.choices[0].message.content, chunks

def main():
    print("\nAntusnet RAG Chatbot - Vol 1")
    print("Backed by Azure OpenAI (GPT-4o) + Azure AI Search")
    print("Type 'quit' to exit, 'sources' to see last retrieved docs\n")
    conversation_history, last_sources = [], []
    while True:
        try:
            question = input("You: ").strip()
        except (KeyboardInterrupt, EOFError):
            print("\nGoodbye.")
            break
        if not question:
            continue
        if question.lower() in ("quit", "exit", "q"):
            print("Goodbye.")
            break
        if question.lower() == "sources":
            if last_sources:
                print("\nRetrieved sources:")
                for i, s in enumerate(last_sources, 1):
                    print(f"  {i}. [{s['score']:.4f}] {s['source']}")
                print()
            else:
                print("No sources yet.\n")
            continue
        print("Searching documents...")
        answer, sources = chat(question, conversation_history)
        last_sources = sources
        print(f"\nAssistant: {answer}")
        print(f"  [Sources: {', '.join(set(s['source'] for s in sources))}]\n")
        conversation_history.append({"role": "user", "content": question})
        conversation_history.append({"role": "assistant", "content": answer})

if __name__ == "__main__":
    main()
Run the Chatbot
1. Run the chatbot in CMD because PowerShell is capturing the input incorrectly. Launch it directly from a plain Command Prompt (cmd.exe) window:
cd C:\azure-rag
.venv\Scripts\activate
set AZURE_KEY_VAULT_URI=https://kv-ai-lab-4136.vault.azure.net/
python chatbot.pyThe AZURE_KEY_VAULT_URI environment variable is not set in the cmd.exe session. Set it before running with: set AZURE_KEY_VAULT_URI=https://kv-ai-lab-XXXX.vault.azure.net/ — replace kv-ai-lab-XXXX with your actual Key Vault name.

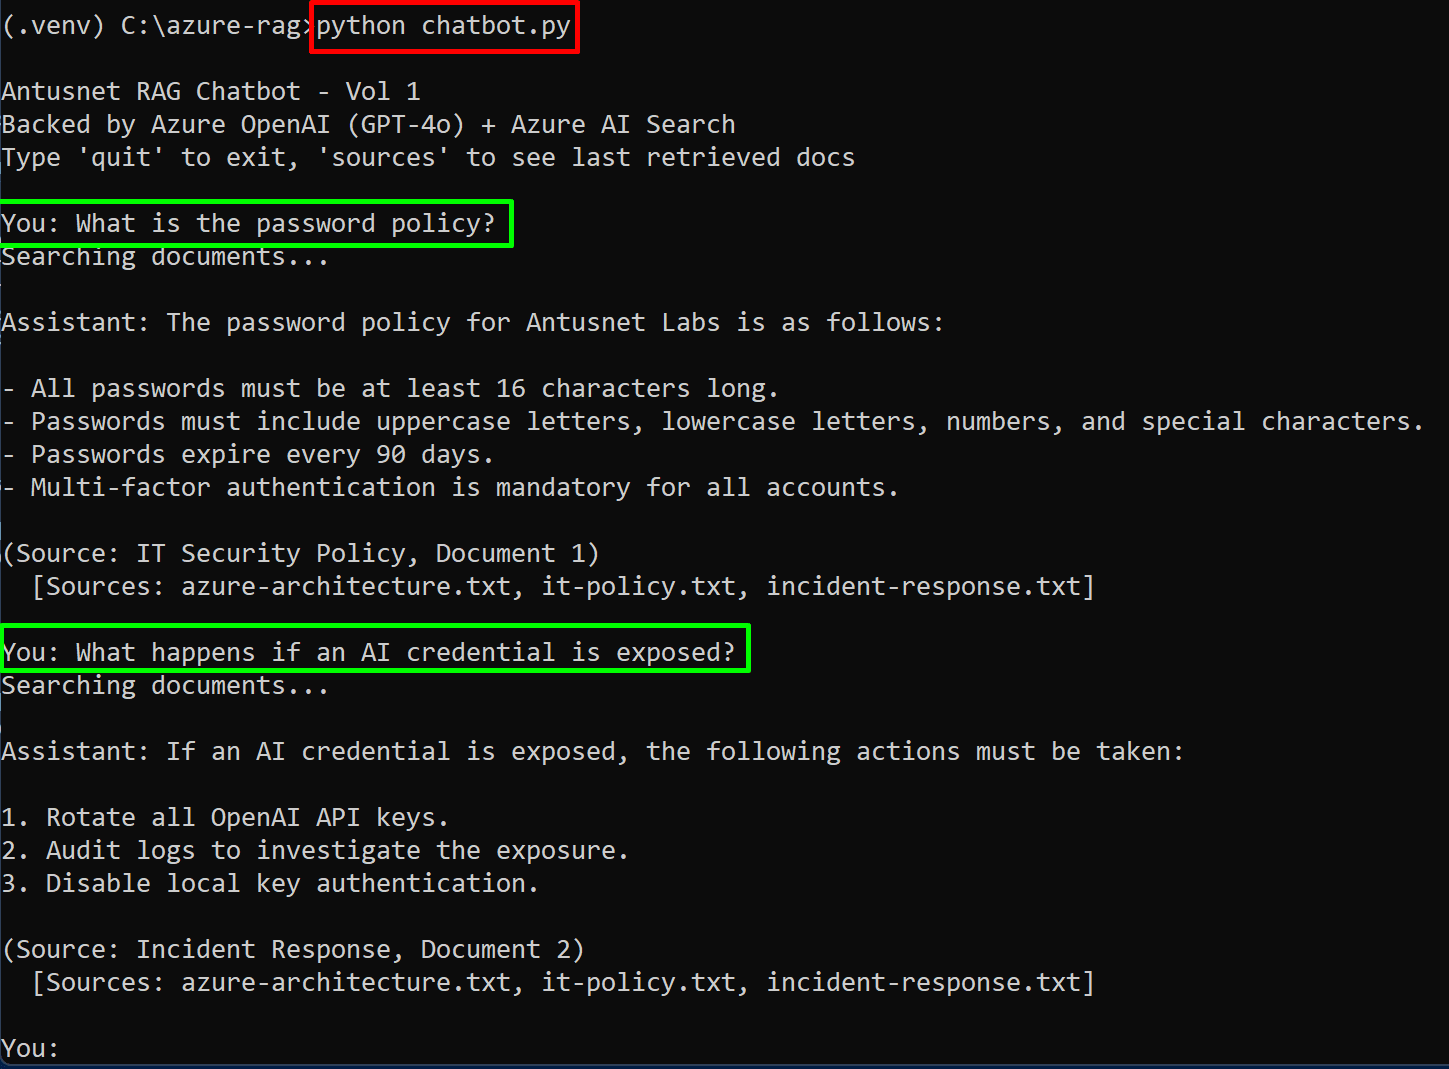
2. The chatbot is running. Ask it something - try:
What is the password policy?What happens if an AI credential is exposed?
Password policy question pulled correctly from it-policy.txt with all 4 policy points. AI credential exposure question pulled correctly from incident-response.txt with the 3 correct actions. Source citations appearing after every answer. Multi-turn conversation working.
You have built a full Azure AI stack from a blank subscription on Windows: Storage, Key Vault, Azure OpenAI (GPT-4o + embeddings), AI Search (vector index), AI Foundry Hub, Azure ML workspace - all connected through a working RAG chatbot. Continue to Volume 2 to harden everything you just built.