
Configuring Microsoft Entra Connect for Hybrid Identity Synchronization.

Azure AD Connect serves as the essential bridge between your on-premises Active Directory and Microsoft Entra ID (Azure AD). It enables organizations to maintain a single identity for users, allowing seamless access to both on-premises resources and cloud services (single sign-on experience), while supporting hybrid identity, authentication, and security management.
*
Note: To follow these steps, you first need to set up a domain and Active Directory environment.
This guide will show you how: Active Directory Lab Guide
*
Task Details
1. Download the Microsoft Entra Connect (Azure AD Connect) sync agent from the Azure portal.
2. Verify Domain Ownership in Azure.
3. Install and configure Azure AD Connect on a domain-joined server with Password Hash Synchronization and single sign-on (SSO) enabled.
4. Validate User Synchronization.
5. Log in to Azure as a synchronized user using on-premises credentials.
*
Steps
Download the Microsoft Entra Connect (Azure AD Connect) sync agent from the Azure portal.
1. Download Microsoft Entra Connect Sync on your on-premises domain controller.
- Go to Entra ID → Microsoft Entra connect

*
2. Click "Manage" tab and download "Connect sync agent."

*
3. Copy the file to your domain controller.

*
Verify Domain Ownership in Azure.
This step ensures that Azure can verify you own the domain. First, create a TXT record at your domain registrar, then click Verify in Azure to complete the validation.
Note: You can skip this step if your domain is not publicly registered, e.g., mydomain.int.
I’m using antusnet.ca, a registered domain, which allows domain ownership verification in Azure.
*
1. Create a custom domain in Azure.
- Go-to → Default Directory → Custom domain names → Add custom domain
- Enter domain name: antusnet.ca (in my case)
- Click Add Domain

*
2. Before clicking Verify, you must create a TXT record in your domain registrar.
In this example, cPanel is used, but the steps may vary depending on your registrar, however, the intent remains the same.

*
3. In the cPanel DNS Zone Editor, add a TXT record using the provided MS-msXXXXXXXX value.
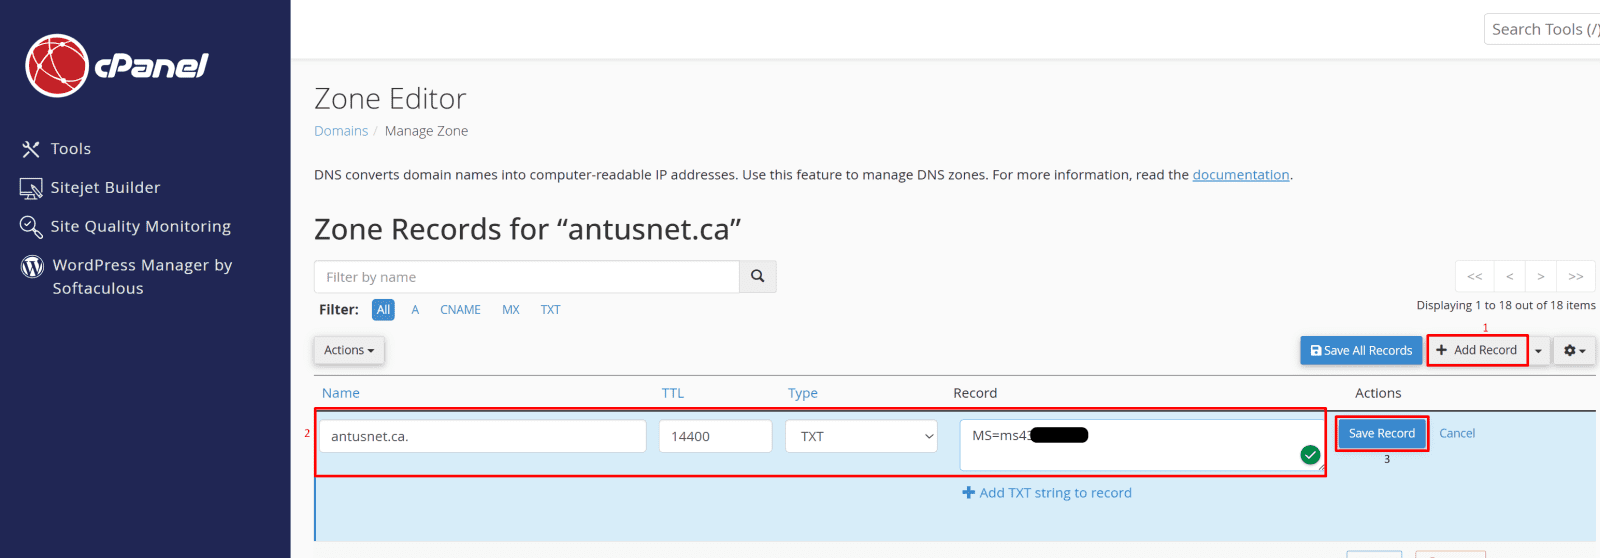
*
4. In Azure Portal, click Verify.
The antusnet.ca domain was verified successfully.

*
Install and configure Azure AD Connect on a domain-joined server with Password Hash Synchronization and single sign-on (SSO) enabled.
1. Double-click on the downloaded file and follow the wizard to sync your on-premises Active Directory with Microsoft Entra ID.

*
2. Choose “Customize” to gain more granular control over the Azure AD Connect settings.
Note: When installing Azure AD Connect, choose “Customize” during the setup. This option allows you to configure advanced settings, such as selecting specific organizational units (OUs) to synchronize, choosing the authentication method, and controlling which attributes are synced. Using Customize gives you more granular control over your Azure AD Connect deployment.

*
3. On the "Install required component" page, leaving everything blank is fine - the wizard will install all defaults (local SQL Express, default service account, and sync all AD objects), which is perfect for a lab or demonstration.

*
Options explanation.
1. Specify a custom installation location
- Lets you choose a folder to install the Azure AD Connect service.
- Useful if you want it on a different drive than C:\ for storage or organizational reasons.
2. Use an existing SQL Server
- Azure AD Connect uses a SQL database to store sync configuration.
- By default, it installs a local SQL Express instance.
- This option allows you to use a pre-existing SQL Server (full SQL) instead.
3. Use an existing service account
- Normally Azure AD Connect creates a dedicated service account automatically.
- With this option, you can use an already-created AD service account, giving more control over permissions.
4. Specify custom sync groups
- Lets you choose exactly which AD groups to synchronize to Azure AD.
- Useful for limiting sync to certain departments or environments.
5. Import synchronization settings
- Allows you to reuse a previously exported configuration from another Azure AD Connect installation.
- Handy for redeployments or lab cloning.
*
4. After the installation is complete, choose the "Password Hash Synchronization" option to allow users to sign in to the cloud using the same passwords that they use on premises.

*
5. Enter the username of the Azure Global Administrator.
Note: Best practice in production is to create a separate, dedicated Global Admin account for administration and synchronization tasks, this improves security and follows the principle of least privilege.

*
6. Click on “Add Directory” (you will need to provide Enterprise Admin credentials).

*
7. Create new enterprise administrator, then click "OK"

*
8. As we can see, the user has been created.
- Select your forest
- Click “Next.”


